
Email Brian
Brian's Website


Email Tom
Tom's Website
|
Email Brian Brian's Website |
|
Email Tom Tom's Website |
Did you read the Preface? Thanks!
The struggle among the Linux distributions for mind-share and cool ease-of-use features are driving installer innovation at a hectic pace. For now, Caldera's Lizard Graphical Installer tool (in its latest revision) is the best installation tool around. You will be pleasantly surprised by its capabilities.
Lizard is our main topic for this chapter. For the rare user that needs to run the non-graphic install mode, also known as the Lisa installer, please consult the online documentation or paperbound documentation that came with OpenLinux. You can create Lisa boot disks by following the instructions in "Choosing a method of installation," later in this chapter.
There are several different approaches to a successful installation of OpenLinux. We are going to take you on a route that will explore many of the possibilities and choices, while providing signposts and a well-lit path from beginning to end. We'll start by revisiting partitioning, which was first discussed in Chapter 2.
There are three types of Linux installation addressed in this chapter:
If you have made the decision to throw off the yoke of commercially licensed software forever, then the first option is definitely yours. However, there are going to be a few bumps on the road as application and data file compatibility play cat and mouse with each other. There are tools and suites that will allow reading and writing many of the popular document formats, like Word 97 (StarOffice) or Excel (Gnumeric) files. These format interchange issues are disappearing as we write: StarOffice 5.2 is now available for download or purchase, and appears to be fully compatible with Office 2000 formats. When installing, use the "Entire Disk" option at the Select Target stage, which wipes the drive and installs Linux partitions for you.
Alternatively, there's the "safe" route - dual-booting operating systems. You can keep your existing OS, and also work in Linux (though not simultaneously). Boot into one or the other, using the boot loader tools that are available from your OpenLinux Installation.
If you choose to dual boot, the easiest approach is to install Linux on a second, empty hard drive. This takes the hassle of repartitioning your current drive out of the equation, which is generally a good thing for most people. However, this is not to imply that you shouldn't back up all of your data prior to beginning your journey with Linux - not the last time you'll see us say that: better safe than sorry. Let's walk through a pair of hypothetical setups, to clarify matters.
There are several advantages to installing GNU/Linux on a second disk. First, you don't have to squeeze down your existing OS installation to make enough room for Linux. Second, you can do all your system partitioning and experimentation on a disk that doesn't risk your current configuration. Lastly, should you decide you aren't ready for Linux (or that Linux isn't ready for you), you still have a heap of extra storage space that can be reformatted for use with your legacy OS.
The steps are straightforward:
If you have a reasonable amount of free space (2GB or more) on your existing hard drive, then you have the option of setting up Linux to share living quarters with another OS. As always, make sure your data is safe prior to starting the installation, because you will be mucking about with the partition tables on your working drive. It's not hard, but if you move through the process too fast, you could lose your data if you don't have a tested backup.
The retail version of OpenLinux 2.4 comes with a custom, limited functionality version of the storage management tool, Partition Magic (PM). Caldera's version of PM works well, effectively resizing FAT, FAT32, and NTFS (though not NTFS51) partitions. The directions for use are clear and straightforward. PM runs from within Win9x installations. For WinNT and Win2K systems, the Partition Magic setup prompts you to create a boot floppy from which to run PM. If you're using the floppy method, then type create at the A: prompt once the boot process is complete. In all cases, you are presented with the screen shown in Figure 3-1.
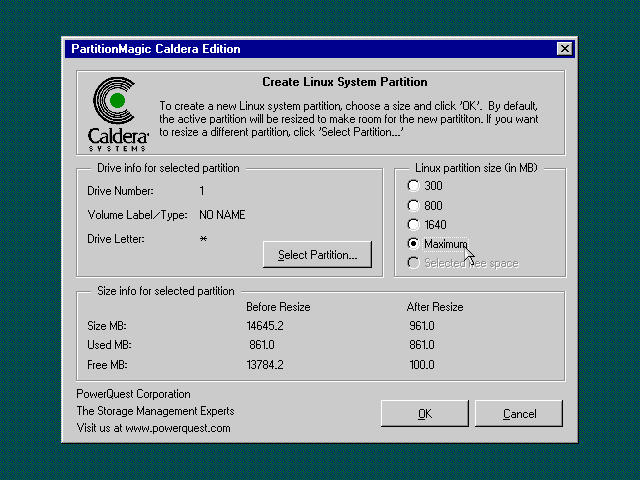
Figure 3-1
Select a partition size using PartitionMagic, Caldera Edition
The main limitation of PartitionMagic, Caldera Edition, is that there are only a few hard-coded partition sizes you can select from. The 300 and 800MB partitions are really only of use for extremely minimal and small sub-set installations, respectively. With 1,640MB, you can install all of OpenLinux, though it doesn't leave much room for user data or upgrades. Finally, our issue with the maximum selection is that it reduces your Windows partition to just about the bare minimum, leaving only 100MB of free space for Windows to function in. This is acceptable only if you're not planning on doing very much more work with Windows. Once you've made your selection, the OK button starts the process of resizing your existing partitions. A pair of progress bars keeps you updated on status, and when the process is done you can boot into the OpenLinux installer directly from the CD-ROM and begin installation.
Whenever you work with your partition table, you're running a greater than average risk of damaging your current installation, which is why you should always have good backups before proceeding. Based on the premise that you have a current, restorable backup of your data available, we recommend taking advantage of the timing to wipe your drive clean and do a fresh install of both OS's at the same time. This clears out the deadwood that has accumulated in the old system.
If you take this path, the steps are as follows:
Whichever choice you make, you are now ready to start the OpenLinux installer.
As a rapidly evolving product, the Lizard installer has a small share of bugs. Fortunately for all of us, Caldera does not attempt to put a three-piece suit on a bug and call it a feature. So, here's the nitty-gritty regarding a couple of the bugs in the partitioning portion of the Lizard Installer we discovered in versions 990815-11S (eServer 2.3) and 20000223-1 (eDesktop 2.4).
First off, both versions have difficulty in correctly reading some pre-existing partition tables on a drive that incorporates the Maxtor BIOS extensions. You can skirt this problem by using the Maxtor tools (usually found on a floppy disk that ships with the drive) to create a low-level partition of the drive. Do not install the EZ-Drive extensions. Then you can install OpenLinux. If you're dual booting (with Windows, as the most likely case), reinstall Windows, leaving enough room for your Linux install as free space on the disk. On older hardware or with versions of Windows older than Win98 SE, you may not be able to allocate the whole disk to Windows. This cannot be avoided and limits you to a 2GB partition size with Win95, or 8G in Win98 original.
Unrelated to the problem with Maxtor BIOS extensions, the eServer installer has difficulty with creating more than five partitions during the boot process - it usually fails, sometimes wiping your existing partition table in the process. This happened to us. Generally speaking, this is not a problem the average user will encounter, since installing eServer is rather at odds with the concept of a dual boot machine. Still, be aware. Safely, we can only recommend eServer for installation on stand-alone machines. Wipe the existing partition table and start from bare metal.
Lastly, we've investigated the possibility that OpenLinux eDesktop 2.4 doesn't like partition tables that are created by other Linux distributions. We've tested with two different versions of Mandrake, two from Red Hat, one from Debian, and in each case got mixed results. Our recommendation if you're upgrading to OpenLinux from another distribution: Save out your user data, either across the network or to some removable media. Then clear the table of partitions created by other distributions, leaving free space for OpenLinux to work in.
These bugs are being actively tracked by Caldera tech support, and may not be a problem in your version by the time this book is out - but take a glance through the Knowledge Base (http://support.calderasystems.com/caldera/) entries for your version prior to installation.
You may easily run the OpenLinux installation directly from Windows 95 or 98. By pressing the "2. Start Installation" button shown in Figure 3-2, a program called Loadlin is executed which closes Windows and runs the installer.
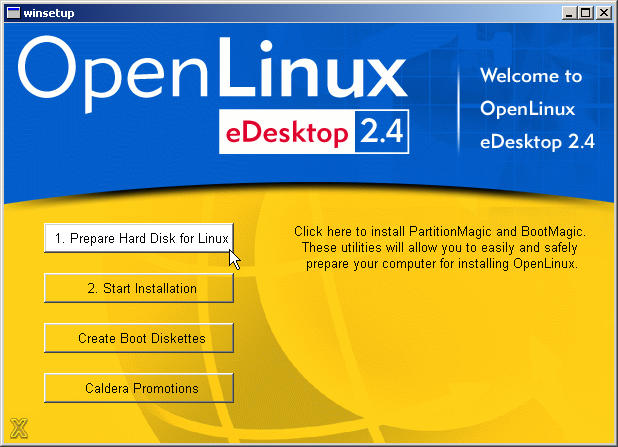
Figure 3-2
OpenLinux 2.4 installer splash screen, seen from Windows
The second and most common method of starting installation is to boot from the Binaries and Installation CD-ROM. This is a necessity for machines running Windows NT or 2000, you must invoke the installer either by booting from the CD-ROM or from boot floppies. To boot from the CD-ROM, run the BIOS setup program accessible during the hardware POST (Power-On Self-Test) cycle and make your CD-ROM the first boot device. This allows the system to boot from CD-ROM media when turning your computer on, but it will continue to boot from the hard disk as normal if a bootable CD is not present.
The third install boot option is to create Install and Modules disks from within Windows, then boot from the floppy drive. You will need to do this only if your system cannot boot from the CD-ROM device. To build these floppies, select the "Create Boot Diskettes" button from the installer splash screen (Figure 3-2), then build "Lizard Modules" and "Lizard Install" disks as instructed after pressing their respective buttons on the screen shown in Figure 3-3.
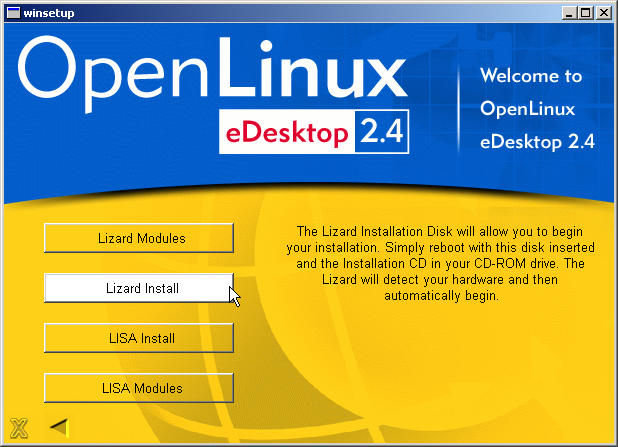
Figure 3-3
The OpenLinux installer Create Installation Disks screen
As you press each button, a dialog box is displayed, containing a message similar to the following:
An installation diskette will now be created
with the image: col\launch\floppy\install.144
Please insert a floppy disk into your a: drive
All data on the disk will be lost!!

       [  OK  ]       [  Cancel  ]
Accept, create, and label each disk appropriately, for use in the boot process. Booting up to the Lizard installer is slower with floppies, of course, but each route leads to the beginning of the installation, our next topic.
Four primary modes of installation are available:
These selections are available from the OpenLinux installation mode screen, shown in Figure 3-4. The differences between the versions lie in the type of hardware probing done and the decisions that are made by the installer, rather than the user. These differences are explored in the following paragraphs.
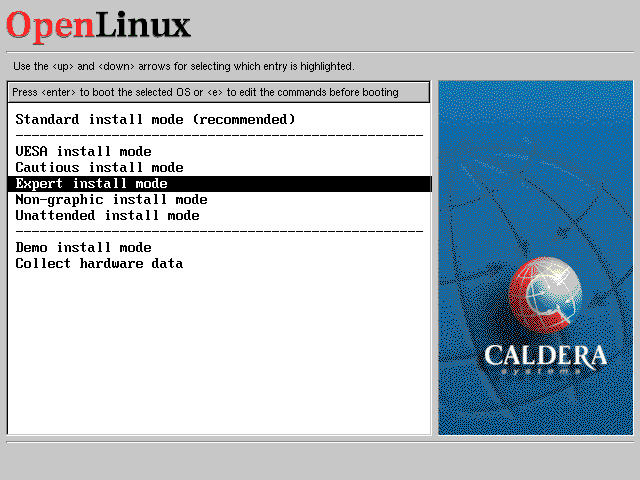
Figure 3-4
OpenLinux 2.4 installation mode selection screen
The other installation types (that we don't cover) are Non-graphic (which runs the Lisa installer from CDROM) and Unattended install mode. The latter is used in scripted installs over a LAN, and used to clone identically configured machines in a corporate environment.
Demo install mode runs a mock installation that does not write anything to hard disk. This is a useful feature for practice runs to familiarize yourself with the routine. Collect hardware data runs the autoprobing function of the installer and collects the information into a text file, then prompts you for a floppy to write the file to. This file can then be e-mailed to Caldera Tech Support (if you've purchased support from Caldera) to assist them in determining an installation problem.
Standard install mode is the method recommended by the people who wrote and configured the installer, with the best of intentions. Standard mode resembles Expert in that the hardware is aggressively queried, which might cause the installer to fail or lock up (though that won't damage your system, you'll just have to reboot and try another option). Standard also hides several screens from the user, in some cases determining hardware settings, in others merely putting off configuration until after the system is up and running.
VESA install mode should be used when the problems with booting into the installer appear to be caused by an unrecognized video card. The simple graphics mode used is compatible with nearly every video card. All aspects of the video subsystem are confirmed in this mode.
Cautious install mode prevents most of the probing of the video hardware, and does not configure the graphical X Window server during the install.
Expert install mode does all of the hardware identification steps that preface a Standard mode setup. This mode then progresses through every configuration screen, skipping none, permitting confirmation and (if necessary) correction. In addition, all of the information shown during an Expert install is ideal for logging purposes, as well as debugging or upgrading your system at a later date.
It should already be obvious from our emphasis in previous paragraphs that we recommend using Expert mode, even if you just take notes and accept all the defaults. You will learn more about your system, leading to a firmer hand at the tiller as your experience increases. All of the screens that follow are shown from the perspective of the Expert installation. If you use a different mode, then don't worry when some screens aren't shown - the installer is generally pretty good about setting up hardware properly.Table 3-1 shows which parts of the setup are available, given a particular installation mode selection at this point.
Table 3-1
Features of Setup Modes
| Standard | VESA | Cautious | Expert | |
| Select Language | * | * | * | * |
| Set Up Mouse | * | * | * | * |
| Select Keyboard Type | * | * | * | * |
| Select Video Card | n/a | * | * | * |
| Select Monitor | n/a | n/a | * | * |
| Select Video Mode | * | * | * | * |
| Select Target | * | * | * | * |
| Select Disk | * | * | * | * |
| Use Free Disk Space | * | * | * | * |
| Select Root Partition | * | * | * | * |
| Format Partitions | * | * | * | * |
| Select Partition | * | * | * | * |
| Select Software | * | * | * | * |
| Set Login Name(s) | * | * | * | * |
| Set Up Networking | if found | if found | if found | * |
| Set Up Modem | if found | if found | if found | * |
| Set Up Internet Provider | if found | if found | if found | * |
| Set Up Boot Loader | * | * | * | * |
| Test Sound Card | if found | if found | if found | * |
| Set Up Printer | if found | if found | if found | * |
| Choose Time Zone | * | * | * | * |
| Entertainment | * | * | * | * |
| Rescue Disk | * | * | * | * |
Once you have selected the installation type, the boot process proceeds. As displayed in Figure 3-5, the hardware is probed, identified, and initialized. Once this process is complete (a matter of one to several minutes, depending on system speed and configuration), the Lizard installer begins to load. The length of the boot process is an installation trait, due to all of the hardware probing going on in the background. Normal boots will not take nearly as long.
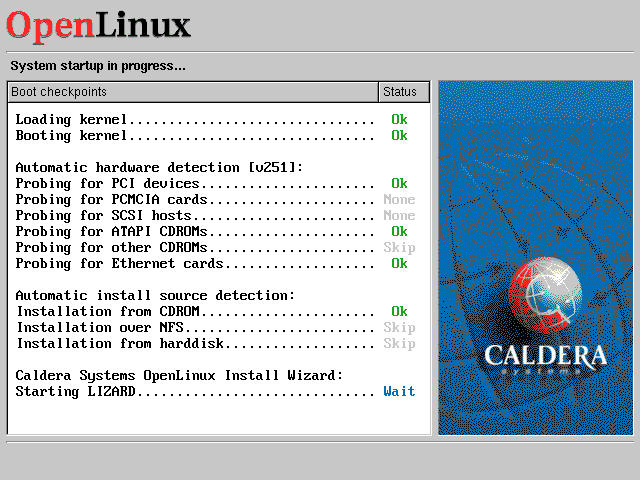
Figure 3-5
The System startup screen with pre-install hardware detection completed
If the boot process fails to progress into the Lizard installer after about 15 minutes or so, it is probably hung up in one of the hardware identification probes. Restart the machine and run in Cautious mode, which is less aggressive about probing, and won't lock the machine. As a trade-off, you then have the opportunity to specify more of your hardware manually.
Once the hardware portion of the installation boot process is complete, a bit of music is played (if your system is configured with a sound card that OpenLinux recognizes off the bat). During this time, the installation X server is initialized, culminating in the first screen of the Lizard installer.
The Select Language step depicted in Figure 3-6 is the first screen of the Lizard installer. The version number for the Lizard installer is shown in the bottom left corner of this screen. Take note of this number; should technical support be needed, this is a useful piece of information to have handy.
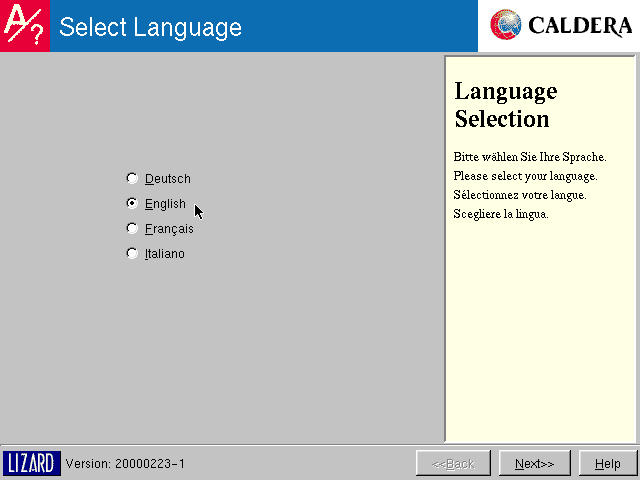
Figure 3-6
The Lizard Select Language screen
Warning
If you are using the Cautious install mode, then the mouse hardware will not be initialized yet. The Tab key moves you from selection to selection on the screen, the Up and Down Arrow keys navigate lists, and the spacebar provides the same function as the left mouse button in activating the selected object. This method of screen navigation is necessary until you have properly set up the mouse in the following configuration screen.
The language selection affects the keyboard layout selection default, as well as the presentation of material throughout the rest of the installation process. Interestingly, once this choice is made and you've progressed to another screen, you cannot change the install language. You can use the Back button to return to the Language screen, but unlike every other screen prior to software selection, you cannot alter your previous choice.
The Set Up Mouse screen appears next, as shown in Figure 3-7. Except in Cautious mode, the mouse is usually correctly detected in the hardware ID process. You are welcome to experiment with alternative settings. For instance, sometimes an IntelliMouse is detected as a Standard without wheel type. In this specific case, accept the default. We have found that it is easier to reconfigure the mouse after installation than to get perfect recognition out of the installer.

Figure 3-7
The Set Up Mouse installer screen: testing the mouse buttons
Warning
When installing OpenLinux eServer 2.3, accept the default mouse type, even if it doesn't match your hardware. You can modify your selection after installation but if you modify it at this stage, the mouse cannot easily be re-configured in the installer. When we worked through this, we usually ended up restarting the install from scratch.
After playing about for a bit, you may need to set the mouse back to a default that works. While the directions given earlier (Tab to navigate, Arrows to scroll, Space to select) work, there are a few shortcut keys that are useful for resetting the mouse type quickly on this screen: they are listed in Table 3-2.
Table 3-2
Mouse Type Selection
| Key Combination | Selected Mouse Type |
| ALT + P | PS/2 Mouse |
| ALT + U | USB Mouse |
| ALT + M | MS Serial Mouse (or compatible) |
| ALT + S | Mouse Systems Mouse |
| ALT + L | Logitech Serial Mouse (or compatible) |
| ALT + E | Emulate 3rd Button |
Not all of the mouse type choices are available with key combinations, however you can generally get enough functionality out of your pointing device with one of the key selections to make use of the pull-down list to refine your choice. When all else fails, Standard without wheel works almost all the time - as previously, use that as a default selection and work on hardware configuration specifics once you've got a running system.
The subsequent screen enables you to select your keyboard. See Figure 3-8. The keyboard type is constrained to the models shown in Figure 3-8 during installation. If your keyboard has special features, these often aren't implemented for use with Linux applications: you should select a base level keyboard that functions at least for the basic keys and the numeric keypad at a minimum. Generic 101 key PC works under every circumstance we can envision. If you're running a thought-controlled computer and having difficulty installing GNU/Linux, please get in touch - we'll be happy to work with your hardware to help determine how best to use it.
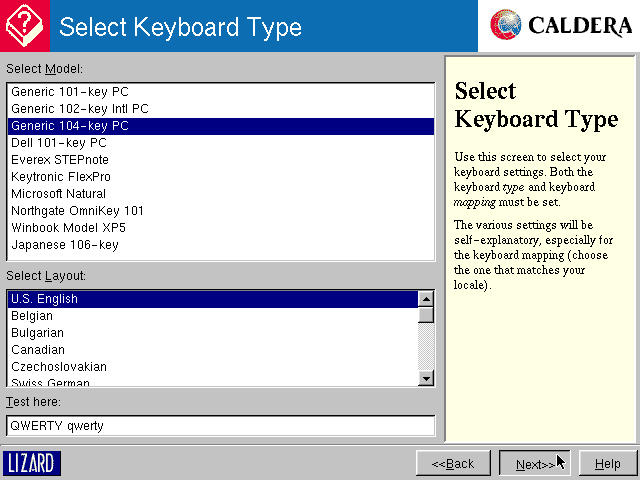
Figure 3-8
Select Keyboard Type: testing the selection
Once the keyboard type and localized layout is specified, then the video card section of the installation routine begins. This is shown in Figure 3-9. XFree86 is the implementation of the X Window System (graphic interface software) shipping with most GNU/Linux distributions. The version packaged with OpenLinux 2.4 is 3.3.6. This recent stable release has been succeeded by version 4.0, which eventually will be included with most Linux systems in the next year or so. It has not yet been integrated as a default into shipping Linux distributions (though it accompanies two or three of the recent revisions). Upgrading to 4.0 is beyond the scope of this book, and unnecessary unless you have a video card that is supported in 4.0 and not in 3.3.6.
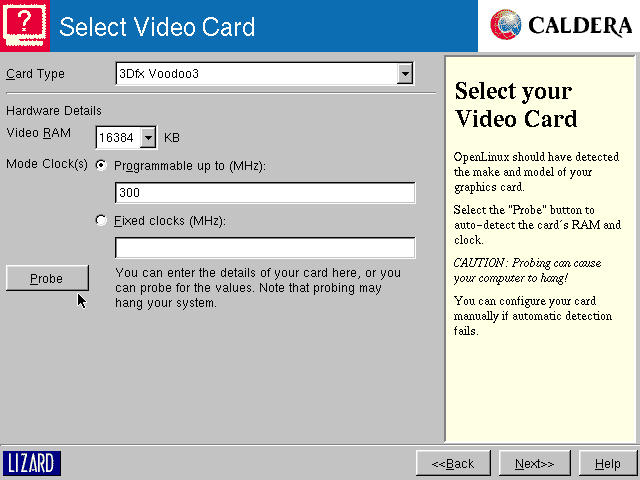
Figure 3-9
Choosing a card type and details from the Select Video Card screen
XFree86 version 3.3.6 supports over 600 models of video card from more than 100 different manufacturers. This is a great achievement, since a prior lack of video drivers has been noted as a factor holding Linux back from wider acceptance. In either Expert or Standard mode, the hardware is pre-probed for you. All you need to do is confirm that your video card has been correctly identified.
If your card is improperly identified, re-probe the card manually. If the card cannot be properly identified, but the various parameters (RAM and Mode Clocks, both explained in the upcoming video mode section) are the same as your hardware documentation, then XFree86 usually operates acceptably. In this circumstance, the server probably won't take advantage of every feature offered by your specific model. As a fallback position, virtually every modern card can at least run as a Generic SVGA, which is useful to just get up and running.
If you have special requirements for video, and XFree86 doesn't meet your performance or hardware needs, there are custom versions of XFree86. TinyX was designed for systems running in 8MB of RAM, and a Web search leads to several special adaptations of XFree86 specifically geared to the laptop market. Also, there are at least two commercial display server products available for the Linux market: Metro-X and Accelerated-X. We haven't used these - your mileage may vary.
Once the video card is set, it's time to select your monitor (see Figure 3-10). Like Caldera's database of video cards, the list of monitors and their associated specifications is staggeringly long. Use the scrolling list in the large window to select the manufacturer and model. The various pertinent parameters will be filled out in the boxes at the bottom; you should confirm that the sync numbers displayed here match those in your documentation.
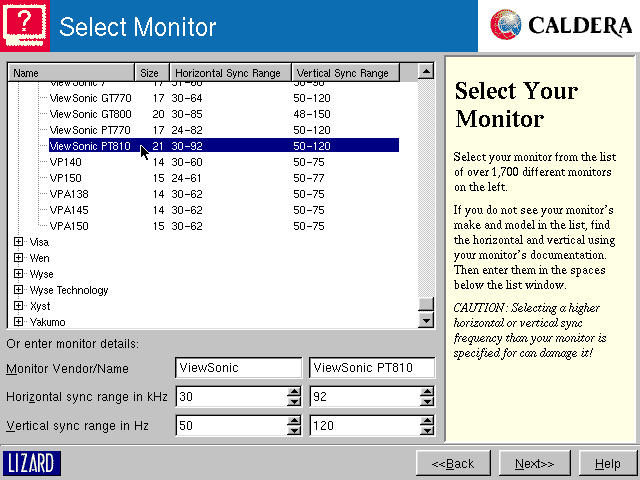
Figure 3-10
Select Monitor: choosing monitor model from the list
The name and model number for a selected monitor is completely insignificant. There is no chipset dependency as in video cards. If the make and model are not listed, but your monitor's manual gives the Horizontal and Vertical sync data, then simply fill out the boxes to ensure correct operation. There are "Generic" models listed, but you need to ensure that their default parameters fall within the specifications for your monitor. See the upcoming list of video mode selection tips to find more details.
With display hardware selections made, selecting the video mode is the next step. It is illustrated in Figure 3-11.
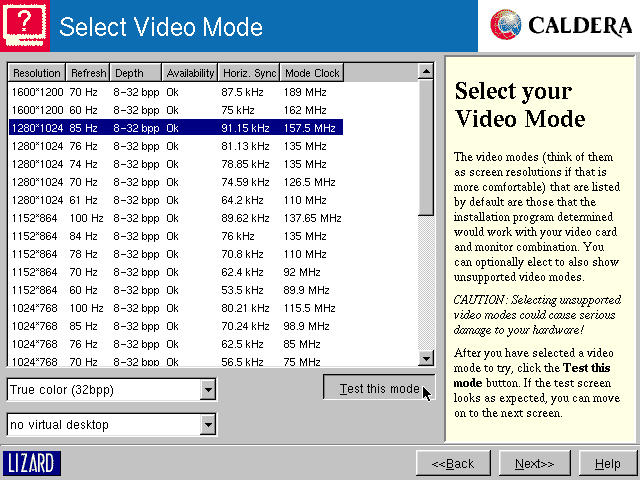
Figure 3-11
Select Video Mode: ready to test
There are usually a wide variety of video modes available, given the versatility of most display hardware. Here are a few tips for making the best use of your video sub-system:
The choices you make here can be easily changed after installation, so make a reasonable guess given your prior experience with resolution and color setup. Once the video mode choice is made, test the configuration. After accepting the warning dialog box, a colorful display screen is shown at the selected resolution and color depth. If the test fails, then try another selection, generally by lowering the resolution or color depth. You should keep trying this until you get a successful screen test.
There are a lot of acronyms and strange numbers flung about when discussing the ways to set up video in Linux. The key factors are:
The tools for setting up video take known specifications and return a list of possible display combinations your hardware is capable of driving. While Linux is configurable enough to allow you to push the envelope for your hardware, it's rumored that exceeding specifications can physically damage your monitor.
For a great jumping off point into lots of information about the X Window System configuration, point your browser to http://www.luv.asn.au/overheads/xconfig/. That is an excellent source of bits to twiddle and adjust, as well. Our recommendation: play it safe, and choose from the list of options presented to you during installation.
Once the display setup chores are done, it's time to make choices about disk storage, partitions, and formatting. We start by selecting a Target, as shown in Figure 3-12.
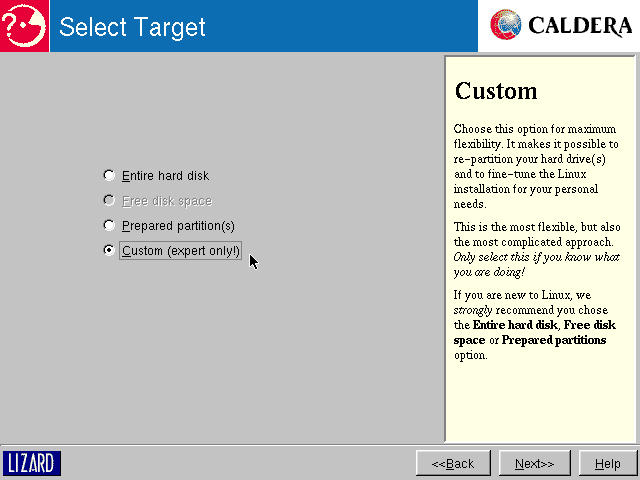
Figure 3-12
Select Target: choosing where (and how) to use hard disk space
The target that is selected at this stage is the location (partition or complete hard drive) OpenLinux installs to. There are four alternatives on this screen. Each takes a slightly different path leading to software package setup and the actual beginning of software installation. Grayed-out selections are not available - if there is no free disk space, then that option cannot be selected. Likewise, if there are no existing Linux partitions on your disk, then you may not choose that route. The following list of disk target selections delineates these choices, and the circumstances under which each makes sense.
In the following pages, we'll cover each of the paths, in order. First up: selecting the disk after choosing "Entire Hard Disk," shown in Figure 3-13.
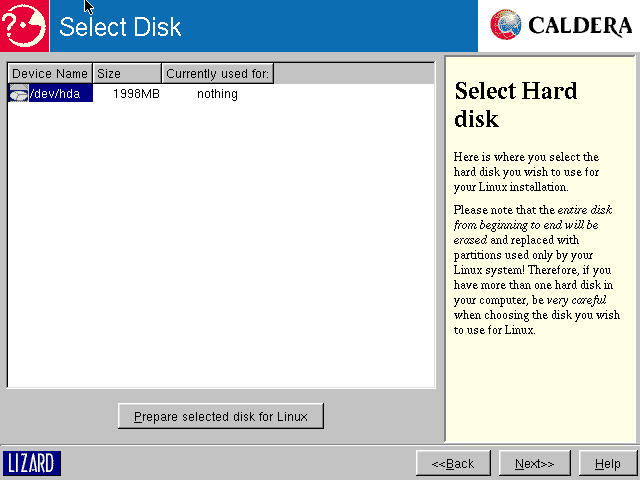
Figure 3-13
Select Disk: following the "Entire Hard Disk" selection, choose, then prepare
The Entire Hard Disk selection leads to a screen entitled "Select Disk." This offers a choice among the installed hard drives, including a column labeling the identified current system(s) using each drive. If you have more than one hard drive, then most often the two disks will be listed as /dev/hda and /dev/hdb (which corresponds to C: and D: drives under DOS/Windows systems). In the case of a dual-boot configuration, you will typically choose the second drive. If it is brand new, then it should list "nothing" in the "Currently used for:" column. Once you have made your selection, then click on the "Prepare selected disk for Linux" button. This creates two partitions (a system partition and a virtual memory partition, also called a swap), then formats the partitions and checks them for bad blocks, all without user input or intervention.
Caution
There is no second chance or warning dialog given at this point in the installation. If you select a disk that contains anything you need, and start preparing that disk for Linux, the data is gone. Period. You have been warned.
Free Disk Space configuration is shown in Figure 3-14. Fundamentally similar in operation to the Entire Hard Disk selection, the advantage of this choice is that it is impossible to overwrite your existing data in this step. Of course, selecting this option implies that you've previously made space available (or added a hard disk) in order to even reach this point. On the other hand, if you've used the Caldera edition of Partition Magic, then you have pre-partitioned your disk. In that case, you choose Prepared Partition(s) from the Select Target screen, to get to a display similar to Figure 3-15.
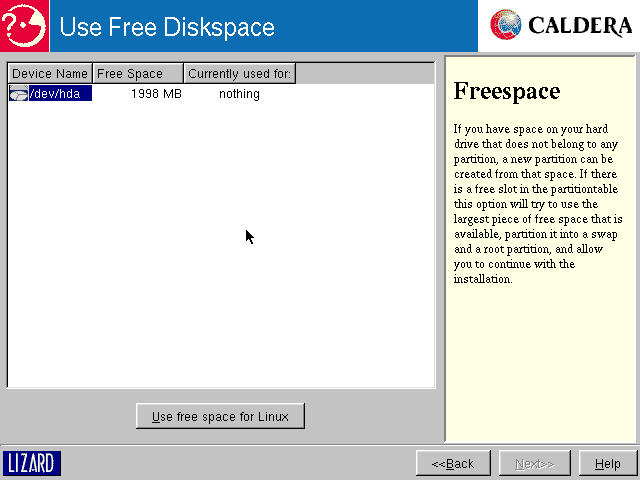
Figure 3-14
Use Free Diskspace: partitions and formats in one operation
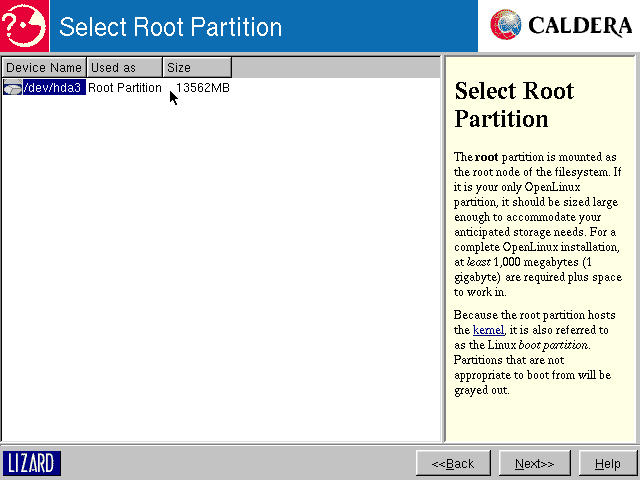
Figure 3-15
Select Root Partition: following "Prepared Partitions" selection
The special purpose in life for the Prepared Partition(s) path through disk space setup is to work with the swap and main partitions created by the Partition Magic tool. No matter how many partitions are available for use under Linux, only one may be selected and used in this section. Once the root partition is chosen it is then formatted, as shown in Figure 3-16.
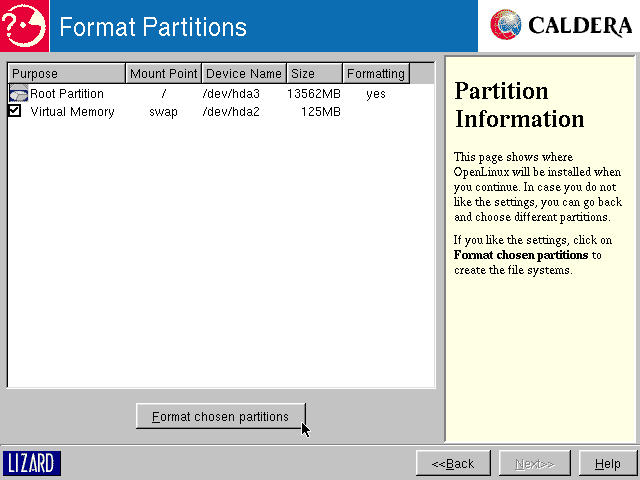
Figure 3-16
Format Partitions: following "Select Root Partition", format selection(s)
Note that there are two partitions shown in the Format Partitions window. One is the root partition selected in the prior step, and the other is a swap partition (for use by Linux as a storage area for virtual memory). The swap partition was not shown previously, since it would be an incorrect choice for use as a root partition. The sum of space used by the two partitions adds up to the same amount of space as was available in the Entire Hard Disk or Free Disk Space choices.
Alternately, you may have selected the "Custom (expert only!)" option from the Select Target screen. If so, then you are presented with the Select Partition screen revealed in Figure 3-17.
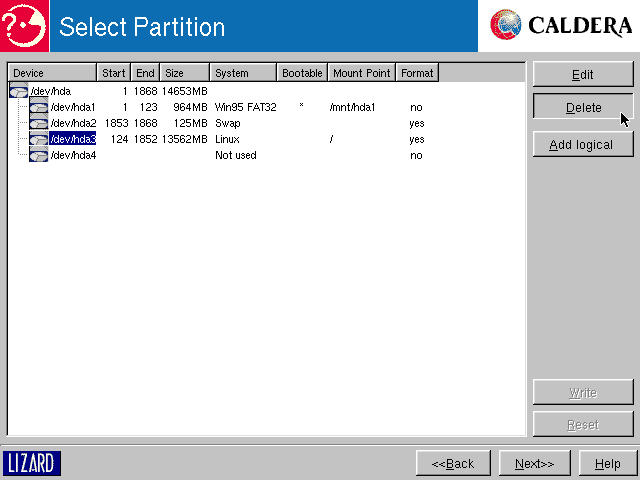
Figure 3-17
Select Partition: following "Expert," a simple setup.
If you've ever used the fdisk utility under DOS or Windows, you are going to be pleasantly surprised by the ease of use of features available in the Lizard partition manager. Partitions can be created, deleted, and resized; mount points for the coming Linux filesystem are specified, all with ease.
Note
Changes made on the Expert partitioning screen are not made permanent until the Write button is selected. Prior to writing, selecting Reset undoes all of the changes that have been made to the existing partition scheme.
The Select partition screen contains the following possible courses of action:
In a simple configuration, as illustrated in Figure 3-17, we're working with a disk that has three defined partitions: one containing the Windows bootable partition (hda1), one for virtual memory (the swap partition, hda2), and one for data (the root partition, hda3). We're deleting the latter in order to set up several partitions better suited to our needs, rather than the "one size fits all" scheme the Caldera version of PartitionMagic defaults to. This is accomplished by selecting /dev/hda3, corresponding to the current OpenLinux root partition, and choosing the Delete button.
The lizard partitioning dialog box is executed by selecting /dev/hda3 (the third primary partition on drive /dev/hda) and choosing the Edit button. We demonstrate a partition edit in progress in Figure 3-18.
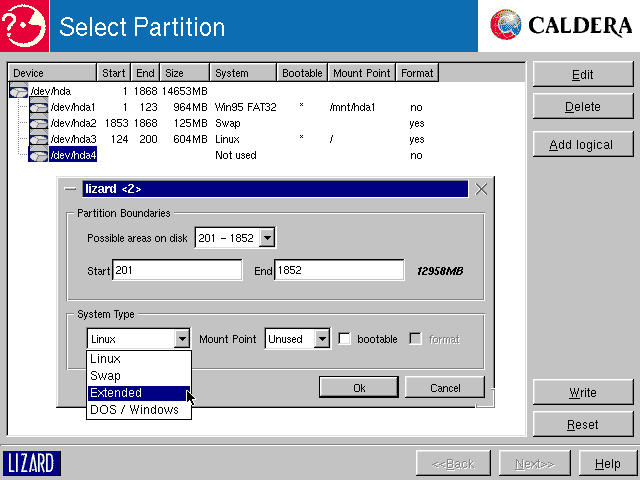
Figure 3-18
Select Partition: Creating an extended partition for logical drives.
Prior to the screen shown in Figure 3-18, we re-created a Linux root partition of 604MB. This is not large enough accommodate all the components of a full OpenLinux installation by itself, but we are going to add a number of other partitions to hold applications and other user data.
In the Partition Boundaries portion of the dialog, contiguous areas of free space are selected from the "Possible areas on disk" drop-down list. These areas are sections of drive defined by either the Sectors or the Cylinders specification of the hard disk2. Unlike every other partitioning tool we've run across, the Lizard partitioning tool is the only one in which specifying a size in megabytes is not permitted. All partitioning is done with cylinder counts. This makes for a little bit of hunting about, as you try to specify an ending sector that gives you the size desired. This is not as difficult as it seems at first glance; it just takes a little trial and error.
Choosing a start point of 210 and an end point of 1,852 yields a size of 12.9GB. Under System Type, the left pull-down list permits choices of Linux, Swap, DOS/Windows and Extended (see the sidebar Partitioning Logic for more information). You should always create a swap partition, generally at least double your physical RAM size or 128MB, whichever is less. The balance of partitions for most purposes will be type "Linux."
Usually, in a complex partitioning setup the fourth primary partition on each drive is defined as an extended partition in order to allow the use of logical drives. Figure 3-19 illustrates the list of default possibilities for partition mount points.
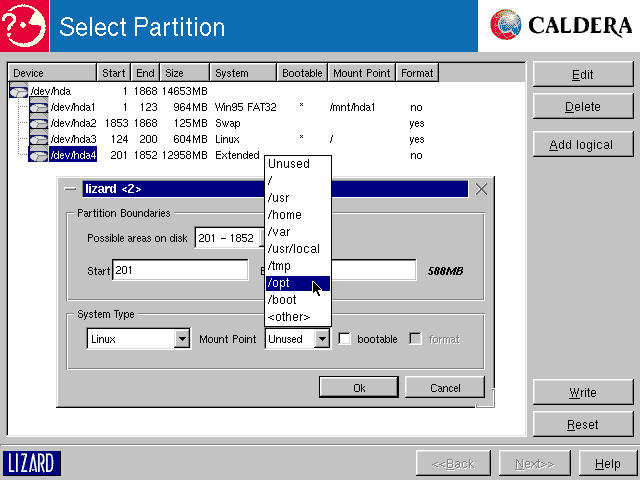
Figure 3-19
Select Partition: choosing a mount point.
Mount points are examined in the Partitioning Logic sidebar. Only the root partition (mount point /) or the boot partition (/boot, if defined) should have the bootable flag checked. Note in Figure 3-19 that the Windows and Linux root partitions are marked as bootable. For a new installation, check the format box for each OpenLinux mounted partition you've set up. Once your partitions are set up to your liking, take a few notes for the log book on the setup (it'll come in handy later, especially in the unlikely event of a damaged partition table), then Write the new partitioning setup to disk.
Caution
If you are setting up a dual-boot system, this is the spot where events can take a distinct turn for the worse. The key step is clicking on the Write button near the lower-right corner of your screen. Prior to that, all changes are to a virtual partition table and are contained in memory. A write commits any changes made to the affected hard disk, without regard for any previous partition table information. Make sure things are as you want them before clicking the Write button.
Fundamentally, there are two distinct camps of hard drive technology: enhanced integrated drive electronics (EIDE) and small computer system interface (SCSI). SCSI disks are limited to 15 partitions per spindle.
EIDE drives may have a maximum of four primary partitions on each spindle (physical drive). A primary partition may be set up to be an extended partition, in which case logical drives may be set, up to a total partition quantity of 63. This count is well in excess of what is considered necessary.
There are a variety of ways, means, and reasons for splitting up a GNU/Linux filesystem among several partitions. Once we put our reasoning down in black and white, droves of e-mails will arrive, telling us where we screwed up. This is our opinion only - caveat emptor.
In the mount point pull-down list in the Select Partition dialog box (shown in Figure 3-19), there are eight default location choices: /, /usr, /home, /var, /usr/local, /tmp, /opt, and /boot. We use all of these. Additionally, partitions may be defined but held in reserve, or you can type in your own mount point.
As an example, you may want to allocate a set amount of space for a specific user. By creating a partition and setting the mount point to /home/brian, you can keep those MP3 files from overwhelming the rest of the users, who all live in and share the available space in the /home partition.
An explicit reason for the existence of a small, separate /boot is that under older versions of Linux, on pre-1999 hardware, the boot partition must be located within a 1,024-cylinder limit for the BIOS to be able to boot into the OS. Why 1,024 cylinders? Well, in the original PC BIOS, 10 bits are dedicated to specifying the hard disk cylinder count, that is: 0 up to 1,023. Which, incidentally, was plenty of room before the day of the multi-gigabyte drive. This is one of the reasons behind a separate, small /boot partition. With more recent BIOS revisions, and either the Grub boot loader (see the section later in this chapter, "Setting up your boot loader") or the latest version of the Lilo utility, the 1,024 cylinder limit is a thing of the past.
Note
Create sub-directory partitions after their parent partitions. The Caldera installer writes the/etc/fstabfile in the order which partitions are allocated. During boot, if the fstab file indicates that/usr/localshould be mounted before/usris mounted, then the/usr/localmount fails since the mount point is not yet available.
Table 3-3 details our recommended use of mount points, the space we've allocated for the purpose, the actual space usage under OpenLinux 2.4, and our take on the reasoning for this setup. Other people have other opinions.
Table 3-3
Disk Space Allocation (one viewpoint)
| Mount Point | Setup Size | Space Used after install | Reasoning |
/boot |
10-25MB | 1.8MB | Properly configured, allows the kernel to lie within the PC BIOS' 1,024 cylinder limit for boot up. Plenty of spare room for test kernels later. |
/ |
100-250MB | 38MB | If the sizeable bits of Linux are on separate partitions, then a large root partition is unnecessary. Note that if you were to do away with all these other partitions, the data and code in those spaces is written into the root directory partition, which will need to be correspondingly larger. |
/usr |
1500MB | 1001MB | Mostly composed of user space binaries, data, and the kernel source tree. If you are going to be playing with multiple kernel trees, then add a separate /usr/src partition with about 100MB of space allocated for each kernel tree. |
/tmp |
100 - 250MB | 1.5MB | Low initial usage, depending on system use, may be increased or decreased. Keep an eye on usage and adjust if necessary. |
/var |
100 - 250MB | 36MB |
This is the home of spool and log files, a spot in the directory structure that can grow unrestrictedly depending upon system usage. If the system purpose is as a server box, we recommend that /var be much larger. An e-mail server supporting even a few users may have the need for a very large mail spool area. If there is no separate /var partition, and the spool or log files manage to fill your root partition up, your system will not boot properly. That requires a rescue disk boot to get in to the disk and delete files that have outgrown their limits. |
/opt |
500MB | 291MB | Some distributions (like OpenLinux) put add-in software into the /opt tree. In this case, KDE, Netscape, and other software is loaded into this directory. We have left room for growth, as a new version of KDE is due out soon, and these tools never shrink. |
/usr/local |
4,000MB | 0MB | This is where user-installed software should be placed. In three months of experimentation and playing with new tools, we managed to use nearly 2GB of space in /usr/local. |
/home |
8,000MB | 15GB | There's never enough personal storage space. With a broadband internet connection, you'll download ISO images, rip and convert audio tracks, and generally amass a lot of "stuff" here. Whatever you think you'll need in a year, doubled, underestimates the reality of the situation. |
For both /usr/local and /home, another big advantage comes into play if you follow the previous recommendations. When installing or upgrading your Linux system you can mount, but not format these two partitions, which will make your data and personal tools instantly available under the new OS. A brief example provides some clarity to this muddy patch.
Tom installs OpenLinux and sets to work doing extensive tests for the book you hold in your hand. He stretches the limits of Linux, intentionally tries to break things on occasion, and in the course of all this downloads numerous handy programs which he installs under /usr/local (where such things belong). Data and documentation (as well as ISO files and other flotsam) accumulate in his /home/tom directory. When Caldera puts out a new version of OpenLinux in a few months, Tom wants to upgrade to the latest and greatest. By using the Custom selection from the Select Target screen (or its equivalent in the next revision), he can specify and overwrite most of his existing partitions. Additionally, he can uncheck the Format box in the partition edit screen for the /usr/local and /home partitions. That way when his new system boots up, the contents of those two partitions are already present and ready for use, eliminating the added step of restoring this data from backup.
Figure 3-20 shows the step following a completed partitioning session: Format Partitions. The major reason for offering this confirming step prior to creating filesystems on all of the new areas is that if you do have data you wish to preserve, here is a last chance to go back and uncheck the Format box for specific partitions.
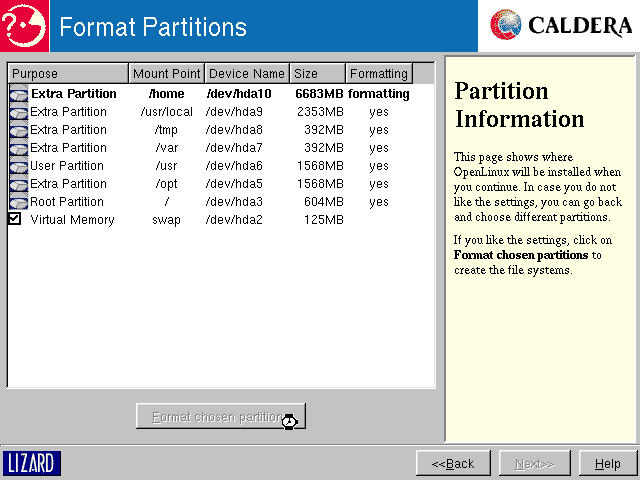
Figure 3-20
Format Partitions: a confirming step.
Thanks for hanging out with us through all of that hard work, but now come the fun bits - selecting software. We've got our asbestos suits on, ready for flaming e-mails. Here on the Select Software screen shown in Figure 3-21, if disk space isn't a consideration, then go with the All Packages selection. It can't hurt too badly to have loads of applications installed, and after you've spent time spelunking and working with various tools, you can always reinstall in less space, perhaps with a Minimum Installation, then add the parts you want manually. Or, simply uninstall those packages you do not find useful once you've had time to experiment.
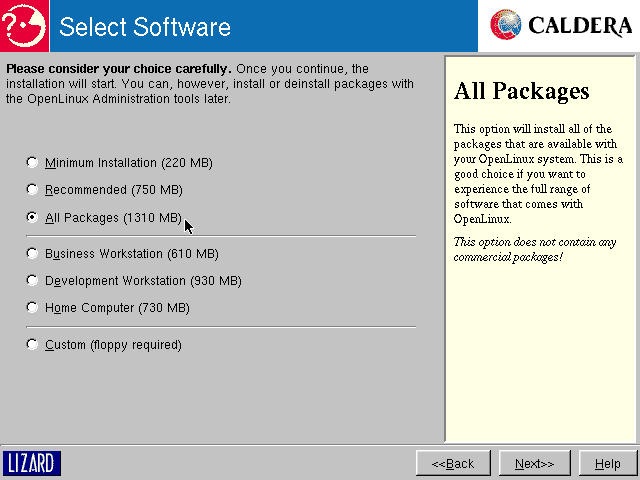
Figure 3-21
Select Software: choose package groupings
The major argument against installing everything is that many of the tools, especially the server and connectivity tools, install in an enabled form. We find no fault with that argument. In "Performing the First Boot" later in this chapter, our first goal is to get you into the configuration tools and show you how to go about turning off most of the outside lights and bolting all the doors. Additionally, we've got a trick or two up our sleeves to help combat that argument coming up a little further into the installation.
If you aren't sure what you want to do at this point, then go back to Chapter 2 and review the package types or have a long look at Appendix A and see exactly which packages are installed with which group. This is your call. Once you choose a package group and press the Next button, the install begins; no going back. You can, of course, start over, or manually add or remove software later.
The package installation process runs in the background and can take from 15 minutes to over an hour depending on system speed and which package group was selected. While the software packages load, you are presented with several screens of key system configuration information required before Linux can boot. The first of these is called Set Login Name(s), depicted in Figure 3-22.
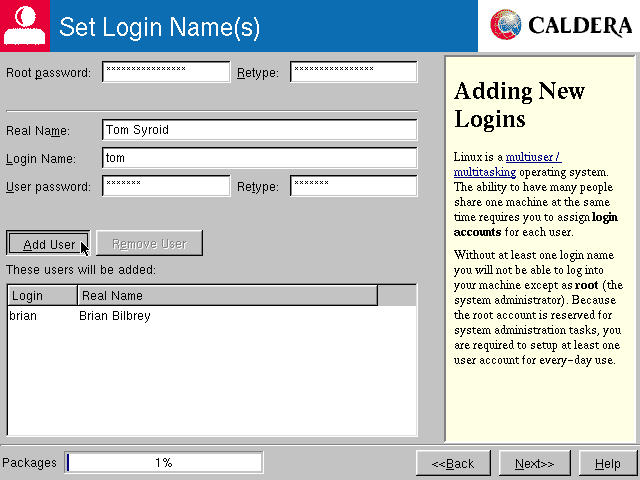
Figure 3-22
Set Login Name(s): Add root password and at least one user
First, look in the lower-left corner of the screen shot. There is the progress bar (shown here at 1%). This indicator carries forward throughout the rest of installation. Sometimes it appears to move at the speed of molasses in January, but a quick glance at the drive lights tells the tale.
Set Login Name(s) is where initial system administrator and user accounts are set up. The administrator account is always known by the user name "root." The root user has full system privileges. Setting up the root user password is the first task. As with all password entries, this must be entered twice for confirmation since the actual password isn't echoed onto the screen. If both entries do not match exactly, an error message pops up below the password fields: "The two passwords you entered do not match. Please try again." Another possible problem crops up if you try to use a password with five or fewer characters in it: "The password is shorter than 5 characters."
For the sake of system security, especially in this day of highly connected machines, use good passwords for all accounts, both root and individual users. A good password is a mix of at least eight letters (upper and lower case), numbers, and punctuation. A bad password is a dictionary word, a name, phone number or date of birth of anyone you know, or anything else that is blindingly obvious. We put it in those terms for a reason - if the password is easy for you to remember, then it is easy to crack.
Now it's time to set up at least one user account. Up to this point, every Linux distribution we've worked with strongly recommends adding a normal user account (that is, an account without default superuser or root access). The OpenLinux Lizard installer is the first such tool to enforce the edict (this is true for both the eDesktop and eServer versions). You cannot proceed from this screen without adding at least one user account. Fill in the blanks appropriately. The same password error messages noted previously occur for the same reasons, only displayed below the user password section. As you select the Add User button, a line of text may flash between the add user fields and listing area below. This is a harmless bug in the installer that flashes one of the password error messages just as the account is added.
Once you have added all the user accounts, you need to get up and running, select the Next button and progress to configuring your LAN, as shown in Figure 3-23. If you do not have an Ethernet card in your system, select the "No ethernet" radio button. If your system resides on a network served by a DHCP server, select the second button unless you know that there is a reserved static address for your machine. The final prospect is that you are on a small static network, in which case you should set up your information as given to you by the Administrator for the network (possibly yourself).
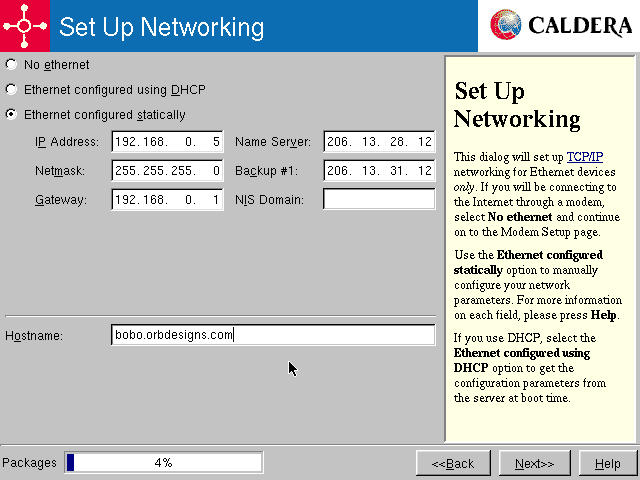
Figure 3-23
Set Up Networking: Ethernet LAN and Hostname configuration
The key bit to get right, especially in a mixed network of Windows clients and servers, is the IP address. Overlapping an existing allocated IP is a distinctly bad thing, and should be avoided, as it breaks connectivity for both devices. OpenLinux does not provide you with any warning if you do so, and at this point the network is not functional.
In the home environment, there is a small but growing contingent of networked systems, set up to share Internet connectivity, printers, and other resources. At home, make sure as well that IP addresses don't overlap.
Warning
If the machine you're installing OpenLinux on is directly connected to the Internet, via corporate LAN, or home broadband connection (DSL or Cable Modem), we strongly recommend that you specify "No ethernet" at this juncture. There are documented instances of systems being hacked within ten minutes of going online for the first time. After the box has been booted, system services secured and locked down, then we'll guide you through setting up Ethernet using the administrative tools available. On the other hand, if you are behind a good firewall, whether at home or at work, then you are usually safe in setting up networking from the beginning.
When selecting the system's hostname in a corporate environment, your system administrator should guide you in this choice. At home, your options are much easier. You need to set up a dotted hostname, even if it's something like bob.linuxbogus.com. For the correct operation of some system services (like a caching name server, among others), your system needs to have a defined hostname (bobo, from the previous example) and domain (linuxbogus.com). If you have an assigned domain, then name your machines and append this domain (as we do, with syroidmanor.com and orbdesigns.com, respectively).
Every modem model that is supported under GNU/Linux is listed in the drop-down list on the Set Up Modem screen, Figure 3-24. If the modem had previously been working under Windows, then you'll have a prior reference as to which serial port it was set up on. For ease of use, Caldera provides (in the device drop-down list) a correlation between the Linux device names and the DOS device names, a very thoughtful touch. Other than the device location, all the other parameters are set up by the model choice.
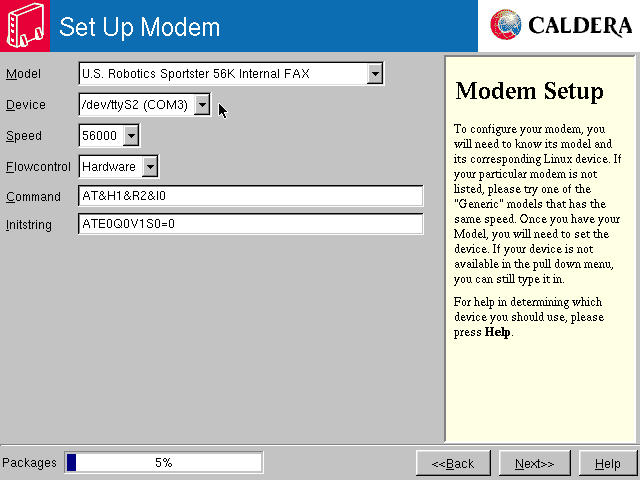
Figure 3-24
Set Up Modem: select model, device, and parameters
Then the install progresses to the Set Up Internet Provider screen, shown in Figure 3-25. In the geographic regions covered, you can select first by country, then by stages narrow your choices down to City and perhaps even ISP. The choices are somewhat limited - this is not an ISP setup service such as Windows users are used to. It merely has lots of pre-defined dialup numbers and information for a few major ISPs. This data is used for dialup access only.
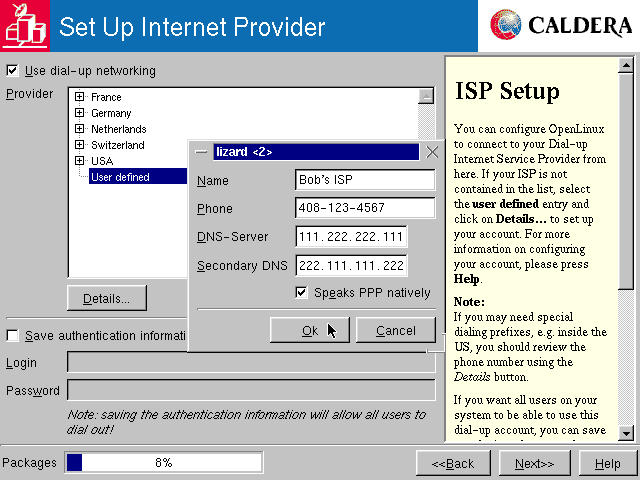
Figure 3-25
Set Up Internet Provider: User defined with Details dialog box
Chances are you already have an ISP, and you can use the information you got with your service to fill out the fields in the Details dialog box. Then you can, if desired, put your login name and password into the appropriate fields and save them for future use. This isn't terribly secure, but it is convenient.
Once the ISP information is filled out (or ignored: No modem, no ISP, so why bother?), you can progress to the Set Up Boot Loader screen, shown in Figure 3-26.
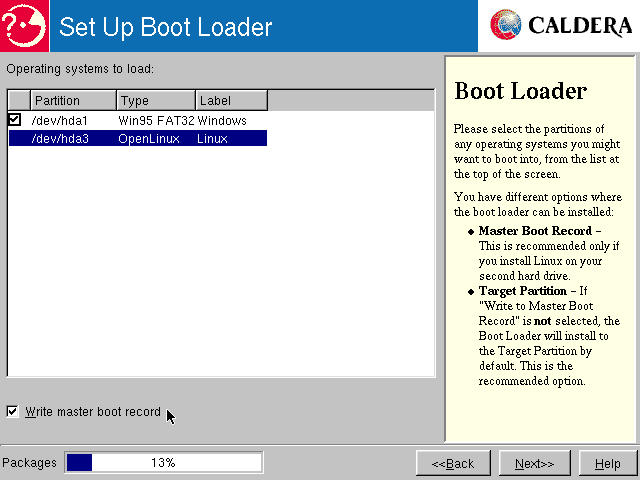
Figure 3-26
Set Up Boot Loader screen
Setting up the Boot Loader is the part of installation that lies at the root of almost as many support calls as partitioning confusions (or errors). The reason for this is that Linux tries its best to co-exist with other operating systems, and the data from those systems. You can mount and access most Windows drive partitions for at least read access. OS/2's HPFS filesystems are supported, as are many others. On the other hand, most other OSs simply say, "There's stuff here I don't recognize. Do you want me to wipe it out and claim it for my own?" There are two different boot loader programs available for OpenLinux, and several different ways to install them.
The two boot loaders are called Grub and Lilo. The interesting bits of these programs are documented in more detail in Chapter 19. The parts that are important now, we'll cover here. First, Grub is the only boot loader that can be installed at this time. Lilo can be substituted once the system is running if you are so inclined. If you don't know (or care) about the difference, then stick with Grub as it has some capabilities older versions of Lilo lack.
Installing Grub comes in two flavors: Master Boot Record and Target Partition. Master Boot Record (aka the MBR) is located on the first hard disk in your boot chain. When the system is turned on, the system BIOS performs several preliminary hardware tests and hands off control of the boot process to a tiny program located at the very front of the first available boot device. Failing to find anything special (like Grub or Lilo) in the MBR, your system will boot into the first bootable partition on the first drive, which is typically a member of the Windows family.
If you install the boot loader into the MBR, you are giving Grub control of your boot process. This can be a very good thing, as Grub will politely offer you a menu of OS possibilities in a multi-boot situation. The view shown in Figure 3-26 is of a dual-boot system - the checkbox next to the Windows partition indicates that Windows will be offered and easily selectable as an alternative at boot. If you do not want Grub to boot into your Windows partition, uncheck the box prior to progressing to the next screen.
A Linux boot loader will not, however, co-exist easily with any flavor of Windows NT. If you want to dual boot Linux and NT, head over to read the NT OS Loader + Linux mini-HOWTO at http://www.linuxdoc.org/HOWTO/mini/Linux+NT-Loader.html and RTFM (Read The Fine Manual).
If you want to install Linux to co-exist with NT, or you've elected to use the Boot Magic boot manager tool that ships with the retail version of OpenLinux, install the boot loader to the Target Partition (your Linux root partition).
Note
If you make a mistake and write to the MBR when you did not intend to, all is not lost. First, continue with your installation and make sure to create the OpenLinux Rescue Disk. Then, when the install is finished and the first boot is completed, shut down your machine using the Shutdown button from the login screen. Reboot using a Windows or DOS boot floppy containing the fdisk utility. At the DOS prompt, typefdisk /MBR. This returns the MBR to a pristine state and allows your prior default OS to boot normally. Then you can install a third-party boot manager, or simply use the Rescue Floppy to boot into your OpenLinux installation.
To recap, if dual booting with Windows NT, or using a third-party boot manager, then write the boot loader to the Target Partition. Most frequently, however, the boot loader should be installed to the MBR. If it appears that our instructions contradict the installation routine, that's because we want you to get it right the first time. Once this step is done, everything else is easy!
Next comes the sound card setup, illustrated in Figure 3-27. If you have a sound card in your system, now's the time to exercise it a little bit. Bear in mind that default sound support in GNU/Linux is really just beginning to gain momentum. Check the hardware compatibility list to see if your card is supported. If not, it will probably default to some basic level of Sound Blaster emulation and allow for a modicum of noise from the machine. The latest-greatest ultra-whiz-bang sound card, supporting a 47234 voice wave table with symphonic ultra-midi overtones, all run by the hottest, latest DSP chip probably isn't going to work under Linux as it would under Windows.
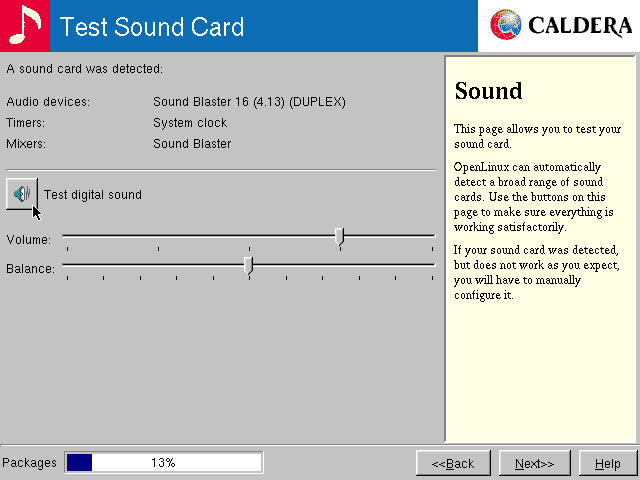
Figure 3-27
Test Sound Card
Click on any buttons you see to hear the various output tones and other warblings and associated transliterated insect noises. You can't set the hardware here, only test what the installer thinks it found. Thankfully, the installer does a pretty good job of detecting supported hardware.
Next, you're escorted to the printer setup section, shown in Figure 3-28. There are a multitude of printers supported under Linux. The kicker is installing the right print filter software to ensure that the data sent to the printer looks like it should when it reaches the page. This software is not nearly as complex as the printer drivers that are installed to operate a printer in other OS environments, but the printer must be properly identified or the output quality will vary between problematic and garbage.
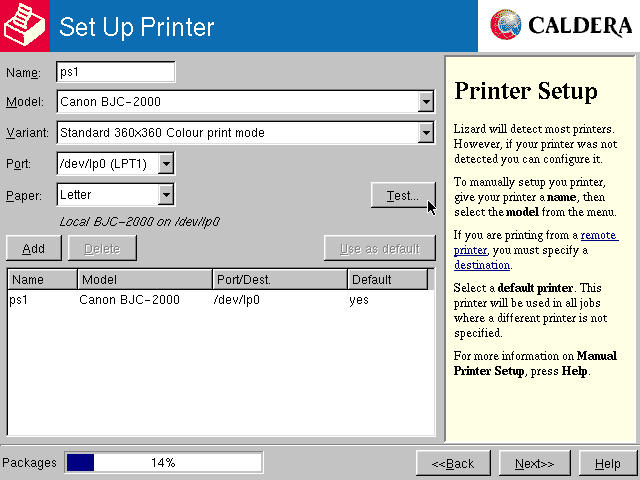
Figure 3-28
Choosing and configuring a printer from the Set Up Printer screen
The good news is that OpenLinux has the best printer identification schemes around for installation of local devices, and the largest set of printer filters we've experienced. For example, Figure 3-28 shows the Canon BJC-2000 printer as being automatically detected. This printer is still not supported by default in other distributions' latest versions. There are several other examples - look to the HCL for your model to be sure. Use the test feature to ensure that your output and connectivity work properly.
Now it's time to tell the computer where it is and how to keep time, as shown in Figure 3-29. The graphical time zone picker in the Choose Time Zone screen is complemented by a drop-down list that allows you to choose from the same data. The purpose of this screen is to define which time zone your system is operating in, and more specifically, what daylight savings rules are pertinent to this location.
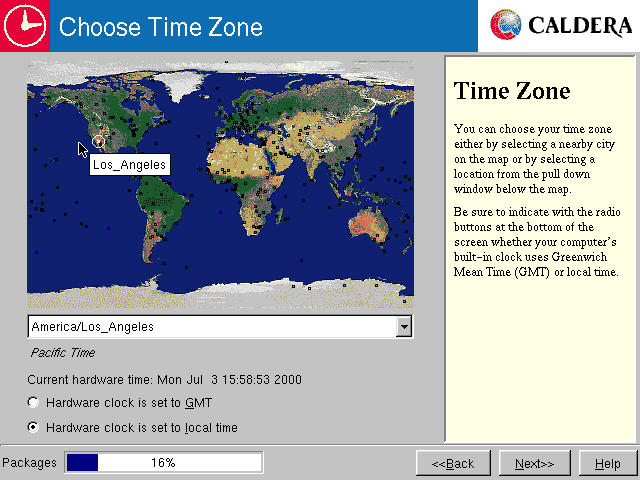
Figure 3-29
Chose Time Zone: graphic or pull-down list choices
The Hardware clock radio buttons allow you to choose between your CMOS clock running Greenwich Mean Time (GMT), which is now known as UTC or Universal Coordinated Time, and local time. Many Unix and Linux boxes run on UTC and display a corrected local time to the user and applications. For servers that are Internet-connected, this is especially true, since time coordination is important for many different aspects of network communication.
On the other hand, machines that dual boot with Windows or another OS should have their hardware clocks left in local time, since the other OS is often counting on that data in that format. For stand-alone OpenLinux workstation configurations, it's your call, but we'd recommend going to UTC (GMT).
Once the previous step is done, nearly everything is complete, except for package installation and post-installation. To help you while away the remaining minutes, there's Entertainment, shown in Figure 3-30.
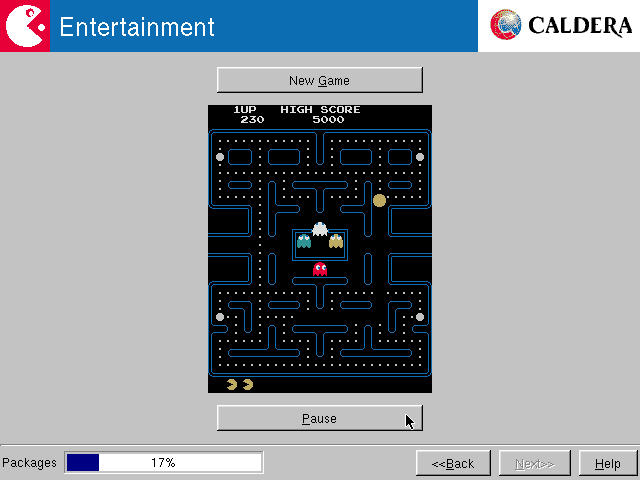
Figure 3-30
Entertainment: A familiar arcade game.
Should you be unfortunate and not have this book in front of you while installation is progressing, then a quick video game provides just the right amount of distraction. Pacman is the choice of the eDesktop package. The eServer installation routine provides a version of Tetris. We offer no assistance or guidance for this stage of the install.
While you play (or read), the packages continue to install. Once the progress bar reaches 100%, then post-installation tasks begin, and a fresh progress bar appears. This second phase of installation generally only runs for three to five minutes, perhaps a little more on older hardware (it's just about five minutes even on PII-200, as a benchmark).
When the post-install stage is complete, progress via the Next button to the Rescue Disk screen, depicted in Figure 3-31. Don't skip this step. Really. Create a rescue disk. In fact, create two; it can't hurt to have a backup, and floppy disks are cheap. A rescue disk will enable you to boot into your OpenLinux system if the boot partition becomes corrupted or other similar problems come up. These are very rare, as hardware is much more reliable than it was even just a few years ago. Better safe than sorry, though.

Figure 3-31
Rescue Disk: a very good idea.
Hurrah! Observe that a new recruit has filled the position of the Next button: Finish. Selecting Finish completes the installation and drops you back into the system startup screen that we left behind about 45 minutes ago, as shown in Figure 3-32.
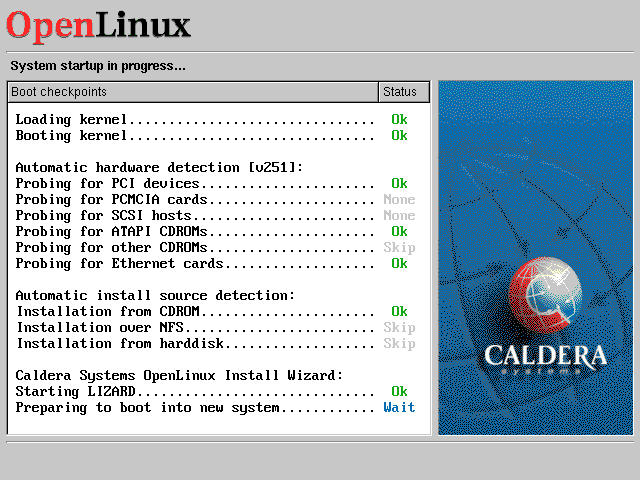
Figure 3-32
OpenLinux - System startup in progress...Performing the First Boot.
The first system boot works like a champ, every time. This is due to the fact that you're booting from a running system. This is not quite identical to the boot process you'll see in the future. This is especially true in those situations involving dual- or multi-boot. Now you're just booting into the freshly installed OpenLinux, which leads quickly to the graphical login screen pictured in Figure 3-33.
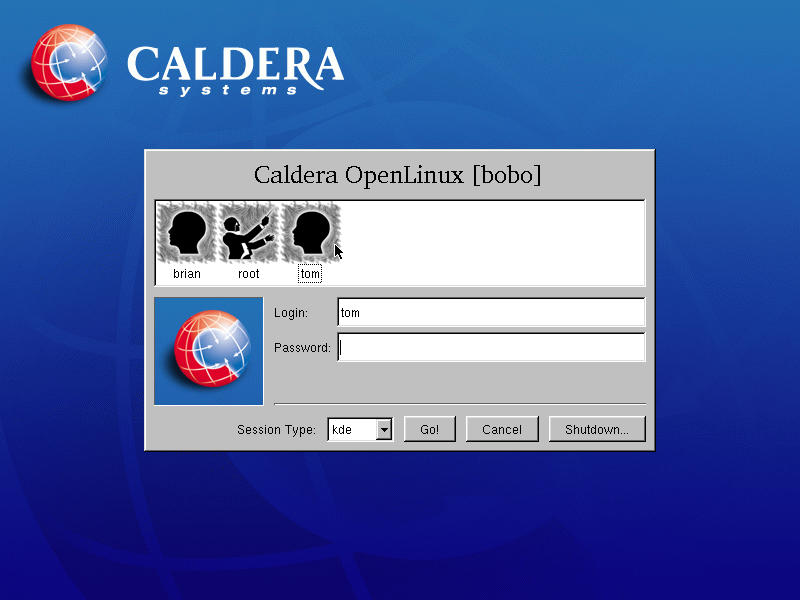
Figure 3-33
KDE Login Screen, Caldera-style
Here we have the Login dialog box displayed on the default Caldera background. The dialog box does not scale with display resolution, so takes up a disproportionate amount of real estate in the 600x800 screen we've captured for your benefit.
Login names may be entered via the keyboard or the username may be graphically entered by clicking on the appropriate user icon. The password you chose must be typed in and cannot be saved (that is, memorized). Aside from direct console access, there is no getting into Linux without entering your password. Period.
After you login, it's time to do an initial tour of the various configuration tools and do a first pass security audit before you connect to the outer world via the Internet.
When you log into OpenLinux for the first time, either as a regular user or as root, you are presented with two open windows: the KDE File Manager (kfm) view of your home directory, and the KDE Setup Wizard shown in Figure 3-34. The wizard allows you to setup a variety of features for your GUI environment quickly and easily.
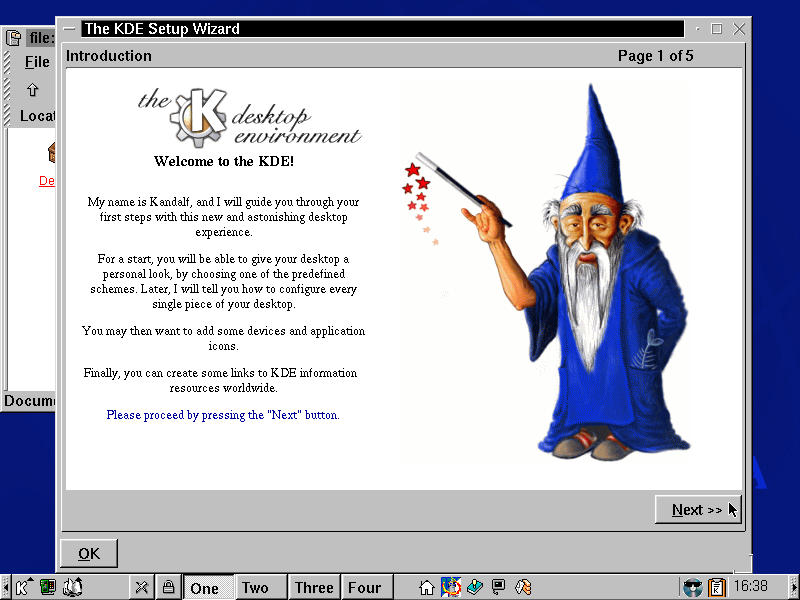
Figure 3-34
KDE Desktop & the setup wizard
Kandalf is the KDE Setup Wizard. A brief glance to the upper right corner of the Setup Wizard dialog box let's us know there are four steps to go. The first, shown, is merely introductory but well worth reading. The other steps to KDE initial setup are as follows:
The KDE Setup Wizard may be re-run at any time by navigating the taskbar menus K --> System --> KDE Configuration Wizard. Complete the dialog box by selecting OK.
In some circles, a system daemon is a service that provides one or more features for networked connectivity, from FTP, to mail, Web serving, and much, much more. In other, more pragmatic terms, these are referred to as holes. If you want to run a service that exposes your system to the Internet, you should learn about it, understand how to track security updates, and generally keep up with the housekeeping. If you aren't using a service or don't need it, disable it.
To have a look at the various services that start up running in an All Packages installation of OpenLinux eDesktop 2.4, we are going to use one of the COAS (Caldera Open Administration System) tools. To get to this utility, the menu path is K --> Settings --> COAS --> System --> Daemons. When you select this or any COAS utility item, if you are logged in as a normal user, KDE pops up with a small dialog box requesting the root password. System administrator privileges are required to make these types of modifications to a Linux system. After you have entered the root password, the requested COAS tool is displayed; in this case the System Services dialog box, as shown in Figure 3-35.
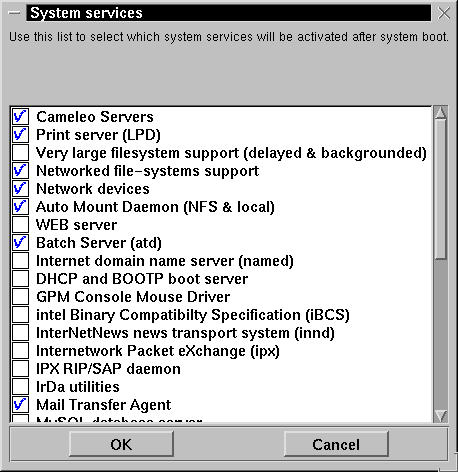
Figure 3-35
System Services dialog, a part of COAS
The good news is that unlike some other distributions, very few of the major daemons are enabled by default. We provide here a list of all the services, with our suggestion for each as well as a short commentary. Each service listed as required in Table 3-4 should still be checked when you are done with this dialog box. If you have other needs, feel free to make changes by adding services. The descriptions explain if the daemon is optional.
Table 3-4
The System Daemons according to COAS
| Daemon Name | Setup | Comments |
| Cameleo Server | Optional | This is the server portion of the Cameleo Light graphics editing and management tool. It doesn't hurt to have it running, but if you don't use the editor, then you should not waste system memory running the server. |
| Print server (LPD) | Customary | This is the UNIX printer daemon. If you're not going to print at all, either locally or through network, then it's unnecessary; otherwise leave it in. |
| Very large filesystem support (delayed and backgrounded) | Optional | Also known as "bigfs", this service provides the capability of delaying the filesystem check and read/write mount for large volumes (greater that 4 GB). The purpose is to boot up to a running system faster. The drawback is that large volumes won't be mounted until they've been checked. |
| Networked file-systems support | Optional | Netmount is a daemon to monitor and unmount unused network resources such as Samba and NFS mounted volumes. |
| Network Devices | Optional | If you have an Ethernet card in your system, either for a home network or DSL/Cable modem, then leave this checked. |
| Auto Mount Daemon (NFS & local) | Required | AMD is used to mount occasional use filesystems (like floppy, CD-ROM, and remote NFS). This daemon is required to make the floppy and CD-ROM icons on the graphical desktop function as advertised. |
| WEB server | Optional | This selection refers (currently) to the Apache httpd daemon. It is needed only if the system is to be an Internet or Intranet server. |
| Batch Server (atd) | Optional | atd is a service to monitor and execute jobs that are scheduled in the future (atd is the name of the daemon program which performs the batch server functions). All of the functionality of atd can be achieved with Cron, without quite the same ease of use. |
| Internet domain name server (named) | Optional | The named daemon provides DNS service. Enable it if needed, otherwise turn it off. |
| DHCP and BOOTP boot server | Optional | These daemons supply dynamic IP addresses and boot volumes respectively to network clients. |
| GPM Console Mouse driver | Optional | GPM provides text mode mouse support. |
| Intel Binary Compatibility Specification (iBCS) | Optional | iBCS enables binary emulation facilities, which allow executables from other UNIX systems such as BSD, SVR4, SVR3, SCO, and others to be run under Linux. |
| InterNetNews news transport system (innd) | Optional | innd provides news server functionality on Linux. |
| Internetwork Packet eXchange (ipx) | Optional | IPX is a networking protocol which is used in conjunction with Netware networks, and isn't needed unless running in a heterogeneous environment including Netware machines. |
| IPX RIP/SAP daemon | Optional | This generic network configuration daemon should be enabled if IPX is running. |
| IrDA utilities | Optional | Infrared Data Association networking utilities are fairly new, and only useful on boxes with an IR port. |
| Mail Transfer Agent | Optional | This controls an MTA (currently Sendmail). Used commonly in a network of Unix boxes, or in a mail server role. |
| MySQL database server | Optional | MySQL provides much ODBC compliant functionality to the OpenLinux environment. |
| AppleTalk Services (atalk) | Optional | atalk is only required in connecting to a native AppleTalk network. It is not needed for Apple machines participating in a TCP/IP network. |
| Basic IP service dispatcher (inetd -- normally enabled) | Required | You should leave this service enabled unless you plan not to be connected to either the Internet or other computers (an unlikely event). This starts interfaces to the various TCP/IP functions that are part of the kernel. |
| BSD remote user info daemon | Optional | rusersd provides information about users that are logged into the system at the request of remote machines on the network. Not recommended. |
| rwall daemon | Optional | rwalld is a service for handling messaging all the users on a machine (or network) in one command. Not recommended. |
| BSD remote who daemon | Optional | This daemon (rwhod) offers the capability to provide extended user information (beyond account name) to remote requests. Not recommended. |
| NFS server | Optional | This server presents the capability to offer volumes (partitions) from the local machine for remote mounting by other systems on the network. Use this with care. |
| NIS - Network Information Service (client part) | Optional | NIS client is used when there is an NIS (aka YP or yellow pages) server elsewhere that needs to be accessed. Useful if necessary. |
| NIS - Network Information Service (server part) | Optional | NIS client is used when there is an NIS (aka YP or yellow pages) server elsewhere that needs to be accessed. NIS can be quite insecure - use with extreme caution and knowledge, or don't use it at all. |
| Netware Client | Optional | A client for Netware networks provided by Caldera. No longer actively maintained, this service provides real value for the Linux box running in a Netware environment. |
| Lightweight Directory Protocol (LDAP) Server | Optional | The OpenLDAP server provides a standards compliant directory service. Like all network services, configure and maintain with care, if used. |
| RPC portmapper (normally enabled) | Optional | RPC is a service providing dynamic port registration and local execution of remote commands for network clients. Useful if you are going to allow r**** (such as rwho, etc.) calls to be made to your box. If you don't need it, dump it. |
| Remote kernel statistics server | Optional | rstatd will query a remote server and log statistics about the remote machine locally. Normally not needed. |
| SMB server processes (samba) | Optional | Samba is used to provide SMB resources (file and print services) to Windows and Samba clients. Not recommended on a box directly connected to the internet without careful configuration. |
| System loggers | Required | Writes system events, errors, and messages to a variety of log files. |
| Cron daemon | Required | Cron monitors and executes repeating scheduled jobs. |
| Web-based administration | Optional | This selection enables the Webmin server, allowing network access to the system configuring functionality of this product. Not recommended, as you can start it dynamically when necessary. If you run this, configure it to authorize for local host only. |
| Network Time Protocol Client/Server | Optional | ntp and ntpd are used to keep network computers time synchronized. These should be properly configured and enabled for server boxes, especially mail servers and transaction processing machines where time stamps are of greater import. |
Now we'll head over and turn off some of the services that are run from /etc/inetd.conf. If you are not currently running as the root user, then log out of the system: K --> Logout (located at the bottom of the menu, accompanied by a stylized "X"). Then log back in as root, and terminate the KDE Wizard program if it comes up. Open the Text Editor program by selecting K --> Editors --> Text Editor, then from the window, File --> Open. The file open dialog box has a variety of fields in it. Fill out the Location box with /etc/inetd.conf and click OK. This opens the inetd.conf file for editing, as shown in Figure 3-36.
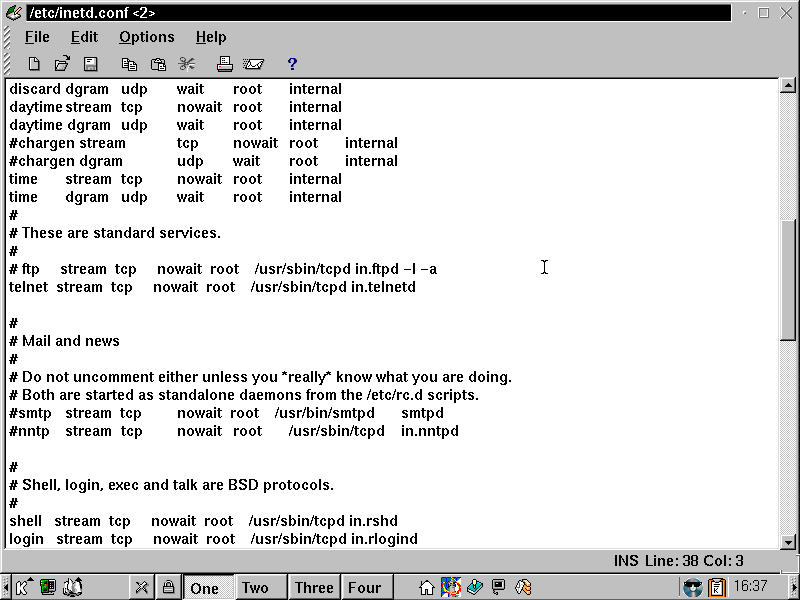
Figure 3-36
Text Editor with /etc/inetd.conf opened for editing
As you can see by glancing through the file, there are a variety of services started and monitored by the inetd daemon. We'll discuss the merits and advisability of these services in Part VI of this book; for now we simply want to help you shut anything down you do not absolutely need.Note the lines beginning with ftp and telnet in the middle of Figure 3-36. FTP has been disabled (commented out) by putting a pound symbol (#) at the beginning of the line. Telnet is still enabled. In order to shut down all of the services that inetd runs, comment out all the lines in this file. Then save the file (click on the Disk icon below the menu bar) and exit the editor.
Although a reboot is not necessary to activate the changes just made, we are going to execute one now to demonstrate the final booting configuration of the machine we set up during this chapter.
If instead you wish to keep working, open a terminal window (K --> Utilities --> Terminal). You should see a root prompt similar to the following example. Type the commands shown to restart inetd with the changes in place.
[root@machine root] # /etc/rc.d/init.d/inet restart
Reboot the machine by logging out from the current session, as discussed previously. Then select Shutdown from the login dialog box. In the resulting Shutdown or Restart sub-dialog box, choose the "Shutdown and restart" radio button and click OK. When the system reboots and the POST (Power On Self-Test) sequence completes, the Grub bootloader screen is displayed as shown in Figure 3-37.
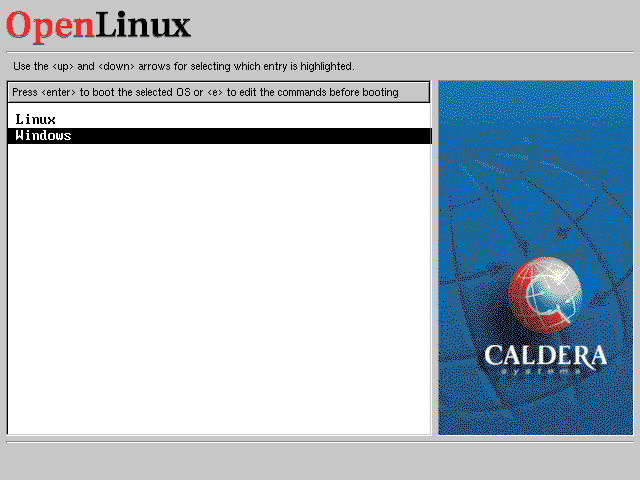
Figure 3-37
Grub bootloader offers Linux or Windows boot choices.
Odds are everything has run correctly and you are now the proud owner of a running OpenLinux system. If you don't see what you think you expect, then proceed to Chapter 5 (Installation Troubleshooting) to get a helping hand.
The OpenLinux Lizard, especially the most recent version that ships with eDesktop 2.4, is a top notch Linux installer. It requires that you know more and participate more than a comparable installation of Windows. It is, however, considerably simpler than similar tools of even a year ago. There are a variety of decision points that affect the final shape of your OpenLinux installation. The installer documents most of these fairly well in its sidebar help. In this chapter, we have provided the balance of the information necessary to ensure that your Linux installation is a resounding success. This chapter covered the following points:
fdisk /MBR at the command prompt.Go to the Table Of Contents