
Email Brian
Brian's Website


Email Tom
Tom's Website
|
Email Brian Brian's Website |
|
Email Tom Tom's Website |
Did you read the Preface? Thanks!
While Chapter 13 addressed managing your OpenLinux system from the graphical tools perspective, now it's time to pop the hood and get grease under your fingernails as we show you the files and features that the GUI tools keep hidden. System management is the privilege and responsibility of one or more GNU/Linux owners, typically called the "superuser," "root," achieved either by logging in as root, or typing su.
The root user is the administrator of a GNU/Linux system. If you are the sole owner and user, guess what? This makes you "Lord and Master of all the Land." Don't worry about it. This is actually fairly easy stuff we're going to show you. There are three secrets to effective system administration:
The last two items are unveiled in the next section. However, with the first, there is a bit of a challenge. We catch ourselves rebooting unnecessarily, from time to time. Of course, there is an exception. The Linux kernel is the conductor of the carefully orchestrated dance of disks, memory, processes, and display. If you modify the kernel or some of the modules compiled for use by the kernel, then a reboot is required in order to effect the changes.
When making system configuration changes, you will be modifying files that are in areas that only the root user has write access to. The purpose of having privileged files and directories is security. While there aren't any Linux viruses to speak of at the moment, there may be one written at any time. When the moment comes that you receive a "Linux virus" by e-mail, and it goes forth to damage your system, you will be glad that the horrid thing can't write to any areas that you don't have access to as a normal user.
The other reason for spending most of your computing time as a "normal" user is that as root user, you have read, write, and execute permissions over your entire system. A command such as rm -rf /*, issued by the root user, results in a blank filesystem and a dead box (that command translates to remove, recursively down the directory tree and by force, all files). The only time you should operate in superuser mode is when system administration responsibilities require it. Then type once and read twice before executing commands that involve permanent actions like rm.
To become the superuser, log in as root to one of the allowed system consoles (generally tty1 through tty8; this is set in /etc/securetty). More commonly, from a terminal or console where you are already logged in as a normal user, invoke the su command.
[bilbrey@grinch bilbrey]$ su
Password: root_password

[root@grinch bilbrey]#
In the preceding example, typing su without argument results in an immediate prompt for the root user password. If successfully entered, then the user is working as root. If the password is entered improperly, the message "su: incorrect password" (or something similar) is displayed, and you are returned to a user command prompt.
Note
Alternatively, typingsu -executes a login shell, rather than a sub-shell. The difference here is that the full root environment, including any /root/.bashrc directives are sourced into the shell. This is less necessary now, because a plain su does correctly set the root$PATHshell variable to include the sbin directories.
Following successful root login, observe that the user prompt has changed (from "bilbrey@grinch" to "root@grinch") and that the prompt character itself changes from '$' to '#'. On some Unix systems, the character prompt may be the only indication that you are superuser. For the root user, ASCII (text) configuration files are the tools of change. Services and system behavior are controlled via these files, listed in the following section, and described in some detail throughout this chapter.
The home for system specific configuration files defaults to /etc. There are about 200 configuration files and sub-directories. Many of these are documented with manual pages. For a listing of all the configuration file manpages, type ls /usr/man/man5 in a terminal window. In Table 19-1, we catalog some of the more prominent configuration files found in the /etc directory, along with a description of the services they control. This table will be an invaluable tool in troubleshooting your system should it become necessary.
Table 19-1
Selected Configuration Files
| Location/File | Description |
/etc/HOSTNAME |
Contains the name of the system host, as entered during system installation, duplicates the value as found in /etc/system.cnf. |
/etc/XF86Config |
Controls keyboard, mouse, and display interaction with the X Server. May also be found in /etc/X11/ |
/etc/aliases |
Aliases file for use with sendmail |
/etc/config.d/shells/bashrc |
bash configuration items referenced by all users |
/etc/cron.d/* |
Sub-directory where system cron jobs are defined in files like Hourly, Daily, and more (distribution specific) |
/etc/crontab |
System crontab file that calls the scripts located in /etc/cron.d/ |
/etc/dhcpd.conf |
DHCP server configuration file |
/etc/filesystems |
List of the filesystems that are tried when storage media like floppies are mounted in auto mode |
/etc/fstab |
Table of partitions to be mounted, floppy and CD-ROM drives as well as system-only partitions such as /proc |
/etc/ftpaccess |
List of actions and command privileges for various user types during FTP accesses |
/etc/ftphosts |
Allowed FTP user/host combinations if FTP runs independent of the inetd super server |
/etc/group |
File associating groups, passwords, IDs, and users |
/etc/grub.conf |
Configuration file for the GRUB boot loader |
/etc/host.conf |
Specific to hosts on a LAN, directs the system in order of operations to resolve host name to IP addresses, also some security features are implemented here |
/etc/hosts |
Local listing of known hosts, used mostly in very small static network settings |
/etc/hosts.allow |
Along with hosts.deny, coordinates the IP network services access privileges - commonly called TCP Wrappers. Service/user@host pairs listed here are explicitly allowed |
/etc/hosts.deny |
Along with hosts.allow, coordinates the IP network services access privileges. Service/user@host pairs listed here are explicitly denied access |
/etc/hosts.lpd |
Configures external hosts allowed to print on local printer |
/etc/inetd.conf |
Listing of services available (monitored and access-controlled) through the inetd TCP/IP super server |
/etc/inittab |
Script that controls initial system startup processes |
/etc/ld.so.conf |
Libraries (shared) that are registered and available for access by running programs. Works in conjunction with ldconfig |
/etc/lilo.conf |
Configuration file for the lilo boot loader |
/etc/localtime |
Configuration symbolic link to the timezone info file located in /usr/share/zoneinfo/ |
/etc/config.d/logrotate |
Specifies details for rotation of system logs |
/etc/modules.conf |
Lists kernel modules and aliases to be active at system boot |
/etc/named.conf |
Configuration file for named, the BIND DNS server |
/etc/ntp.conf |
Config file for the xntpd network time daemon |
/etc/passwd |
Lists system user information, though usually not passwords (when shadow passwords are implemented) |
/etc/printcap |
Holds local and remote printer definitions |
/etc/resolv.conf |
DNS setup file, specify search domains and name servers |
/etc/securetty |
List of devices upon which root is allowed to login to directly |
/etc/security/* |
Files to configure usage and limits for users |
/etc/shells |
List of shells available on local system |
/etc/syslog.conf |
Configures message types and logfile locations. |
In Table 19-1, we show the locations of these files as installed in OpenLinux 2.4. With new versions or in other distributions these locations might differ, with some configuration files in sub-directories of /etc and others directly in /etc.
This is one of the issues that the Filesystem Hierarchy Standard (FHS, currently at version 2.1) project is designed to address. With configuration files in disparate locations, third-party software has problems in configuration and operation. Information on the FHS specification is found at http://www.pathname.com/fhs/. In the interim, if you can't find a configuration file, use the locate command to help in the search:
[bilbrey@grinch bilbrey]$ locate syslog.conf
/etc/syslog.conf
/usr/man/man5/syslog.conf.5.gz
The preceding example returns the location of the configuration file and the location of the manual page for syslog.conf. Other searches yield lots of results - tacking an auxiliary grep command on the output of the locate helps in such situations:
[bilbrey@grinch bilbrey]$ locate XF86Config | grep etc
/etc/XF86Config
Adding the | grep etc to the end of the locate command isolates the one result shown from a total of 7 different files incorporating the string "XF86Config" (when run on a freshly installed OpenLinux 2.4 system, your mileage may vary).
Chances are you set up OpenLinux using the Lizard GUI installation utility. As discussed in Chapter 3, there are a variety of paths through the installer, most of which insulate the user from the intricacies of disk and partition management. In Chapter 13, we touched on disk operations using Webmin, the open-source browser-enabled tool for system management that is packaged with Caldera's product line. In this section, we delve into the nitty-gritty details of disk and partition management without graphics. Let's start with the physical details.
Hard drives come in two basic flavors: IDE and SCSI. IDE is by far the more common type of drive. IDE is the acronym for Integrated Drive Electronics, basically a statement that the controller electronics is incorporated onto each drive. ATA (and variations), seen in close proximity to IDE, refers to the data bus interface, AT Attachment. There are a few standards, and many marketing terms that seem designed to confuse the unwary disk buyer. A good reference to the acronym mania about IDE drives is found at http://www.pcguide.com/ref/hdd/if/ide/. For the most part, recent drives and recent motherboards work together just fine, though it's always a good idea to read the motherboard interface specifications prior to purchase. Linux recognizes every IDE drive that we've heard of.
SCSI (Small Computer Systems Interface) is considered a more "professional" or commercial grade of disk and interface. The drives are usually more expensive, require an additional add-in controller card, and are regarded as more reliable. SCSI is suitable for high speed, high availability environments, and is commonly used in RAID configurations (Redundant Arrays of Inexpensive Disks). If your budget can stand it, then SCSI is a good choice. Make sure to coordinate drive and controller specifications though, as there are several standards. Additionally, make sure that the controller you choose is supported by the Linux distribution chosen (http://www.calderasystems.com/support/hardware/ for Caldera products).
Coming from the DOS/Windows side of the fence, formatting is a procedure undertaken to prepare for writing data to a medium, whether floppy or hard disk. Some of us remember the low-level formatting that was required to really make a MFM or RLL hard disk like new, back in the good old days of 5MB or 10MB hard disks in external enclosures.
In the interests of precision, we'll re-define a few terms here. Formatting is really low-level formatting, done for the purposes of testing the media, laying down the magnetic markers on the media to set up tracks (cylinders) and sectors in preparation for steps two and three.
While we can and do format floppies, hard disks (both IDE and SCSI) in this day and age are low-level formatted at the factory, and ought not be mucked with by ordinary mortals like us. That said, some drive manufacturers do supply bootable floppies that provide diagnostic and low-level formatting capabilities. When making use of these tools, we recommend reading the directions at least three times, then stopping and taking a nice long nap prior to running them. Mistakes in low-level formatting can be difficult to recover from.
Partitioning (aka, step two) is generally only practiced on hard disks (or "spindles"). Breaking up a floppy into chunks of a usable size seems rather . . . silly. For hard drives, there are a number of reasons for partitioning a drive into a number of virtual storage areas when using GNU/Linux. The fundamental text-mode tool for partitioning disks is called cfdisk.
The third and final step in creating a filesystem is the process of writing the file directory structures and housekeeping records (in Linux terms, inode tables and superblocks). The mkfs utility is used to build a filesystem on a prepared partition.
In order to demonstrate these steps, and the tools GNU/Linux makes available on the command line, we are going to supplement an OpenLinux installation with an additional 2GB hard drive. The process is really quite easy.
Strongly Recommended
Ensure that data you cannot afford to lose is backed up. Working as root on partitions and filesystems has the potential to wipe your drives clean. Be careful and learn. Maybe that sounded a little stern. Make mistakes and learn from them - we have, and do.
A safe assumption is that a kitchen sink (as in "Everything but...") install of the non-commercial packages from a recent OpenLinux distribution takes approximately 1.8GB of hard disk space. We intend to press the new 2GB space into service in two ways. We'll add a dedicated /usr/local partition, and a fresh /home.
Shut down your system properly by using the shutdown (halt) button from the login panel for KDE, or as root, type shutdown -h now. When the operating system has finished trundling, it may shut off the system itself. If not, look for a "System Halted" message or an equivalent prior to powering off the box.
Install the hard disk following the instructions for your system and drive. If this drive will be dedicated to Linux, then do not follow any of the Windows software installation directions - just physically install the drive and we'll help you from there on.
After powering up the system, login as a normal user, then su to root (or login as root). Next, from a terminal window or virtual console, type telinit 1. This shuts down multiuser mode and the networking functions. Then the system restarts in single user mode. For the ultra paranoid, create a file called /etc/nologin (containing whatever text you want). This prevents any possible user logins while you're mucking about with the filesystem.
First order of business is to confirm that the installed physical drive corresponds to a specific device file in /dev. Looking at the fstab (type cat /etc/fstab) confirms that the original HD is located on /dev/hda (in this system), and the CD is on /dev/hdc. As we progress through this section, we'll only use the "/dev" portion of the device names as necessary.
That leaves hdb and hdd as possible locations for the recently installed drive. If you installed on the primary IDE channel, then hdb is the right one. To confirm its location, we need to have a look at the messages that the system displayed during boot. Type less /var/log/messages, then press G , to get to the end of the file.
Then page back up a little bit, looking for lines to do with the hard disks and the drive channel locations, like those highlighted in Figure 19-1. In the messages logfile shown, the second drive is on hdb. Of course, this 14.6GB Maxtor is a little larger than our hypothetical 2GB drive. No two messages listings are the same - look for the similarities and try to avoid getting stuck on the differences.
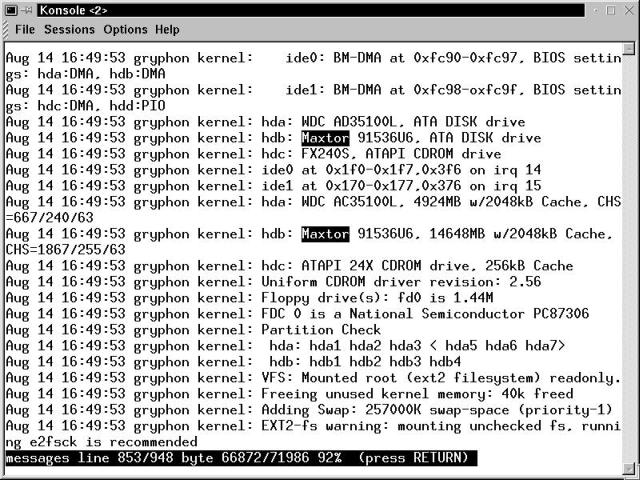
Figure 19-1
View of /var/log/messages after boot, showing drive to device mapping
In our hypothetical case, we have determined hdb is the IDE channel that is our new drive's home. This corresponds to a device file of /dev/hdb. To partition the drive, use the cfdisk command. Before running this powerful utility, have a look at the manual page. It calls cfdisk a "Curses based disk partition table manipulator for Linux." You might think, as we did, that curses were the correct response to using cfdisk incorrectly. In reality, curses relates to the terminal library used to control how the data is displayed on the screen. There are lots of handy warnings and vast quantities of information about partitions and hard drives to be had from the cfdisk manual page. Read it. Trust us: doing so is much better than reinstalling the operating system.
[root@bobo bilbrey]# cfdisk /dev/hdb
Be sure to run cfdisk with an argument of the full path and file name for the device file that represents your new drive. When the partitioning screen is displayed, it will look remarkably similar to Figure 19-2. This indicates you are starting with an empty drive. Navigate through the cfdisk screens with the Arrow keys.
Warning
If there are partitions already defined on your screen, then make sure you're working with the desired disk. If you are, then be careful - this is one of those "do it right, once" moments.
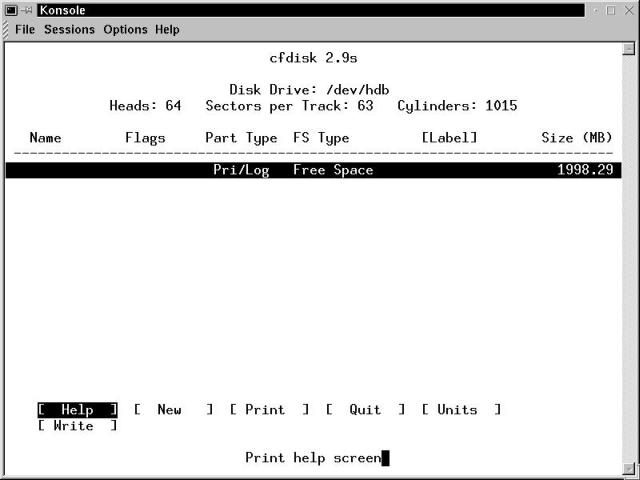
Figure 19-2
Partitioning a new drive - an initial view
There are only a few menu options available when the partition cursor (the wide black bar) is on free space. Help is mildly useful, especially in the context of having read the manual page. Print comes in handy later. We aren't Quitting just yet. Units default to size in megabytes, which is our preference. The Units menu item toggles from the default through cylinders and sectors and back to the default. Write is the key command, and we'll execute that last in the procedure.
Using New, we have the option to create primary or logical partitions. There can be up to four primary partitions on an IDE disk, or three primaries, and many more logical drives (set as "extended" partitions in one of the primaries).
After creating both partitions, our partitioning screen is shown in Figure 19-3, as we get ready to Write the partition table.
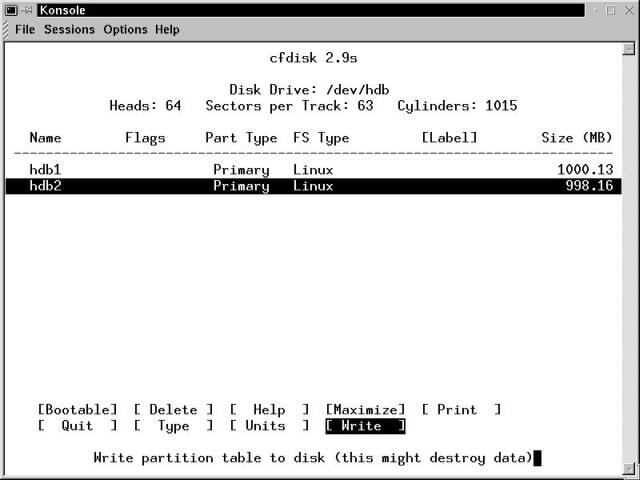
Figure 19-3
A partitioned drive, getting ready to write the partition table to disk
Linux doesn't need a bootable flag set in its partitions (and we aren't creating boot devices anyway, just data). The Delete item removes a defined partition, returning that space to the free amount.
Extra Information
The partition table of a disk is written to the first sector of the first track of the first head on a disk. The rest of the first track is unused, which wastes some space, usually in the tens of kilobytes. To recover this space, the first primary partition on a drive can be maximized. This also sets the flag NC, which indicates specifically that this drive is not compatible with DOS or OS/2. Given modern drive sizes, we don't recommend maximize.
Print can be used at this point to document the partition setup for your log file (you do log system changes and information, don't you?). Linux recognizes at least 73 different types and dialects of filesystem, from various native Linux formats through several different Microsoft formats. These may be selected at partition time. Most commonly, however, Type is used to select whether a partition is going to be Linux native, or Linux swap.
Since we're about to commit the partition table to disk, give everything one more good, hard look. Writing a new partition table to the wrong drive is like throwing your first great longhand novel into the blast furnace. All previous data is history. Of course, we're perfectly calm at moments like this, having re-installed our systems enough times that we can do so in our sleep.
Write prompts for an explicit, fully typed out "yes" or "no" answer prior to committing changes to disk. Then, confusingly, cfdisk returns, telling you there is no bootable partition and that a DOS MBR cannot boot this disk. Fine. Since we aren't building a partition that has to boot DOS or any of its relatives, we don't care about this warning. Quit from cfdisk. The terminal window refreshes, displays a warning that the disk has changed, please reboot to correctly read the partition table, and returns a command prompt. Reboot as directed.
mkfs is a front-end utility, a program designed to provide a consistent interface to a variety of file system-specific utilities. In default operation, mkfs builds Linux native file systems (Extended 2 File System, aka ext2). Alternatively, you can directly execute mke2fs, the filesystem tool that mkfs calls for building Linux native file systems.
mkfs - Build a Linux file system
Usage : mkfs [options ...] filesys
|
|
-V |
Verbose output from mkfs, not generally used |
-t fstype |
If present, specify file system type, default to ext2 (current as of this writing), type man mkfs for details. |
-c |
Check device for bad blocks prior to building file system |
-l filename |
Read a list of bad blocks from filename |
-v |
Verbose output from the called file system build program |
filesys |
Either the device name (for example, /dev/hdb) or the mount point (for example, /home, if the mount point is defined in /etc/fstab) |
Now let's look at the example (below). In the building of ext2 on /dev/hdb1, we create a stock filesystem. In the second call, we take advantage of a special feature of the underlying mke2fs utility to cut down the number of superblock backup copies. We'll discuss that in more detail after mounting the partitions. To build the ext2 partitions, execute the following as root (commands and output captured with the script command):
[root@bobo bilbrey]$ mkfs -c /dev/hdb1
mke2fs 1.14, 9-Jan-1999 for EXT2 FS 0.5b, 95/08/09
warning: 95 blocks unused.

Linux ext2 filesystem format
Filesystem label=
257000 inodes, 1024001 blocks
51204 blocks (5.00%) reserved for the super user
First data block=1
Block size=1024 (log=0)
Fragment size=1024 (log=0)
125 block groups
8192 blocks per group, 8192 fragments per group
2056 inodes per group
Superblock backups stored on blocks:
8193, 16385, 24577, 32769, 40961, 49153, 57345, 65537, 73729, 81921,
90113, 98305, 106497, 114689, 122881, 131073, 139265, 147457, 155649,
163841, 172033, 180225, 188417, 196609, 204801, 212993, 221185, 229377,
237569, 245761, 253953, 262145, 270337, 278529, 286721, 294913, 303105,
311297, 319489, 327681, 335873, 344065, 352257, 360449, 368641, 376833,
385025, 393217, 401409, 409601, 417793, 425985, 434177, 442369, 450561,
458753, 466945, 475137, 483329, 491521, 499713, 507905, 516097, 524289,
532481, 540673, 548865, 557057, 565249, 573441, 581633, 589825, 598017,
606209, 614401, 622593, 630785, 638977, 647169, 655361, 663553, 671745,
679937, 688129, 696321, 704513, 712705, 720897, 729089, 737281, 745473,
753665, 761857, 770049, 778241, 786433, 794625, 802817, 811009, 819201,
827393, 835585, 843777, 851969, 860161, 868353, 876545, 884737, 892929,
901121, 909313, 917505, 925697, 933889, 942081, 950273, 958465, 966657,
974849, 983041, 991233, 999425, 1007617, 1015809

Checking for bad blocks (read-only test):   0/  1024001
Checking for bad blocks (read-only test):   done
Writing superblocks and filesystem accounting information: done

[root@bobo bilbrey]$ mkfs -c -s 1 /dev/hdb2
mke2fs 1.14, 9-Jan-1999 for EXT2 FS 0.5b, 95/08/09
Linux ext2 filesystem format
Filesystem label=
256000 inodes, 1022112 blocks
51105 blocks (5.00%) reserved for the super user
First data block=1
Block size=1024 (log=0)
Fragment size=1024 (log=0)
125 block groups
8192 blocks per group, 8192 fragments per group
2048 inodes per group
Superblock backups stored on blocks:
	8193, 24577, 40961, 57345, 73729, 204801, 221185, 401409, 663553,

Checking for bad blocks (read-only test):   0/  1022112
Checking for bad blocks (read-only test):   done
Writing inode tables:   0/125
Writing inode tables:   done
Writing superblocks and filesystem accounting information: done
For a single data point, we can tell you that checking for bad blocks adds about 30 seconds per gigabyte in run time on our 7200 RPM IDE drives. Additional information can be gleaned from the displayed output. Clearly there's a lot of overhead in building a file system. 5 percent of the drive's free space is allocated automatically to root. This is necessary, since a full drive is a problem that only the root user can solve, and a little headroom on the partition is a good thing (see "Disk maintenance commands", below). Inode counts tell you how many files can be created on the partition: just over a quarter million in each 1GB file system.
Extra Information
Shown in the second part of the example, we used the -s 1 flag when generating the file system for hdb2. Given that hard drives are generally very reliable, using the sparse-superblocks option is as safe as not using it. Several distributions use sparse superblocks by default. When we checked the available space of the mounted drives, discounting the 5 percent root reserve and normalizing the partition sizes, using the -s 1 option saved 7.5MB or nearly 20 percent of the filesystem overhead. Recommended for use in conjunction with 2.2 kernels and up.
Nothing left now but a little mopping up. Create a couple of temporary mount points for the new partitions in /mnt:
[root@bobo bilbrey]$ mkdir /mnt/temp1

[root@bobo bilbrey]$ mkdir /mnt/temp2
Then we'll mount the filesystems, move the data, create entries in /etc/fstab for the new addition, and finally remount the partitions in their permanent places. First, let's have a look at the syntax of the mount command:
mount - Mount a file system
Usage : mount [options ...] [-t fstype] [fs options] device | mount-point ...
|
|
-V |
Print mount program version and exit |
-h |
Print a help message |
-v |
Verbose mode |
-a |
Mount all listed filesystems in /etc/fstab |
-f |
Fake the actual mount - used in conjunction with verbose for debugging purposes |
-n |
Don't write successful mount data in /etc/mtab |
-s |
Sloppy options accepted - used with the autofs automount system |
-r |
Mount named device as read-only |
-w |
Mount named device read-write (default) |
-t fstype |
Specify filesystem type (if mounting a partition not listed in fstab) |
fs options |
Pass through of options to the called file system utility |
See the mount manual page for more details and options. There are two common modes for mounting partitions. The following is one of the more common usages:
[root@bobo bilbrey]$ mount /mnt/cdrom
In this example, we're specifying a mount point that exists in the /etc/fstab file. All of the parameters necessary to mount the specific device at that mount point are given in the file. Simply giving the device or mount directory is sufficient for the mount command to do its work. In the second invocation, mount is being used to access a device that is not (yet) listed in the fstab file, as we are about to do:
[root@bobo bilbrey]$ mount -t ext2 /dev/hdb1 /mnt/temp1

[root@bobo bilbrey]$ mount -t ext2 /dev/hdb2 /mnt/temp2
In this case, we specify the type of file system being mounted, the device to be mounted, and the placement in the directory tree (which MUST exist, which is why we created the mount points previously). Executing mount without arguments displays a listing of the currently mounted devices, as shown here:
[root@bobo bilbrey]$ mount
/dev/hda1 on / type ext2 (rw)
devpts on /dev/pts type devpts (rw,gid=5,mode=620)
/proc on /proc type proc (rw)
/dev/hdb1 on /mnt/temp1 type ext2 (rw)
/dev/hdb2 on /mnt/temp2 type ext2 (rw)
Along with our current main partition (on /dev/hda1), we find a couple of system mounts: devpts, which is a collection of system devices known as pseudo-terminals (such as the pts/1 listing seen when running the who program); and proc, which is a virtual file system for storage of and access to the running kernel information. Last in the listing are the new partitions.
When copying data from one filesystem to another, there is one major factor to keep in mind: preserve permissions. If we simply move all of the data from the /home tree into the new partition parked on /mnt/temp1, then every file, every directory will be owned and operated by root. Not an optimal outcome for all of the user data, since normal users can't access objects owned by root. To preserve file permissions (and create a safety backup) use the tar command.
[root@bobo bilbrey]$ cd /home

[root@bobo home]$ tar cpf bhome.tar .
We change directories to the root of the home sub-tree (/home) and then execute the tar command. The options used are c to create the tar file, p to preserve file permissions, and f to write the tar output to the specified file, in this case bhome.tar. The period indicates that all of the contents of /home and its subdirectories are to be concatenated with their file information into the tar file. The next steps are to copy the tar file over to the root of the target directory (/mnt/temp1) then extract the contents of the file.
[root@bobo home]$ mv bhome.tar /mnt/temp1

[root@bobo home]$ cd /mnt/temp1

[root@bobo temp1]$ tar xpsf bhome.tar
Here, the tar options are x to specify that the requested operation is extraction, p to preserve permissions, s to preserve ownership, and f to specify the file. When the tar command is done running, the data is duplicated on the new partition.
Since the tar command operates by default on the STDIN and STDOUT streams, we can use this to perform a permission preserving transfer without writing to an intervening file. The trick is to tar up the contents of the current directory, and then extract the stream back into the target directory. Do this by running the extracting tar command in a sub-shell, following a cd target command. The && operator only allows the tar command to run if the first command (cd /mnt/temp2) is successful. This accomplishes all of the prior activity, in just two command lines:
[root@bobo temp1]$ cd /usr/local

[root@bobo local]$ tar cpf - .| (cd /mnt/temp2 && tar xpsf -)
Make a backup copy of, then edit the /etc/fstab file, adding the following lines (type man fstab for more details on entry syntax):
/dev/hdb1 /home /ext2 defaults 1 2
/dev/hdb2 /usr/local /ext2 defaults 1 2
The defaults part is an alias for standard mounting options for Linux filesystems, and the "1 2" is related to how the file system works with the dump and fsck commands, discussed below. cd to a neutral location, / for instance, after saving the revised fstab file,. Unmount the two new partitions from their temporary locations and remount them where they belong.
[root@bobo local]$ cd /

[root@bobo /]$ umount /mnt/temp1

[root@bobo /]$ umount /mnt/temp2

[root@bobo /]$ mount -a
Unmounting is accomplished using the umount program. [At least three different online references claim that umount lost its 'n' at a really good frat party sometime in the late '60s in Berkeley.] umount works using the data found in /etc/mtab, which is the system maintained file of actual, current partition mounts. See the system documentation for more details if you're interested. Lastly, we can invoke the -a option of the mount command to handle mounting both new partitions (/home and /usr/local) in their correct locations as we have just defined them in fstab.
Ever astute, you noticed that we didn't delete the old data yet. True. The new partitions are mounted right over the top of the old data. This way, if something has gone awry, we can simply demount the partitions, remove the entries from fstab, and get back to a known good setup. After exercising the system for a bit (hours to days), then demount the partitions and delete the underlying data, then remount the partitions. The job is complete.
There are a number of Linux programs that are explicitly used to perform maintenance on hard disk partitions. We'll examine fsck, sync, tune2fs, dumpe2fs, and debugfs with you. Additionally, we'll have a look in our crystal ball at the future of Linux filesystems, in the sidebar titled "Filesystems - The Next Generation" at the end of this section.
fsck is not just another four letter word (although it's often used in that manner)! It stands for File System ChecK. Alert: do not run fsck for fun on a partition that is mounted read-write. Partitions are checked at regular intervals (by count of system boots) during startup, as well as following an irregular shutdown. If the automatic fsck run during boot fails to fix a problem, the startup process diverts into single user mode, where partitions may be checked in a "safe" (as opposed to running) environment.
We do not recommend running fsck on a partition that is currently mounted, as the running kernel will not recognize changes made by fsck. Instead, manually unmount a partition, check it, and then remount it. To check the root partition, reboot your OpenLinux system into single user mode (see the upcoming section on Startup and Shutdown for details). Like mkfs, fsck is a front-end for a variety of file system specific utilities.
fsck in Safety
Instead of rebooting, you can drop to runlevel 1 (typetelinit 1), remount the root filesystems as readonly (typemount / -o remount,ro), and unmount all other filesystems, before doing disk maintenance.
fsck - Check and repair a Linux file system
Usage : fsck [options ...] [-t fstype] [fs options] device | mount-point ...
|
|
-A |
Check all the filesystems listed in /etc/fstab in one run |
-R |
Used with -A, skip root file system, if already mounted read-write |
-s |
Check multiple file systems in serial manner. Especially useful when running in interactive mode and checking on multiple spindles (physical drives) |
-V |
Verbose output, including file system specific commands |
-t fstype |
Specify filesystem type (if mounting a partition not listed in fstab) |
fs options |
Pass through of options to the called file system utility |
For an example, unmount the /usr/local partition created in the previous section, check it, and then remount the filesystem. Note that in the output of fsck, you can see the initialization and version information for the e2fsck program that is called by fsck to do the actual work.
[root@bobo root]$ umount /dev/hdb2

[root@bobo root]$ fsck -t ext2 /dev/hdb2
Parallelizing fsck version 1.14 (9-Jan-1999)
e2fsck 1.14, 9-Jan-1999 for EXT2FS 0.5b, 95/08/09
/dev/hdb2: clean, 2289/256000 files, 106179/1022112 blocks

[root@bobo root]$ mount /dev/hdb2
One of the methods that Linux uses to remain agile and responsive to user input is by buffering disk reads and writes. The disadvantage to this technique is that if power is lost, then user data can potentially vanish at the same moment, trapped forever in the limbo between the process writing to buffer, and the buffer committing to disk. This is why every reference we know of strongly recommends only shutting down the system via the shutdown command (discussed later in this chapter). One way to make sure that critical data is written to the disk is by using the sync utility, so named because it synchronizes the buffers with the disk(s).
sync - Flush file system buffers
Usage : sync [option]
|
|
--help |
Display brief help message and exit |
--version |
Display sync program version info and exit |
There's no point to a sync example - there isn't any output, it just works. An additional process to keep disks and memory reasonably in step is the update program (also known as bdflush). This program spawns processes to flush a percentage of dirty buffers at regular intervals. update is called during the system boot process, prior to checking or mounting any file systems in read-write mode. Details are available on the update manual page.
The first of several diagnostic and tune up commands explicitly directed at the e2fs file system (Linux Native), tune2fs is a program to adjust various filesystem parameters. As the manual page says, "Never use tune2fs to change parameters of a read/write mounted filesystem." The list of options reveals the various tunable features:
tune2fs - Adjust tunable filesystem parameters on second extended filesystems
Usage : tune2fs [options] device
|
|
-c max-count |
Change the interval between filesystem checks forced by max-count mounts (usually coincidental with boots) |
-e error-behavior |
Change kernel response relative to kernel errors, the options for error-behavior are continue, remount-ro, and panic; default response is panic |
-g group |
Make the 5 percent of reserved blocks available to group |
-i N[d | w | m] |
Independent of mount-count interval checks, specify time dependent filesystem checks, specify N with d for days, w for weeks, or m for months |
-l |
Display contents of device's superblock |
-m N |
Change amount of reserved blocks as N, an integer percentage of the whole filesystem |
-r N |
Change the amount of reserved blocks as an absolute count |
-s [0 | 1] |
Set (1) or unset (0) the sparse superblock flag (generally this is only specified when building the filesystem, we can't figure out why this is here) |
-u user |
Specify user who can use reserved blocks |
-C mount-count |
Directly modify the current mount count for device |
-L label |
Set a volume label of no more than 16 characters |
-M last-mounted |
Set the last-mounted directory for the filesystem |
-U UUID |
Set a new, null, or random UUID for the filesystem |
Example:
[root@bobo bilbrey]# umount /dev/hdb2

[root@bobo bilbrey]# tune2fs -L UserLocal /dev/hdb2
tune2fs 1.14, 9-Jan-1999 for EXT2 FS 0.5b, 95/08/09

[root@bobo bilbrey]# tune2fs -l /dev/hdb2
tune2fs 1.14, 9-Jan-1999 for EXT2 FS 0.5b, 95/08/09
Filesystem volume name:   UserLocal
Last mounted on:          <not available>
Filesystem UUID:          9fec59fc-2c5c-11d4-9986-0050568e0007
Filesystem magic number:  0xEF53
Filesystem revision #:    0 (original)
Filesystem features:      sparse_super
Filesystem state:         not clean
Errors behavior:          Continue
Filesystem OS type:       Linux
Inode count:              256000
Block count:              1022112
Reserved block count:     51105
Free blocks:              915933
Free inodes:              253711
First block:              1
Block size:               1024
Fragment size:            1024
Blocks per group:         8192
Fragments per group:      8192
Inodes per group:         2048
Inode blocks per group:   256
Last mount time:          Thu May 18 18:29:16 2000
Last write time:          Thu May 18 18:29:21 2000
Mount count:              2
Maximum mount count:      20
Last checked:             Thu May 18 17:07:38 2000
Check interval:           15552000 (6 months)
Next check after:         Tue Nov 14 16:07:38 2000
Reserved blocks uid:      0 (user root)
Reserved blocks gid:      0 (group root)
Hidden fstab Alternatives
In place of /dev/xxxx in /etc/fstab, use "LABEL=..." or "UUID=..." This specifies the entries in fstab in a device-independent way, allowing partitions to be mounted properly even if the physical device chain is altered. We found this information confirmed deep in the mount manual page following a lead from Linux developer Theodore T'so. Ted also confirms that this doesn't affect the requirement that your booting device be the drive 0, period. Labels won't help (and aren't used) in lilo.conf.
dumpe2fs displays a superset of the information presented by tune2fs -l. The extra data is composed of listings of block usage and status information by group. In this context, group means the groups of 8,192 disk blocks (usually disk blocks are 1K in size, leading to 8MB groups). Suggested usage for viewing the data is to type dumpe2fs device | less.
debugfs is a tool to allow access to raw data on block devices. One of the potential uses of this powerful and dangerous command is to "undelete" files. Space constraints prevent us from addressing this topic. We can point you to a good resource online, though: http://www.linuxdoc.org/HOWTO/mini/Ext2fs-Undeletion.html.
Sidebar :: Filesystems - The Next Generation
Now that 20-40GB hard drives are being sold on virtually every street corner, and multi-Terabyte drive arrays are making an appearance, the Extended Second Filesystem (ext2) filesystem that Linux has depended upon is getting a little long in the tooth. Ext2 has file and filesystem size limitations, as well as performance issues that are exacerbated as larger partitions become common. So it is good to know that there are some front-runners in the pack to replace Ext2. These are ReiserFS, XFS, Ext3, and JFS. Expect to see most major distributions shipping with a journaling filesystem options in 2001.
[Update June 2001 - ReiserFS is included in the stock kernel tree, starting with 2.4.1. XFS is now at version 1.0.x and undergoing heavy testing.]
ReiserFS is currently usable and running as a set of kernel patches, and it is a shipping option with the SuSE 6.4 and Mandrake 7.1 distributions. Currently Intel processor-specific, ReiserFS combines balanced-tree directory and data storage methods with journaling. Balanced tree is an efficient data storage and retrieval algorithm. Journaling is a process where disk updates are logged prior to being written, making crash and bad shutdown recovery considerably more reliable and faster as well. The homepage for ReiserFS is located at http://www.namesys.com.
XFS is a recent contender for the Linux filesystem crown. It is a functional 64-bit journaling filesystem in use by Silicon Graphics on their line of IRIX based workstations. SGI has placed its XFS code squarely in the Open Source camp, releasing their Linux port of XFS under the GNU General Public License (GPL). At this writing, XFS is not ready for primetime. The homepage for this project is http://oss.sgi.com/projects/xfs/.
Ext3 is the project to update Ext2 to include journaling capability. The current goal is to be able to add and subtract the journaling feature from existing Ext2 partitions. This will allow for easy migration, although the kernel code will of course be different for addressing an Ext3 partition (an additional kernel module). http://beta.redhat.com/index.cgi?action=ext3 is the Ext3 homepage.
The most recent runner in this race is JFS, being ported to Linux from IBM's crown jewel of the Unix environment, AIX. JFS for Linux is also being released under the GPL. With a porting effort that began following IBM's announcement at the beginning of February 2000, there's a bit of catch-up to be done, but as with XFS, this is a port of an established, existing, operating filesystem. Information can be found at http://oss.software.ibm.com/developerworks/opensource/jfs/index.html.
While the most commonly used and discussed storage media are hard drives, there are other types, and filesystems that make use of them. Floppies, CD-ROM (or R/RW) discs, and tapes are all referred to as removable media. Additionally, there are medium storage capacity devices like the Zip disks from Iomega. With the advent of cheap CD-R/RW drives, we anticipate a rapid decline in the use of these intermediate size storage media, and so don't discuss them.
Floppies have filesystems on them just like any other media. In OpenLinux (and most other distributions), the A:drive floppy is addressed by the special device file /dev/fd0, a B: drive would be addressable as /dev/fd1. A look at /etc/fstab reveals the relevant line:
/dev/fd0 /mnt/floppy auto defaults,user,noauto 0 0
Aside from the standard device and mount point fields, note the special auto filesystem type in field three. This is a signal that the kernel should attempt to determine the type automatically, loading the required filesystem module as required to access the floppy. In addition to the default mount options, user access is allowed, and the noauto option prevents the mounting of the device at boot time.
Warning
One major drawback to using floppies is that obnoxious mechanical eject button. This allows a floppy to be removed from the system without being sync'd or unmounted. This is seriously bad form, usually leading to corrupted data. Always explicitly unmount a floppy prior to ejecting it.
A listing of the floppy devices in a standard OpenLinux installation reveals this:
[root@bobo bilbrey]# ls /dev/fd*
/dev/fd0        /dev/fd0h880   /dev/fd0u3520   /dev/fd1h1494  /dev/fd1u1743
/dev/fd0CompaQ  /dev/fd0u1040  /dev/fd0u360    /dev/fd1h1600  /dev/fd1u1760
/dev/fd0H1440   /dev/fd0u1120  /dev/fd0u3840   /dev/fd1h360   /dev/fd1u1840
/dev/fd0d360    /dev/fd0u1440  /dev/fd0u720    /dev/fd1h410   /dev/fd1u1920
/dev/fd0h1200   /dev/fd0u1600  /dev/fd0u800    /dev/fd1h420   /dev/fd1u2880
/dev/fd0h1440   /dev/fd0u1680  /dev/fd0u820    /dev/fd1h720   /dev/fd1u3200
/dev/fd0h1476   /dev/fd0u1722  /dev/fd0u830    /dev/fd1h880   /dev/fd1u3520
/dev/fd0h1494   /dev/fd0u1743  /dev/fd1        /dev/fd1u1040  /dev/fd1u360
/dev/fd0h1600   /dev/fd0u1760  /dev/fd1CompaQ  /dev/fd1u1120  /dev/fd1u3840
/dev/fd0h360    /dev/fd0u1760  /dev/fd1d360    /dev/fd1u1440  /dev/fd1u720
/dev/fd0h410    /dev/fd0u1840  /dev/fd1h1200   /dev/fd1u1600  /dev/fd1u800
/dev/fd0h420    /dev/fd0u1920  /dev/fd1h1440   /dev/fd1u1680  /dev/fd1u820
/dev/fd0h720    /dev/fd0u2880  /dev/fd1h1476   /dev/fd1u1722  /dev/fd1u830
/dev/fd0h880    /dev/fd0u3200

/dev/fd:
0  1  2  3
Fortunately, /dev/fd0 and /dev/fd1 are special types of device file that bridge the various kinds of specific floppy drive format types. However, floppies can be mounted in a type specific manner by root, for instance:
[root@bobo bilbrey]# mount /dev/fd0H1440 /mnt/floppy
Warning
The danger in using the direct device files, rather than /dev/fd0, is that the device mounts anyway, attempting to interpret the data based upon the tracks/sectors layout determined by the device file. We recommend sticking with fd0 and fd1.
ISO9660 is the filesystem type recognized for use with CD media. There are two different extensions of the standard, called RockRidge and Joliet, respectively. These both add the ability to cope with long filenames. In addition, the RockRidge extensions provide for Unix-style symbolic links. Joliet extensions are a Microsoft format which include Unicode character sets, for internationalization purposes. Note that if you compile your own kernel, you'll need to add Joliet capabilities during module configuration.
The /dev/cdrom device is a symbolic link to the actual device file. This is usually one of the raw IDE devices (/dev/hdc, and so on). Once mounted, the CD is treated as just another part of the filesystem, albeit a read-only portion.
More Information
If the device is an ATAPI CDR/RW then addappend "hdx=ide-scsi"in lilo.conf, or "hdx=ide-scsi" in the Grub configuration file, where hdx is the IDE device that the R/RW drive is attached to. Then address the drive by mounting (or aliasing to) /dev/scdN (where N is often 1). The effect here is to treat the device as SCSI for the purposes of working with the tools to read and write to CDR/RW. This will break your existing /dev/cdrom link, which usually points to one of the IDE device links. typeln -sf /dev/scdN /dev/cdromas root (with N being the appropriate device number) to fix that up properly.
Tape comes in several different flavors, from floppy chain drives such as the Travan drives from Colorado, to high speed, high capacity DDS SCSI drives. Tape drives are character devices - that is, they are addressed in a serial manner, and are written to and read from as files, rather than as block devices. This allows the /dev/tape device to be used as the output file in a tar command such as the following:
tar czf /dev/tape /home /etc
See the kernel modules section in Chapter 7 for more details about configuring your system for tape operations. ftape is the module for use in floppy chain and parallel port tape drives.
There are a variety of Iomega Zip drives on the market: parallel port, IDE, USB, SCSI, perhaps even 1394 (aka Firewire, according to Apple) by the time this is published. The features and device setups will vary from version to version. Some of these will be auto-detected by OpenLinux on installation. We recommend that you use both the Iomega Web site and the Zip Mini-HOWTO located at http://www.linuxdoc.org/HOWTO/mini/ZIP-Drive.html.
The major difference when using SCSI devices with Linux is that there are some SCSI driver cards that are not supported. Check the various distribution lists for your current hardware. If any one vendor supports your hardware, you should be able to cobble together a solution.
There are several advantages to SCSI, offsetting the additional costs. First, you can put a large number of devices on a SCSI chain, both external and internal. IDE generally tops out at four drives. There is no 1,024-cylinder limit on booting partitions as there is with IDE. Also, as we noted previously, SCSI is built more for commercial purposes, and while it costs more, the components are usually of better quality yielding a more reliable system overall.
Starting with OpenLinux eDesktop 2.4, the boot loader utility used to oversee the operating system startup process is called GRUB, which stands (quite dramatically) for GRand Unified Bootloader. Prior to GRUB, the Lilo program was the primary resource for starting Linux. In this section, we shall review the features of these two boot programs. A sidebar is used to provide direction in creating boot, root, and rescue disks. Then we examine the various functions that are initiated when a system is booted, and discuss the settings and configuration files that control this process. Finally, we talk about shutdown procedures.
GRUB is one of the more recent additions to the GNU/Linux family. A bootloader is a short (initially less than 512-byte) program that resides in a specific sector on the first hard drive. GRUB tells the system where to find the operating system (or systems) to be loaded, and begins the boot process. GRUB was initially designed for the FreeBSD OS, and is currently a GNU GPL licensed package.
GRUB has distinct advantages over the software (Lilo, discussed later in this chapter) it replaces:
Unlike Lilo, GRUB is a two-stage bootloader, where the stage1 bootloader is in the first 512-byte block of the booting (Active) partition, which starts stage2. Stage2 reads an ASCII file of boot configurations, and presents the options therein as a menu for the user to select from.
Since OpenLinux installs GRUB by default, there is very little that needs to be done to maintain a GRUB installation. There are, however, significant differences in style and terminology when migrating from Lilo. Let's have a look at the files that control a GRUB installation: /etc/grub.conf and /boot/grub/menu.lst.
1  #
2  # /etc/grub.conf - generated by Lizard
3  #
4
5  root (hd0,0)
6  install /boot/grub/stage1 (hd0,0) /boot/grub/stage2 0x8000 \
     (hd0,0)/boot/grub/menu.1st
7  install /boot/grub/stage1 d (hd0) /boot/grub/stage2 0x8000 \
     (hd0,0)/boot/grub/menu.1st
8  quit
9
This grub.conf is a Caldera-specific file, used only in the GRUB installation process, as a script. According to Caldera online documentation, this file should not need to be edited, but notes that if you do change it, then re-run GRUB to write the changes to the boot sector. In this listing and the next, the continued lines (6 and 7, above; 14 below) are actually single lines, wrapped to fit on this page.
The GRUB documentation is typically cryptic: it is tricky to know how to modify and use the grub.conf file. A reason for doing so is if you add a new boot hard drive or shift your partition structures and want to continue to boot OpenLinux from its new location. Modify the grub.conf file to match the new partition setup, and then use one of the following lines to re-install GRUB:
[root@bobo bilbrey]# grub --batch < /etc/grub.conf
or
[root@bobo bilbrey]# grep -v^# /etc/grub.conf | grub --batch
In the first version, after invoking GRUB in batch (non-interactive) mode, redirection is used to get the contents of the grub.conf file taken as command input for GRUB. The drawback is that GRUB tries and fails to interpret the comment lines in the configuration file. The failures generate error messages that can be confusing (but are otherwise meaningless). The second version uses grep to strip out the comment lines, leaving only one interpretation failure, at the blank line. In both cases, however, the commands are executed correctly, and GRUB installs properly.
grub.conf also demonstrates the distinct partition numbering scheme that is currently used only by GRUB. The partition that is represented by (hd0,0) is called /dev/hda1 or /dev/sda1. This means that GRUB doesn't differentiate between ATA and SCSI drives, and that some translation is required when writing menu items (shown next) for GRUB.
1   #
2   # /boot/grub/menu.lst - generated by Lizard
3   #
4
5   # options
6
7   timeout = 5
8   splashscreen = (hd0,0)/boot/message.col24
9
10  default = 0
11
12  title  = Linux
13  root   = (hd0,0)
14  kernel = /boot/vmlinuz-pc97-2.2.14-modular vga=274  noapic \
      nosmp debug=2 root=/dev/hda1
15
When GRUB uses the menu.lst file above, it displays a single item boot menu as shown in Figure 19-4.
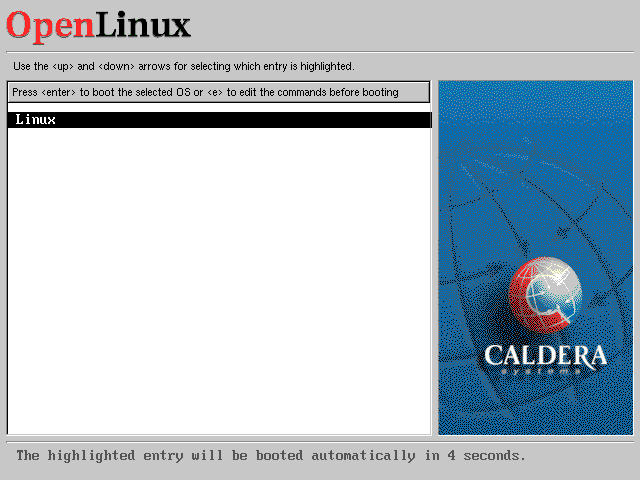
Figure 19-4
OpenLinux bootloader menu screen generated by GRUB
As previously noted, adding a booting OS to the menu is a simple process. For instance, to add a windows partition to the list, which is booted off of the first partition of the second hard drive, add the following lines to /boot/grub/menu.lst:
title  = Win9x
chainloader = (hd1,0)+1
chainloader is simply a command to pass the ball, as it were, to the next bootloader. Using the trailing "+1" addresses the boot sector for the hard disk/partition specification.
How are kernel options passed using GRUB? It's quite simple. Add the requisite option to the "kernel=..." line in menu.lst. For example, on one of our machines, we have two disks at hdc and hdd, a CD-ROM drive at hda, and a CD-RW drive at hdb. Using the CD-RW drive when booting with GRUB would modify the kernel line from above, adding the parameter "hdb=ide-scsi":
14  kernel = /boot/vmlinuz-pc97-2.2.14-modular vga=274 \
      noapic nosmp debug=2 root=/dev/hda1 hdb=ide-scsi
There is system documentation available by typing info grub, and also the GNU Project page on the topic: http://www.gnu.org/software/grub/grub.en.html. Lastly, check out the Caldera Knowledgebase at http://support.calderasystems.com/caldera, search on the term "grub".
More Information
Although you need to be careful, you can experiment directly with the GRUB shell by typinggrubas root, from the command line. At the "grub>" prompt, type help to see all of the possible commands. You can typehelp command_nameto get specific details. For a great recent entry at the Caldera site, go to the Support search page at http://support.calderasystems.com/caldera/search, select the "AND keywords" radio button, and enter "Zen GRUB" into the search box. Then select the Search icon. The new Technical Guide (TG), "Zen and the art of using GRUB", is our first and only search result. Posted in late October of 2000, this TG answers all of the other questions that we ran out of space to print.
Lilo stands for LInux LOader, and has been the primary boot loader for several years now. The executable file /sbin/lilo takes the configuration as described in /etc/lilo.conf and builds a boot sector OS loader. The most recent versions of Lilo, not yet included in any distribution, are written to work with the LBA drive modes available on recent hardware/BIOS combinations. This allows booting from partitions beyond the 1,024-cylinder limit, just as GRUB does.
Now let's have a look at the /etc/lilo.conf file:
1   #
2   # /etc/lilo.conf - generated by Lizard
3   #
4
5   # target
6
7   boot = /dev/hda
8   install = /boot/boot.b
9
10  # options
11
12  prompt
13  delay = 50
14  timeout = 50
15  message = /boot/message
16
17  default = linux
18
19  image = /boot/vmlinuz-pc97-2.2.14-modular
20      label  = linux
21      root   = /dev/hda1
22      vga    = 274
23      read-only
24      append = "debug=2 noapic nosmp"
25
That is the default /etc/lilo.conf as generated by Lizard at the time of system installation. While this file is unused in normal circumstances, you can treat it like a pitcher sitting in the bullpen. According to Caldera's instructions on using Lilo, simply remove the /boot/grub directory and its contents. Then uninstall the GRUB package from your system by typing rpm -e grub. Finally to install the bootloader, type lilo. Voila - Lilo is installed and ready to start your system on the very next reboot cycle.
We would insert just one instruction into that list. The contents of the /boot/grub directory, along with the file /etc/grub.conf, should be transferred to someplace safe as a backup, perhaps on a floppy. Another method would be to print and file away /etc/grub.conf and /boot/grub/menu.lst. Either method makes retracing your steps far easier, should you decide to return to Grub.
There are about 12 pages of documentation on the contents of the lilo.conf file, viewed by typing man lilo.conf. Some of the features found can be over-ridden at the command line, when Lilo is invoked to install the bootloader:
lilo - Install boot loader
Usage : lilo [options ...]
|
|
-v |
Increase verbosity of Lilo. Additional 'v' options request more output |
-q |
List the currently mapped files (found also in /boot/map) |
-m mapfile |
Use another mapfile (instead of /boot/map) |
-C configfile |
Use another configfile (instead of /etc/lilo.conf) |
-d delay |
Specify boot delay in tenths of seconds to allow for selection of booting OS |
-D label |
Use kernel marked with label, rather than first in list, as default booting kernel |
-r root_dir |
Before any other action, chroot to specified directory. Used when repairing a configuration from a boot floppy |
-t |
Don't actually write out boot configuration. Used in conjunction with -v to test Lilo actions |
-c |
Map compaction, merges read requests from adjacent sectors, which greatly speeds the boot process. |
-g disk_tab |
Use another disk geometry file (instead of /etc/disktab). Used only in cases of unusual disk configurations |
-i boot_sector |
Specify file to be used as boot sector (second stage boot, normally /boot/boot.b) |
-P fix | ignore |
Partition table problems: fix or ignore (choose one) |
-s save_file |
Prior to Lilo overwriting the current boot sector, save the old one in save_file. |
-S save_file |
As above, but allow overwrite of save_file |
-u device |
Used with -s to copy the save_file back to the boot sector on specified device. Check time stamp on save_file |
-U device |
As above, but don't check the time stamp on save_file |
-R command_line |
Specify a run-once boot command line, usually used in conjunction with installation scripts prior to a shutdown -r |
-I label |
Put label of running kernel in variable BOOT_IMAGE and echo label to STDOUT |
-V |
Print version number and exit |
Example:
[root@bobo bilbrey]# lilo
Added linux *
Added windows
For all of those options listed, there are ways to configure the same thing from within the lilo.conf file. It is a rare occurrence to run Lilo with command line arguments.
Generally, Lilo works like a charm. In cases where it doesn't, it is useful to know that as Lilo loads, it prints "LILO" to the display, where each letter indicates a completion of a stage in the boot process. If, for example, your boot process gets stuck at "LI" then Table 19-2 will prove useful for diagnosing the problem.
Table 19-2
Lilo Error Codes
| Start Message | Error Condition |
nothing |
If there is no output on boot, then either Lilo isn't loaded or the boot sector isn't on an active partition. |
L [error] |
First stage loaded, can't load second stage. Error code usually indicates some form of media failure or bad disk geometry specification - Check the BIOS parameters for the drive. See Table 19-3 for listing of disk error codes. |
LI |
Second stage installer executing, but either geometry error or a moved boot.b file. Repair by re-running Lilo or fixing the disk specification |
LIL? |
Second stage installer loaded at wrong address. Same possibilities as with "LI" |
LIL- |
Descriptor table is corrupt. Same possibilities as with "LI" |
LILO |
All parts of Lilo loaded and executing properly - kernel boot should proceed |
Attribution
LILO program code, documentation and auxiliary programs are Copyright 1992-1997 Werner Almesberger.
Table 19-3 lists the hexadecimal error codes that can be issued in conjunction with "L" during a Lilo boot. Please note that if these errors persist when you have made no changes to your boot configurations, this is a strong indication that the disk is possibly failing. If this is the case, use a successful boot to move all critical data off-system, and at the very least wipe and repartition the drive, with extensive bad block testing. When we start seeing errors that might indicate drive failure, we replace the drive - the cost is much less hassle than dealing with massive data loss sometime down the road, usually at a far more inconvenient time.
Table 19-3
Disk Error Codes from Lilo
| Error Code (hex) | Error Condition |
0x00 |
Internal error. This code is generated by the sector read routine of the LILO boot loader whenever an internal inconsistency is detected. This might be caused by corrupt files. Try rebuilding the map file. Another possible cause for this error are attempts to access cylinders beyond 1,024 while using the LINEAR option. |
0x01 |
Illegal command. This shouldn't happen, but if it does, it may indicate an attempt to access a disk that is not supported by the BIOS. |
0x02 |
Address mark not found. This usually indicates a media problem. Try again several times. |
0x03 |
Write-protected disk. This should only occur on write operations. |
0x04 |
Sector not found. This typically indicates a geometry mismatch. If you're booting a raw-written disk image, verify whether it was created for disks with the same geometry as the one you're using. If you're booting from a SCSI disk or a large IDE disk, you should check whether LILO has obtained correct geometry data from the kernel or whether the geometry definition corresponds to the real disk geometry. Removing COMPACT may help too. So may adding LINEAR. |
0x06 |
Change line active. This should be a transient error. Try booting a second time. |
0x07 |
Invalid initialization. The BIOS failed to properly initialize the disk controller. You should control the BIOS setup parameters. A warm boot might help too. |
0x08 |
DMA overrun. This shouldn't happen. Try booting again. |
0x09 |
DMA attempt across 64k boundary. This shouldn't happen. Try omitting the COMPACT option. |
0x0C |
Invalid media. This shouldn't happen and might be caused by a media error. Try booting again. |
0x10 |
CRC error. A media error has been detected. Try booting several times, running the map installer a second time (to put the map file at some other physical location or to write good data over the bad spot), mapping out the bad sectors/tracks and, if all else fails, replacing the media. |
0x11 |
ECC correction successful. A read error occurred, but was corrected. LILO does not recognize this condition and aborts the load process anyway. A second load attempt should succeed. |
0x20 |
Controller error; indicates problems with your hard drive (IDE or SCSI) controller. |
0x40 |
Seek failure. This might be a media problem. Try booting again. |
0x80 |
Disk timeout. The disk or the drive isn't ready. Either the media is bad or the disk isn't spinning. If you're booting from a floppy, you might not have closed the drive door. Otherwise, trying to boot again might help. |
0xBB |
BIOS error. This shouldn't happen. Try booting again. If the problem persists, removing the COMPACT option or adding/removing LINEAR might help. |
While it may appear that we have devoted a lot of space to a secondary utility, note that GRUB is currently the default bootloader only on the most recent OpenLinux releases, with no guarantees that other distributions will adopt it. For this reason, we chose to provide rather more extensive coverage of Lilo.
Most current GNU/Linux distributions, including those from Caldera, prompt the user to create a boot disk as a part of the install process. The disk thus created is useful when the boot sector has been overwritten or otherwise trashed, usually by an attempt to load another operating system that doesn't know it can comfortably co-exist with Linux.
However, this boot disk doesn't help you if your root partition has become corrupted or damaged in such a manner that it cannot be mounted. For this, you need both root and boot disks, in place of the "rescue" floppy created during installation. In these circumstances, what you need is a boot floppy which creates a RAM disk, and loads a critical subset of system commands onto the RAM root partition, allowing you to do repair work on the damaged partition(s).
There are a variety of possibilities for creating such tools - we recommend Tom's Root Boot. Fetch the latest revision of the utility from http://www.toms.net/rb/, and read the FAQ (Frequently Asked Questions) also located at that site. Unpack and execute the install script as directed by the instructions in the FAQ. You'll need one blank high-density diskette. The result will be a single disk rescue system that will enable mounting and repairing problems on any partition of your hard drive, even the root partition. And if the problems are too bad, at least you'll be able to copy the data off system, in most cases.
When the loader (GRUB or Lilo) process is complete, the kernel is loaded and running. The kernel then starts the syslogd facility. The syslog daemon records selected details for both the boot process and other important system operations such as login, system cron jobs, and ftp access.
After booting OpenLinux, login, then su to root (this step is necessary because normal users don't have read access to the messages file). Type less /var/log/messages to view the messages file. Go to the very bottom of the file, then page up perhaps seven screens worth to see something like this:
May 21 17:19:49 bobo syslogd 1.3-3: restart.
May 21 17:19:49 bobo kernel: klogd 1.3-3, log source=/proc/kmsg started.
May 21 17:19:49 bobo kernel: Loaded 7468 symbols from /boot/System.map-2.2.14.
May 21 17:19:49 bobo kernel: Symbols match kernel version 2.2.14.
May 21 17:19:49 bobo kernel: Loaded 1 symbol from 1 module.
May 21 17:19:49 bobo kernel: Linux version 2.2.14 ([email protected]) (gcc version egcs-2.91.66 19990314 (egcs-1.1.2 release)) #1 SMP Thu Feb 17 11:49:42 MST 2000
 * * *
And so on. The above text shows the Linux kernel and symbol table loading into memory. As the logged activities progress, the following activities take place:
Needless to say, there are lots of things going on that aren't shown in /var/log/messages. When the kernel boot process is complete, it hands the reins to init (always PID #1), the process responsible for starting all other systems run under Linux. The order, priorities, and defaults are set in the file /etc/inittab:
#
# inittab       This file describes how the INIT process should set up
#               the system in a certain run-level.
#
# Author:       Miquel van Smoorenburg, <[email protected]>
#               Modified for RHS Linux by Marc Ewing and Donnie Barnes
#               Modified for COL by Raymund Will
#

# The runlevels used by COL are:
#   0 - halt (Do NOT set initdefault to this)
#   1 - Single user mode (including initialisation of network interfaces,
#       if you do have networking)
#   2 - Multiuser, (without NFS-Server und some such)
#       (basically the same as 3, if you do not have networking)
#   3 - Full multiuser mode
#   4 - unused
#       (should be equal to 3, for now)
#   5 - X11
#   6 - reboot (Do NOT set initdefault to this)

#
# Default runlevel.
id:5:initdefault:

# System initialization.
s0::sysinit:/bin/bash -c 'C=/sbin/booterd; [ -x $C ] && $C'
si::sysinit:/bin/bash -c 'C=/etc/rc.d/rc.modules; [ -x $C ] && $C default'
s2::sysinit:/bin/bash -c 'C=/etc/rc.d/rc.serial; [ -x $C ] && $C'
bw::bootwait:/etc/rc.d/rc.boot

# What to do in single-user mode.
~1:S:wait:/etc/rc.d/rc 1
~~:S:wait:/sbin/sulogin

l0:0:wait:/etc/rc.d/rc 0
l1:1:wait:/etc/rc.d/rc 1
l2:2:wait:/etc/rc.d/rc 2
l3:3:wait:/etc/rc.d/rc 3
l4:4:wait:/etc/rc.d/rc 4
l5:5:wait:/etc/rc.d/rc 5
l6:6:wait:/etc/rc.d/rc 6
# Normally not reached, but fallthrough in case of emergency.
z6:6:respawn:/sbin/sulogin

# Trap CTRL-ALT-DELETE
ca:12345:ctrlaltdel:/sbin/shutdown -t3 -r now

# Action on special keypress (ALT-UpArrow).
kb::kbrequest:/bin/echo "Keyboard Request--edit /etc/inittab to let this work."

# When our UPS tells us power has failed, assume we have a few minutes
# of power left.  Schedule a shutdown for 2 minutes from now.
# This does, of course, assume you have powerd installed and your
# UPS connected and working correctly.
pf::powerfail:/sbin/shutdown -h +5 "Power Failure; System Shutting Down"

# If battery is fading fast -- we hurry...
p1::powerfailnow:/sbin/shutdown -c 2> /dev/null
p2::powerfailnow:/sbin/shutdown -h now "Battery Low..."

# If power was restored before the shutdown kicked in, cancel it.
po:12345:powerokwait:/sbin/shutdown -c "Power Restored; Shutdown Cancelled"


# Run gettys in standard runlevels
1:12345:respawn:/sbin/getty tty1 VC linux
2:2345:respawn:/sbin/getty tty2 VC linux
3:2345:respawn:/sbin/getty tty3 VC linux
4:2345:respawn:/sbin/getty tty4 VC linux
5:2345:respawn:/sbin/getty tty5 VC linux
6:2345:respawn:/sbin/getty tty6 VC linux

# Run kdm in runlevel 5
gu:5:respawn:/bin/sh -c 'C=/etc/rc.d/rc.gui;[ -x $C ]&&exec $C;init 3'
First, look at the description of the runlevels in the comments at the top of the listing. Many people choose to boot into X11, which provides a GUI environment and full multiuser mode. This is runlevel 5. The other common runlevel for normal use is 3, which does not load the graphical operating environment. Access for runlevel 3 is via consoles, serial, and network logins only. Runlevel 2 is everything except networking and runlevel 1 is single user mode, with networking. Runlevel 0 halts the system, and 6 reboots the system. Runlevel 4 is unused.
We can hear our friend John now, "Why should I care about this?" Well, when things are broken, then use single user mode to fix them (see the section "Shutdown" later in this chapter). Runlevel 3 is commonly used in server installations, where direct interaction is infrequent, and the CPU and memory resources are better directed towards the services provided, rather than tied up in graphical displays. Runlevel 2 is very handy for working in the whole functioning system, possibly for configuration purposes, without any other users being able to login and disturb ongoing processes. We'll address runlevels 0 and 6 shortly.
The inittab manual page describes the attributes of this file quite well. However, there are a couple of features worth mentioning. Below the comment line that says "Trap CTRL-ALT-DELETE" is the command that executes a shutdown when the traditional three-finger salute is used. This only works in console mode; see the Hint at the end of this section.
The other significant landmark in the inittab file is the line "id:5:initdefault:" This controls which of the other lines are executed from inittab. If there is no initdefault line or if /etc/inittab does not exist, then the boot process halts and a runlevel prompt is displayed on the console device. To make OpenLinux boot into the text mode-only environment of runlevel 3, change the line to read "id:3:initdefault:" Reversing the process is just as simple.
The tool to signal a dynamic change of runlevel is telinit. telinit takes a single character argument and submits a runlevel change to init, which sets the environment as guided by the inittab file.
telinit - Process control initialization
Usage : telinit [-t N] argument
|
|
-t N |
N is the time in seconds between sending the SIGTERM and the SIGKILL signals to running processes. This defaults to five seconds, which is sufficient for most system processes. However, a process that has a complex termination, such as a database server, should be given more time to terminate. |
argument |
Single character directing init, noted below. |
The most common arguments to telinit are runlevel settings, from 0 through 6. Bear in mind that 0 and 6 should be avoided as the shutdown program invokes them properly. Other possibilities are a, b or c, which direct init to execute lines in /etc/inittab that have a runlevel field corresponding to the specified character. Q or q reloads inittab, S or s directs init to switch immediately to single user mode, and U or u tells init to re-execute itself (basically a restart).
First, let's talk about the right way to shut down a system. From within KDE, log out, select the Shutdown button, and then select the type of shutdown: Shutdown (halt), Shutdown and Restart (reboot), Restart X Server, or Console Mode. The last selection switches the system to runlevel 3, and drops the user into console mode.
From the console, su to root, then invoke shutdown:
shutdown - Bring the system down
Usage : shutdown [options] time [warning]
|
|
-a |
Use /etc/shutdown.allow, root user can give normal users shutdown privileges using this file |
-k |
Don't really shutdown, just pretend, send warning to users |
-r |
Reboot after shutdown (that is, go to runlevel 6) |
-h |
Halt after shutdown (that is, go to runlevel 0) |
-f |
Skip fsck on reboot. |
-F |
Force fsck on reboot |
-c |
Cancel an already running shutdown process |
-t N |
N is the time in seconds between sending the SIGTERM and the SIGKILL signals to running processes. This defaults to five seconds, which is sufficient for most system processes. However, a process that has a complex termination, such as a database server, should be given more time to terminate. |
time |
Required: When to shutdown, format is either absolute (hh:mm), relative (+m, for minutes), or most commonly, now |
Examples:
No one else logged in on the system, halt (-h) or reboot (-r) the system. This is the most common form for workstation usage:
[root@bobo bilbrey]# shutdown -h now
However, if your system is connected to a network and there is the possibility that other users are on the system, check by running who, and set a shutdown to occur at some time in the future to give users a chance to close out what they're working on.
[root@bobo bilbrey]# shutdown -h +10 "System Maintenance Time" &
If the root user were to change his mind, then the process is easily cancelled:
[root@bobo bilbrey]# shutdown -c
Shutdown cancelled.
As is common with many Linux commands, shutdown options may be combined into a single string. To schedule a shutdown in five minutes, reboot, and skip the filesystem check in either of the following ways:
[root@bobo bilbrey]# shutdown -rf +5 "Shutdown, reboot, no fsck"
or
[root@bobo bilbrey]# shutdown -r -f +5 "Shutdown, reboot, no fsck"
The Three Finger Salute
Ctrl + Alt + Delete, a common method of bailing out of a Windows or DOS session is actually a system behavior, built into the BIOS. In order to prevent corrupted file systems,inittabsets into place a trap for that key combination, which executes a proper shutdown (actually a warm boot, aka a reboot). Since this form of shutdown is masked by X and KDE, a double three finger salute is necessary. First pressCtrl + Alt + F1to get to a console, then pressCtrl + Alt + Deleteto execute the shutdown. Of course, data in running applications is up for grabs, so close your apps first!
Every GNU/Linux setup that we've done asks that we create at least one user account. The OpenLinux Lizard installer requires that at least one "normal" user account be created during system setup. There are good reasons for this. The root user is all-powerful, able to create (and destroy) with casually typed commands. For most purposes, an unprivileged user account is sufficient for day-to-day work. We cannot emphasize this point enough, even in a chapter on superuser commands - do your work as a regular user, su to root only when necessary. This cuts down on the types of problems that might arise as a new user becomes accustomed to Linux.
Managing user and group accounts and permissions is one of the primary jobs in Linux system administration. In the single user environment of a home Linux system, groups are often ignored. User accounts are counted on one finger. Taken together, this is not a very challenging environment. However, taking the time to learn group and user organization in a small environment is a great way to get needed experience - very useful a few months hence, when the Linux box becomes a central file and print server at the heart of a small (or not so small) apartment wide network (AWN).
The primary configuration file for user management is /etc/passwd. The format is extensively documented in the passwd (5) manual page. However, let's have a brief look at a default passwd file (the line numbers in this listing are for reference only):
1   root:x:0:0:root:/root:/bin/bash
2   bin:x:1:1:bin:/bin:
3   daemon:x:2:2:daemon:/sbin:
4   adm:x:3:4:adm:/var/adm:
5   lp:x:4:7:lp:/var/spool/lpd:
6   sync:x:5:0:sync:/sbin:/bin/sync
7   shutdown:x:6:11:shutdown:/sbin:/sbin/shutdown
8   halt:x:7:0:halt:/sbin:/sbin/halt
9   mail:x:8:12:mail:/var/spool/mail:
10  news:x:9:13:news:/var/spool/news:
11  uucp:x:10:14:uucp:/var/spool/uucp:
12  operator:x:11:0:operator:/root:
13  games:x:12:100:games:/usr/games:
14  gopher:x:13:30:gopher:/usr/lib/gopher-data:
15  ftp:x:14:50:FTP User:/home/ftp:
16  man:x:15:15:Manuals Owner:/:
17  majordom:x:16:16:Majordomo:/:/bin/false
18  postgres:x:17:17:Postgres User:/home/postgres:/bin/bash
19  mysql:x:18:18:MySQL User:/var/lib/mysql:/bin/false
20  bind:x:19:19:DNS Server:/:/bin/false
21  httpd:x:55:55:HTTP Server:/:/bin/false
22  nobody:x:65534:65534:Nobody:/:/bin/false
23  bilbrey:x:500:100:Brian Bilbrey:/home/bilbrey:/bin/bash
24  syroid:x:501:100:Tom Syroid:/home/syroid:/bin/bash
25
The format of the file is one record per line, with seven colon-separated fields. The fields are:
Observe in the sample password file displayed that most of the "users" are actually system functions and daemons. The reasoning behind making users out of processes is to be able to give to the process the required permissions for it to do its job. User and group accounts are the gatekeepers for every Linux system.
When the password field is blank, there is no password required for the account. You should never see a blank password field. If you accidentally create or modify an account to have no password, you should rectify that as soon as you notice it. A password-free account is like propping open your front door and posting a sign out front saying, "Welcome all burglars. Come on inside. Free stuff found here." The password field for each record above contains an 'x'. This is a fairly new development, one that is not reflected in the passwd (5) manual page. 'x' means that the password is located not in the world-readable /etc/passwd file, but is in the /etc/shadow file instead, for enhanced security.
Linux doesn't actually pay attention to user or group names; the system uses the UID and GID fields (in addition to the GID affiliations in /etc/groups, discussed later) to identify and provide or deny services to users. The GECOS field, an acronym with a long history, is seldom used, accessed, or required.
Actual users should always have home directories and a shell process specified. In the creation of user accounts, these features are automatically addressed if user management utilities (like adduser) are employed. If creating a user manually, the appropriate directories and /etc/passwd entries must be created. An unspecified home directory defaults the user to the root directory (where she has no write privileges). A blank shell field defaults to /bin/sh, which in OpenLinux 2.4 is a symbolic link to /bin/bash.
The /etc/passwd file must be a world-readable file. There are many user space (as opposed to system or root) services and programs that use the passwd file. In the misty past, passwords were stored directly in /etc/passwd (thus the name). The problem is that the actual encrypted passwords were also world readable.
Encryption is nominally non-reversible, in that knowing the encrypted version does not convey knowledge about the plaintext password. However, an encrypted password can easily be tested against a list of known words or other tokens that have been pre-encrypted. A match reveals the password.
Shadow passwords were implemented to prevent such casual perusal of the encrypted data. /etc/shadow is owned by root, and defaults to read and write permission for the root user only. The specific programs that actually need to verify passwords, such as login, su, and others, are programs that have permission to read root files, even when run by regular users. But a regular user can neither read nor copy /etc/shadow, thus enhancing system security.
Learn more about the structure of /etc/shadow by typing man 5 shadow.
There are a variety of commands related to managing user information - the primary tool to create new users is called adduser. A quick glance at the adduser program reveals that it is a shell script. There is no manual page or other documentation for adduser that we can find. In fact, the commentary at the beginning of the script, maintainer Ian Murdock notes "I need to write a man page for this."
adduser - Utility to create a new user account, associated files, and directories
Usage : adduser username
|
|
username |
Specify the account name for a new user |
Example:
[root@bobo /etc]# adduser murgatroid
Dynamically looking for policy of group assignment... default group mode

Looking for first available UID... 502
Using default GID=100
Adding login: murgatroid...done.
Creating home directory: /home/murgatroid...done.
Creating mailbox: /var/spool/mail/murgatroid...done.

Don't forget to set the password.

[root@bobo /etc]# passwd murgatroid
New user password: initial_password
Retype new user password: initial_password
The /etc/passwd configuration file now contains the line:
murgatroid:x:502:100:Caldera OpenLinux User:/home/murgatroid:/bin/bash
In addition to creating the directories as noted in the preceding listing, the adduser script also copies into the user's home directory several basic files and subdirectories. These supply fundamental configurations for shell and GUI desktop access and are copied from the /etc/skel directory. To enhance the basic furnishings for new users, add to /etc/skel. As adduser terminates, it reminds us to set an initial password for the new user. This is accomplished using program passwd.
/etc/group is the second half of the required configuration to manage users and permissions. The group file contains system-specified groups for services and for actual users (as the passwd file does). Additionally, /etc/group is the home for local system groups of users and services that are not native to the distribution. As you look at the following listing, notice the two groups at the end (only the start and end of the file are shown, in the interests of brevity).
root::0:
wheel::10:
bin::1:bin,daemon
daemon::2:bin,daemon
sys::3:bin,adm
adm::4:adm,daemon
 * * *
ftp::50:
http::55:
nobody::65534:
users::100:
projectx::700:bilbrey,syroid
Second to last is the default users group, generated by the system at installation. "projectx," on the other hand, is strictly a local group (which is to say it is not set up by OpenLinux, but rather by the system administrator).
Why create groups at all? Use groups to create permissions for sharing files and resources with multiple users. By having a projectx group, we can create files and directories that both Brian and Tom have access to, but no other user does. We used a similar type of structure to share files, images, and backup files in the production of this book, on a server with several active users.
[bilbrey@bobo bilbrey]# passwd
Changing password for bilbrey
(current) UNIX password: myoldpw
New user password: test
BAD PASSWORD: it is too short
New user password: tes
BAD PASSWORD: it is WAY too short
New user password: tester
BAD PASSWORD: ...dictionary word
OpenLinux (and other distributions) offer an additional facility when setting passwords: a simple check function to notify the user of extremely bad password choices. These are demonstrated above. Remember that the password text isn't actually echoed to the screen. What we don't show here is that, even after the warning, if you type the identical bad password again, it will be accepted.
This is accomplished by use of cracklib, a library of tools that is used by the passwd program to determine whether passwords are good or bad. For details on this library, and it's relation to the Crack password-hacking program, see the contents of /usr/doc/cracklib-2.7/.
How should you choose a good password? A truly excellent password is a long password, eight characters or more, using upper and lower case letters, numbers, and punctuation. The tricky bit involved is remembering such an outlandish concoction - without writing it down. The number one security failure is a password written down and posted near the computer.
A very good password that you take the time to memorize is far better than resetting your password frequently. Constant change leads to forgotten, written, and weak passwords.
One good way to remember a complex password is to use a phrase, for instance: "Jack and Jill went up the hill." Use the first character from each word, do one numeric substitution, and insert punctuation. This leads to a password like: !JaJwu2h. No dictionary attack is going to break that, and you'll have a mnemonic to remember it by. Of course, don't use this particular implementation. Always assume that a documented password is entered in the password-cracking dictionaries of the black hats.
There are a variety of programs used for managing users and groups on GNU/Linux. In addition to some brand new utilities, we're re-addressing some of the commands that were first discussed in Chapter 17. Here, we reveal the capabilities that these programs have when run by the superuser. Table 19-4 lists these utilities.
Table 19-4
User and Group Management Utilities
| Program | Description |
vipw |
Edit the /etc/passwd file, using vimor vi and locking the file so that access is blocked during update. This prevents conflicting updates to the plaintext file. |
chpasswd |
Batch update of /etc/passwd file, takes STDIN or redirected file input, one username:password per line. |
useradd |
Another utility to add users to the system. |
usermod |
Modify all data for existing users, including the ability to change username and ID. Don't do those while the user is logged in. |
userdel |
Removes user from /etc/passwd and /etc/shadow. Makes a backup of the files. Does not remove user data. |
vigr |
Edit the /etc/group file, using vimor vi and locking the file so that access is blocked during update, like vipw. |
groupadd |
Add groups. Must have unique GID if specified. |
groupmod |
Change group names and GIDs. |
groupdel |
Delete existing groups. |
chage |
Modify expiration date of user passwords, not used often. |
chown |
Change ownership and group information for files and directories, for example, chown syroid.projectx *jpg, to change the JPG files in the current directory to be owned by syroid, and accessible by members of the projectx group. |
Some of the commands listed in Table 19-4 have neither manual page nor Texinfo data to document their operation. When this is the case, cursory help is usually available by running the program without any arguments, like so:
[root@bobo /etc]# useradd
usage:  useradd [-u uid] [-g group] [-m] [-d home] [-s shell] [-r rootdir]
                [-e expire dd/mm/yyyy] [-f inactive] name
        useradd -D
        useradd -v
This isn't the only Linux book to punt on the subject of disk space quotas. At least we tell you we're punting, and with good reason. For most purposes, restricting user storage space is a particularly silly thing to do.
On a workstation, there are usually very few users. For a server, on either a home or business network, when users start running low on space, it is time to start adding storage or servers. On the other hand, ISPs and other service/space-for-hire type businesses require quotas.
If you're interested in quotas, storage management, and related topics on Linux, then we can recommend http://www.linuxdoc.org/HOWTO/mini/Quota.html as a good starting point. OpenLinux supports quotas out of the box. It is most easily configured using Webmin. Annoyingly, OpenLinux doesn't ship with useful tools like edquota, requiring painful hand tuning of the relevant files.
Quota capabilities need to be enabled when the Linux kernel is compiled, and are currently only effective with ext2 filesystems. Quotas provide the ability to restrict storage allocation based on either users or groups, on a per filesystem (partition) basis.
When removing users, the commands noted previously (userdel, for example) are remarkably incomplete. There are several other decisions, with commensurate actions, that need to be made when removing a user from a GNU/Linux system. Here is a list of some of the features that need to be considered:
Data This includes the user's home directory, as well as any files that are stored in shared or mounted volumes, group or personal. Can it be deleted? Should it be backed up? To which medium?
Mail Most likely the user had a local mail account. Possibly there are entries in /etc/aliases. Also check for the existence of un-retrieved mail in the mail spool (usually /var/mail/spool/username). Should new messages for the user be forwarded? To whom?
Cron & At The user possibly has scheduled jobs queued up. These need to get cleared. If the user is an administrator or operator, then some of the jobs may be required for correct system or business operation and should be transferred to another user, along with any accompanying scripts.
Here are the steps we take to remove a user (called mary, in the following example):
su to root - normal users don't have the authority to access the files necessary for user removal.who). Type vipw and edit the password field (in /etc/passwd, opened automatically for you by vipw) for user account mary to *. Then use vim or another editor to do the same in /etc/shadow. This prevents user login.newaliases, and then restart the MTA (usually sendmail) by typing /etc/rc.d/init.d/sendmail restart (or alternatively killall -HUP sendmail). This command will obviously vary with the mail software installed.su mary. Then type crontab -l, to list Mary's cron jobs, if any. Type atq to list outstanding scheduled jobs, and if necessary, use atrm to remove any jobs. Take note of any jobs or processes that should be taken over by another user.exit to return to the root user. Make a backup of Mary's data files (we have a dedicated backup directory) tar czf /home/backup/mary.tgz /home/mary then delete the home directory by cd /home && rm -rf mary. Delete using the aforementioned combination to prevent typing errors from causing damage when using of rm -rf.vigr), and remove any references found. Finally, run userdel mary to remove the entries from /etc/passwd and /etc/shadow. Then type exit, leaving superuser status; we're finished.To wrap up this section: user management is a prerogative of system administration - with it comes the responsibility not to make mistakes that prevent people (including yourself) from doing their jobs. Along with the variety of commands that are available for use in creating, modifying, and deleting user accounts, there are several that overlap in capability, but with a different focus usually split along interactive versus non-interactive lines. As you work with the user management programs, we recommend reading the appropriate manual pages and checking over your command line carefully prior to execution.
The section on process and scheduling in Chapter 17 introduced many of the commands used in Linux process management. Any repeats here are in the interest of providing a convenient reference.
fuser is a multi-purpose tool, with both informational and management capabilities. Given a file, filesystem, TCP or UDP port, fuser can identify which processes (and optionally which accounts) are using the specified resource.
fuser - Identify processes using files or sockets
Usage : fuser [option ...] name ...
|
|
-a |
Show all files named, whether there are associated processes or not |
-k |
Kill processes accessing the file |
-i |
Interactive: ask user before killing process (if -k) |
-l |
List signal names, a handy reference |
-m |
List processes related to specified filesystem or block device |
-n space |
Select a namespace other than files (specifically, tcp or udp system ports - aka sockets) |
-s |
Silent operation: ignore -a, -u, and -v options |
-signal |
Signal to replace SIGKILL, when -k is used: usually with HUP to restart rather than kill processes or TERM to get clean process termination |
-u |
Append user name to listed PID(s) in output |
-v |
Verbose mode |
- |
Single dash, used to reset options, including -signal |
name |
Device, filesystem or file name |
Examples:
[root@bobo /] umount /usr/local
umount: /usr/local: device is busy

[root@bobo /] fuser -v -m /usr/local
                  USER      PID ACCESS COMMAND
/usr/local        bilbrey  3384 ..c..  bash
                  bilbrey  3727 ..c..  vi

[root@bobo /] fuser -k -v -m /usr/local
                  USER      PID ACCESS COMMAND
/usr/local        bilbrey  3384 ..c..  bash
                  bilbrey  3727 ..c..  vi

[root@bobo /] umount /usr/local
In the example, processes that access the /usr/local filesystem must be terminated before the umount command can work. The first attempt to unmount /usr/local fails. A message of "device is busy" sometimes indicates a running process tying up the partition, but most often simply means that a user's current pwd (working path) is somewhere on that filesystem.
An initial run of fuser, with options to be verbose (-v) and list the associated processes (-m) for /usr/local, reveals that both of the above types of busy are true: there is a bash shell and a vi process accessing the device. From here, there are several courses of action:
In the example, we chose option 3 - kill the processes outright. Then we can unmount the /usr/local partition, without error messages. However, this is bad form - the superuser has killed an active user process without notifying the user. BAD Admin. No cookie.
A rather obvious program in action, kill is used to terminate running processes. There are several different numeric signals that can be used to kill a job; these are listed below:
kill - Terminate a process
Usage : kill [option ...] pid ...
|
|
-s signal |
Specify signal to send, by name or number |
-p |
Display pid of process, don't actually send a signal |
-l |
Display list of signal names |
pid |
Process ID |
Examples:
[root@bobo root] kill -15 `pidof kmahjongg`

[root@bobo root] kill -l
 1) SIGHUP      2) SIGINT    3) SIGQUIT    4) SIGILL
 5) SIGTRAP     6) SIGIOT    7) SIGBUS     8) SIGFPE
 9) SIGKILL    10) SIGUSR1  11) SIGSEGV   12) SIGUSR2
13) SIGPIPE    14) SIGALRM  15) SIGTERM   17) SIGCHLD
18) SIGCONT    19) SIGSTOP  20) SIGTSTP   21) SIGTTIN
22) SIGTTOU    23) SIGURG   24) SIGXCPU   25) SIGXFSZ
26) SIGVTALRM  27) SIGPROF  28) SIGWINCH  29) SIGIO
30) SIGPWR
Here, in the first call, we send a terminate signal (15, SIGTERM) to the process which is identified by the Process ID (pid) returned by the pidof command (discussed later in this section). There is no return value from a successful execution. We are terminating a running KDE mah-jongg game.
The second invocation lists all of the possible signals that can be sent to a process. The printout is of the signal names, which are displayed in numeric order. For most commands (including kill and fuser), the number may be used in place of the signal name. In addition, the SIG part of a signal name may be left off. We'll demonstrate this when we look at the killall program, next.
killall is a program that is fundamentally the same as kill. However, killall works with process names rather than pid numbers.
killall - Kill processes by name
Usage : killall [option ...] name ...
|
|
-e |
Exact match required for long process names |
-g |
Send a kill signal to the entire process group (group owning the specified process) |
-i |
Interactive: ask before killing |
-l |
List all known signal names |
-q |
Quiet: no output, even if no processes killed |
-v |
Verbose: display success or failure message |
-V |
Display version information then exit |
-w |
Wait for killed processes to terminate; useful for delaying until programs with extensive termination tasks are done prior to exiting. The drawback is that killall may not return in this mode, if the program to be killed won't die |
name |
Name by which process is listed |
[root@bobo root] killall -v kmahjongg
Killed kmahjongg(3914)

[root@bobo root] killall -v -HUP sendmail
Killed sendmail(3856)
In the first example, we kill the mah-jongg game yet again (really, it's there because we like the game...), in a manner easier to remember than using the kill utility. The second example is a demonstration of terminating and restarting a process by sending SIGHUP. This is most commonly done to force a system service to re-read all of its configuration files after making modifications. One area of confusion is the return message of "Killed ..." following a -HUP signal. This is actually a true statement, since the original program is terminated, and the restarted process acquires a new pid.
ps is one of the utilities we use most frequently. All fun aside, understanding processes and the relationships between them is crucial to the administration of Linux. When invoked, ps displays a list of the current processes. The selection of processes and formatting of the information provided by the output is controlled by various options; we'll cover the most useful, in the examples that follow:
[bilbrey@bobo bilbrey]$ ps
  PID TTY          TIME CMD
  774 pts/2    00:00:00 bash
  781 pts/2    00:00:00 ps
Our initial example has limited scope - the processes that are running under the current shell. This normally includes the shell, any background or sleeping processes, in addition to the foreground process which will always be ps. For each process, the process ID (PID), controlling tty device, time (accumulated system execution time), and the command associated with the process are displayed.
[bilbrey@bobo bilbrey]$ ps ax
  PID TTY      STAT   TIME COMMAND
    1 ?        S      0:06 init [5]
    2 ?        SW     0:00 [kflushd]
    3 ?        SW     0:00 [kupdate]
    4 ?        SW     0:00 [kpiod]
    5 ?        SW     0:00 [kswapd]
  397 ?        S      0:04 syslogd
  400 ?        S      0:04 klogd -k /boot/System.map-2.2.14
  411 ?        S      0:00 rpc.portmap
  415 ?        S      0:00 inetd
 * * *
  774 pts/2    S      0:00 bash -i
  784 pts/2    R      0:00 ps ax
ps is typically invoked with the 'a' and 'x' flags to include processes with and without controlling tty devices. This is equivalent to running ps -A (for All processes), but quicker to type. Note the addition of the status (STAT) field showing that all of the current processes except ps are sleeping, and several (with the appended 'W') are actually paged out of memory altogether. This listing is useful in numerous situations; for instance, locating processes which have been sent into the background.
[bilbrey@bobo bilbrey]$ ps aux
USER       PID %CPU %MEM   VSZ  RSS TTY      STAT START   TIME COMMAND
root         1  0.1  0.3  1100  440 ?        S    13:46   0:06 init [5]
root         2  0.0  0.0     0    0 ?        SW   13:46   0:00 [kflushd]
root         3  0.0  0.0     0    0 ?        SW   13:46   0:00 [kupdate]
root         4  0.0  0.0     0    0 ?        SW   13:46   0:00 [kpiod]
root         5  0.0  0.0     0    0 ?        SW   13:46   0:00 [kswapd]
root       397  0.0  0.4  1292  588 ?        S    13:47   0:04 syslogd
root       400  0.0  0.6  1492  804 ?        S    13:47   0:04 klogd -k
bin        411  0.0  0.3  1120  404 ?        S    13:47   0:00 rpc.portmap
root       415  0.0  0.4  1272  560 ?        S    13:47   0:00 inetd
 * * *
bilbrey    774  0.2  0.8  1852 1024 pts/2    S    15:36   0:00 bash -i
bilbrey    785  0.0  0.7  2608  928 pts/2    R    15:36   0:00 ps aux
Running ps with an 'aux' option string delivers a huge amount of information for each process - amounts of CPU time and memory usage, in addition to various measures of the size of the process and the process start time are given. Such a listing is useful when a snapshot is required detailing which processes are consuming what resources. This complements the dynamic listings generated by the top command, covered in Chapter 17.
The manual page for ps documents the potentially bewildering array of interlocking options that may be used, along with information about the various fields that can be displayed. Another useful view of the list of processes is generated by the next command, pstree.
pstree displays a singularly useful aspect of the running processes: an ASCII tree view, as demonstrated in the example which follows. While it doesn't serve a great deal of information helpful for process management, it does a marvelous job of showing the parent-child relationships among the various running jobs.
[bilbrey@bobo bilbrey]$ pstree -a
init
 |-amd -F /etc/am.d/conf
 |-atd
 |-calserver /opt/cameleo/lib/calserver.cfg
 |-cron
 |-getty tty1 VC linux
 |-getty tty2 VC linux
 |-getty tty3 VC linux
 |-getty tty4 VC linux
 |-getty tty5 VC linux
 |-getty tty6 VC linux
 |-inetd
 |-kaudioserver
 |  `-maudio -media 0
 |-kdm -nodaemon
 |  |-X -auth /etc/X11/kdm/authdir/A:0-beDfEj
 |  `-kdm
 |     `-kwm
 |        |-(kaudioserver)
 |        |-kautorun
 |        |-kbgndwm
 |        |-kfm
 |        |-klipper
 |        |-konsole -restore konsolerc.1 -icon konsole.xpm -miniicon
 |        |  `-bash
 |        |     `-su
 |        |        `-bash
 |        |-konsole -restore konsolerc.3 -icon konsole.xpm -miniicon
 |        |  `-bash
 |        |     `-script
 |        |        `-script
 |        |           `-bash -i
 |        |              `-pstree -a
 |        |-kpanel
 |        |-krootwm
 |        `-kwmsound
 |-keyserver /opt/cameleo/lib/Caldera.licenses
 |-(kflushd)
 |-klogd -k /boot/System.map-2.2.14
 |-(kpiod)
 |-(kswapd)
 |-(kupdate)
 |-lpd
 |-rpc.portmap
 |-rpc.rstatd
 |-(rpciod)
 |-sendmail
 `-syslogd
As noted in the context of the kill command described previously in this chapter, pidof is a program that returns a process ID number when given a process name. We find this utility most useful as a scripted or aliased command for cleaning up after programs that have a tendency to die badly.
That deserves a little explanation. For example, Netscape 4.61 is a notoriously unstable piece of software under Linux. It would work wonderfully for days and exit without a problem. Other times, Netscape would turn up its toes and die, leaving stranded processes, every 5 to 10 minutes. On these occasions, we'd use ps to determine the pid of the Netscape parent, then kill -9 that process. Quickly this became tiresome. However, the full name of the process with path remained unchanged, time after time. We used this to generate one of the most used aliases defined in our .bashrc file:
alias nsdie='kill -9 `/sbin/pidof /opt/netscape/bin/netscape-communicator`'
The pidof command is enclosed in back-tics (single left quotes) to provide command expansion (as discussed in Chapter 15). That is, the results from pidof are inserted (substituted) into the rest of the command line. Although this can be used by either root or normal users, we include pidof in this section because it is located in /sbin, with other superuser utilities.
Tasks (yet another name for processes) have an additional property: a priority level, which defaults to 0, within a range of -20 to + 20 where -20 is the highest possible priority. The tool to modify a task's priority is called renice. Normal users may adjust processes they own in the 0-20 range. Root is the only user who can set a task's priority to below zero. One reason for doing so is visible when looking at system services. If a service such as httpd (the Apache Web server daemon) is being swapped out to disk during idle times, then response time will suffer when demand ramps quickly upwards. Giving the daemon higher priority keeps its code pages in memory, and swaps processes of lesser priority to disk when necessary.
Guesswork
The current priority level of a task is labeled NICE. We presume this refers to how 'nice' the process is to its fellows. This yields 'renice' as the name of the utility to modify priority.
Let's walk through this together. We start with a customized use of the ps command that lists all processes (-e), with a custom output (o) of the process ID (pid), process priority (ni), major page faults (majflt), and command names (comm). Additionally, we use the --sort option (gleaned from the ps manual page) to make the display more useful by arranging the output by page faults. This tells us which processes are afflicted most frequently by not finding a code page in memory on demand.
[root@grendel html]$ ps -eo pid,ni,majflt,comm --sort=majflt
  PID  NI MAJFLT COMMAND
    2   0      0 kflushd
    3   0      0 kupdate
 * * *
  659   0   1118 httpd
14453   0   1208 httpd
13467   0   1233 httpd
13281   0   1369 httpd
13231   0   1584 httpd
13177   0   1673 httpd

[root@grendel html]$ renice -10 `pidof httpd`
14453: old priority 0, new priority -10
13467: old priority 0, new priority -10
13281: old priority 0, new priority -10
13231: old priority 0, new priority -10
13177: old priority 0, new priority -10
659: old priority 0, new priority -10
Making use of the pidof program, discussed , we can renice all of the running httpd processes. Of course, changing task priorities is not to be undertaken lightly. Study of the relevant statistics and watching the effects of small changes is the prudent course of action when modifying system service priorities.
Backup is arguably the single most important responsibility of a system administrator. There are a variety of system services to meet the need for a simple backup scheme. These include tar, cpio, dump and restore. We take a good second look at tar (the first was back in Chapter 17). There are a variety of text-mode and GUI front ends for these command line tools, as well as commercial backup tools that are beyond the scope of this book.
tar is the best known of the archiving tools under GNU/Linux. tar stands for Tape ARchive, although its use is not limited to working with tapes. The advantage of tar is that it is easy to employ, natively works with the gzip compression tool (found along with tar, in Chapter 17), and is fast. The drawback is that the archives are not file-based and there is no built in error correction. This means that any corruption of a tar file (also referred to as a "tarball") prevents any data past the point of error from being retrieved.
tar, in combination with gzip (*.tar.gz or *.tgz) is the common denominator for file transfer across the Internet for the Unix variants, in the same manner that zip formats rule in the Windows arena. The command structure is straightforward (we'll show the most common options), and there are a number of uses for tar that we demonstrate shortly. First, let's quickly review some of the main options of tar in a pair of examples:
[root@bobo home] tar czf /mnt/backup/monday.tgz /home /etc
tar: Removing leading '/' from absolute path names in the archive
tar: Removing leading '/' from absolute links
In the preceding section, several features of tar are used. First, note that the leading dash (-) for the options is not used. This is similar to option usage in some other GNU tools; a leading dash merely makes it clear that options are referenced, especially when using the command in a script. The 'c' means we are creating an archive, the 'z' tells tar to use the gzip utility to compress the tarfile, and 'f' indicates that the next filename is the output file for the command.
The messages displayed to the screen indicate that the pathnames in the archive have been made relative by the removal of the leading slash. Files are restored from a tar file to the pathname specified in the archive. If the leading slash is present, there is a danger of unwittingly overwriting existing files, a problem if you've made changes since the creation of the archive. Also, normal users might not have write permissions to the specified locations in the directory structure when absolute filenames are given. Since GNU tar defaults to removing the leading slash, tar files may be easily "restored" to temporary directories, where the required files may be examined, transferred, renamed, or whatever is necessary.
If there is no "f tarfile" or "-f tarfile," then the output will be sent to STDOUT, usually to be redirected to a file, so the previous command could be rewritten as:
[root@bobo home] tar cz /home /etc > /mnt/backup/monday.tgz
To extract the data from the tarball, use the following syntax:
[root@bobo tmp] tar xzf /mnt/backup/monday.tgz
In the previous example, the command prompt indicates that we are restoring into a temporary directory. This prevents overwriting files that have changed since the archive was created. If specific files were needed from the archive, we can extract just those files:
[root@bobo tmp] tar xzf /mnt/backup/monday.tgz \
   home/bilbrey/Important.txt
In specifying the file to be retrieved, we specified the entire path to the document, without the leading slash, since those were removed when the archive was created. If instead, we wanted to restore the archive directly over the old data, while only writing "new" files out of the archive (those that were, say, accidentally erased) we would invoke tar using the 'k' option (to keep old files):
[root@bobo /] tar xzkf /mnt/backup/monday.tgz
cpio is another archiving tool, capable of making archives compatible with tar. The main draw of cpio is the list of archive formats that it can read and write, making it a good tool for portability for those systems that do not have GNU tar available. The formats, and the options of the program are documented in the manual page. For strictly Linux use, cpio is not nearly as capable as GNU tar, and we leave further explorations to you, the reader.
The dump program, and its complement, restore, make up a competent filesystem backup suite. Originally, dump only worked with filesystems (partitions). Recent versions of dump are aware of files and file dates. It may be used for full image and incremental backups. The manual page for dump documents both the options for the command, and example backup procedures. restore is used to extract backups from dump files (or devices).
dump works quite well when backing up to files. However, it is confusing to set up properly for use with tapes, since the physical tape parameters must be calculated (bit density versus tape length) in order to prevent device overrun.
There are many different elements to a good backup strategy. Most of the online and print resources you read emphasize one thing above all else: A healthy paranoia goes a long way in ensuring that the strategy is over- rather than under-designed. There are three major steps in the consideration of a process for protecting data.
Followed strictly, this is a non-terminating process, which leads to all backup, and no work - an inequitable solution. However, a few passes to determine more than one type of backup media and a blending of onsite and offsite storage makes a great deal of sense. The fundamental premise is to backup those items that are not restorable from installation media, thus easily restoring a system to the last known-good state.
Follow along as we design a backup for a (soon to be) typical home network of three computers, with an in-house tape drive, CDR/RW and broadband connectivity. The script fragments are designed to be owned by root, and run from cron.
The network is composed of the following computers:
All of these boxes are connected via a 10/100BaseT (Ethernet) network, behind a router/firewall appliance that is connected to the Linux server. The Linux server is multi-homed (multiple network cards), and provides the Internet connection gateway for the other machines.
From Machine3, we have to cope with Windows and Linux partitions, best done from within Linux. From the Windows side, backup /mnt/windows/My\ Documents (note the backslash used to quote the space inside the directory name. The Linux half contributes only the contents of /home, since there are no special configuration files. Run each night, the command to backup these files is:
tar czf m3.backup.tgz "/mnt/win/My Documents" /etc /home \
  && scp m3.backup.tgz backup@machine2:.
Run as a cron job each night, the tar command creates (overwriting) the compressed backup file m3.backup.tgz, containing the contents of the specified directories. The extended line uses scp (secure copy, see Chapter 22) to copy the backup file to the home directory of the backup "user" on Machine2.
From Machine2, we want to conserve the system configuration files, the user data, and parts of the local directories. In addition, we'll use Samba (see Chapter 27) to mount the appropriate read-only share from Machine1, and back those up as well.
mount -t smbfs -o username=NAME,password=PASS \
  //Machine1/MyDocs /mnt/m1md
tar czf /dev/tape /etc /home /mnt/m1md
umount /mnt/m1md
The MyDocs share from Machine1, the Windows box, is mounted, with appropriate options. Since there is privileged information contained in this script, it would be wise to protect it with a mode of 500 (r-x, user only), allowing none but root access. Then that share, in addition to the configuration and data files, is backed to the generic tape device (a symbolic link to the actual tape device, which varies from machine to machine).
Warning
Most SCSI tape drives perform hardware compression on the data stream as it is written. For these drives, do not use the 'z' option to compress the tar stream. In addition, some sources warn that compressing data at all onto tape is a bad idea, since a block corruption of compressed data can leave a whole tape useless. However, we suggest that you balance that against your backup needs and resources. If the only way you can get automated backups to a single tape is by compression, then do it. There is less risk in this approach than having to remember to be present for tape changes.
This setup creates a full image backup each time, acceptable in a small network. For a larger network, a weekly full image with daily differential backups, may be more appropriate. Here's a script to accomplish just that:
#!/bin/sh
# Backup Script by Bilbrey
#  create a full image backup manually, and touch /root/backup.date
#    before installing cron job - to start the cycle properly
#
#  WARNING: Username and Password data here - chmod 500
#  written 05/16/98
#  modified 12/28/99 - added smb shares

DAY=`date '+%A'`  # Set variable DAY equal to day of week name

# mount the windows data directory from Bowie
mount -t smbfs -o username=NAME,password=PASS //Bowie/MyDocs /mnt/bowie_sh

# Differential is most common, so we'll do that first, 6 days a week
if [ "$DAY" != "Sunday" ]
then  # we're doing a differential backup
      # backup all the files more recent than the last full backup
  tar czf /dev/tape `find /home /etc /mnt/bowie_sh -newer /root/backup.date`

else  # it's Sunday, do a full backup.
  tar czf /dev/tape /home /etc /mnt/bowie_sh
  touch /root/backup.date  # reset our full image date to current
fi

umount /mnt/bowie_sh

#EOF
This form of backup scheme is advisable. The weekly full images are rotated off site, for fire and theft safety. Additionally, critical data (such as the files for this book) are backed up nightly off site over the Internet. Around the first of each month, a full image gets burned manually to CDR, and put into a bank deposit box. While this may seem like overkill to some readers, imagine having to recreate your data files, your address and calendar data, perhaps your financial records. The advantage of tape is one swap a day, any time, with an automatic backup done by the system overnight. Make the processes easy to follow, and you will. If it's too much work, you may decide to skip sometimes. This is demonstrably a BAD THING (tm), leading to eventual problems.
As we begin this section on adding software, a few definitions are in order. A package is a collection of executable, configuration, and documentation files, combined with directions for installing the files. The package manager handles the task of actually installing the files. The package management system used by OpenLinux is called RPM, which is short for Red Hat Package Manager, a piece of GPL software that has been incorporated into many different distributions. In addition to RPM, the other major packaging systems are Debian's (a format that competes with RPM), and Slackware's (which is an enhanced tar file format).
Software may also be installed by getting a tarball, which is a tar file, generally gzipped. The tarball may contain binaries or source code to be compiled locally for best compatibility and performance. For a good example of getting and installing software from a tarball, look at the section on the Joe editor in Chapter 16.
The advantage of using RPM packages is that as the manager installs packages, they are logged in a database. This allows requirements, dependencies, and conflicts among the packages to be more easily resolved. This greatly eases the task of administering the software that is on the system.
A problem, of course, is mixing tarballs and packages on a single system. Each can rupture the other, in the same manner that installing ill-behaved Windows applications could break other, previously working applications. That said, we have mixed both in systems in the past. Generally, there have been no problems that consulting the system logbook didn't solve. (You do keep notebooks on the computer hardware and software installed, don't you?)
The other distinct advantage to RPMs is that much of the software you need is available on the CD-ROM you installed from. Security and updates are available and signed from the distribution's site (in this case, http://www.calderasystems.com/).
Warning
Getting and installing a tarball is like kissing a stranger. Most of the time it's perfectly safe. However, you should always pay attention to the reputation of the source of your software.
rpm is the Red Hat Package Management utility. There are a variety of GUI front ends for rpm; however the program works great from the command line, too. For the developer, check the canonical online location, http://www.rpm.org/, as well as looking at the rpm manual page to learn more about the various modes of this utility. Here, we briefly cover adding, updating, querying, verifying, and removing packages.
rpm - Red Hat Package Manager
Usage : rpm [options ...] [ package | pkgfile ...]
|
|
-i [opts] pkgfile |
Install pkgfile. Use only when the package has not been installed before |
-U [opts] pkgfile |
Upgrade pkgfile, removing all older versions if they exist |
-F [opts] pkgfile |
Freshen package installation - only upgrades if previous package is present |
-q [opts] |
Use query in many ways, to determine if a package is installed, the revision level, and much more |
-V pkgfile |
Provides verification of size, checksum, signatures when available. This is useful in determining what's changed since initial installation from read-only media (like a CD-ROM) |
-e [opts] package |
Uninstall (remove) package. Provides dependency checking to inform user of breaking associated packages |
-v[v] |
Verbose output displayed while utility works |
--version |
Display rpm utility version information and exit |
In the following example, we use the sample rpm file for the program Speak Freely, an Internet telephony application that is available from the contributed files section of the Caldera site (ftp://ftp.calderasystems.com). We downloaded it, then as root, moved the file to the directory /usr/local/RPMS (creating it if necessary, as that's our customary place to store RPM files that don't come from the distribution CDs). Then, as root:
[root@bobo /usr/local/RPMS] rpm -i speakfreely-7.1-1.i386.rpm

[root@bobo /usr/local/RPMS] rpm -i speakfreely-7.1-1.i386.rpm
package speakfreely-7.1-1 is already installed
The install is a rather terse mode. When rpm installs without error, which is most of the time, there is no output. A repeat installation (our most common mistake) results in the error message printed in the second example.
[root@bobo /usr/local/RPMS] rpm -q speakfreely
speakfreely-7.1-1

[root@bobo /usr/local/RPMS] rpm -q speakfreely --list
/usr/doc/speakfreely-7.1
/usr/doc/speakfreely-7.1/COPYING
 * * *
/usr/local/bin/sfecho
/usr/local/bin/sflaunch
 * * *
/usr/local/man/man1/sfecho.1.gz
/usr/local/man/man1/sflaunch.1.gz
 * * *

[root@bobo /usr/local/RPMS] rpm -q -f /bin/login
util-linux-2.9s-5
Used in its most basic form, query merely validates the current installation by returning the version number. One extraordinarily useful query is to get a list of the files installed, as the second example shows. This allows you to know where (and what) the executables are, and what documentation has been installed. The last of the examples for querying demonstrates how rpm can use its database to identify the package from which any given file is installed (provided that rpm was used to install the file).
[root@bobo /usr/local/RPMS] rpm -V -p speakfreely-7.1-1.i386.rpm

[root@bobo /usr/local/RPMS] rm /usr/doc/speakfreely-7.1/COPYING

[root@bobo /usr/local/RPMS] rpm -V -p speakfreely-7.1-1.i386.rpm
missing    /usr/doc/speakfreely-7.1/COPYING
In the preceding examples, the installed package is verified against the specified package file. As with installation, the output of a successful verification is boring. In the second command, we erase one of the files provided by the Speak Freely package in order to induce a verification failure, shown following the third prompt.
[root@bobo root] rpm -e speakfreely
cannot remove /usr/local/man/man1 - directory not empty
cannot remove /usr/local/man - directory not empty
cannot remove /usr/local/bin - directory not empty
When removing a package, it is only necessary to specify the package name, not the revision level - after all, you are deleting, rather than installing, so who cares about versions? On removal, rpm attempts to undo everything that it did when installing a package. Fortunately, it is bright enough to fail, if other events have also modified the resources.
In the example shown, when Speak Freely was installed, rpm tried to create the directories /usr/local/man, /usr/local/man/man1, and /usr/local/bin. If these directories already existed, with or without contents, there is no problem. When deleting the package, as rpm finds that it cannot remove the directories, it displays the notices shown.
Time is always a problem - just look at our schedules to prove that! Time can be kept on an OpenLinux system in either local time or what is now called UTC (Universal Coordinated Time, formerly GMT). When OpenLinux is first installed, you are prompted to select a time zone and to specify whether your hardware clock is (or will be) keeping local or UTC time. For most workstation use, and certainly if you plan on dual-booting Linux with any other operating system, select local time for your hardware clock. The only situation in which we can unreservedly recommend that you should set the system and the hardware clock to UTC is on an Internet-connected server. In communications with other servers across the Internet, using a single base time is important.
There are actually two clocks on your OpenLinux system. The first, as noted, is your hardware (or CMOS) clock, which isn't wondrously accurate, but it does keep ticking even when the AC is turned off. Then there's the system clock, which is a software clock that is an interrupt-driven event timer. In normal circumstances, the system clock is very accurate indeed. Under extreme system load (such as multiple compiles, running graphics intensive games, etc.), the system clock itself may not keep proper time. There are ways of coping with clock errors, between local adjustments and network timekeeping facilities. Now, let's review the some of the various time-keeping and related utilities available.
date is the frontline program for time management on GNU/Linux. It is used for both displaying and setting the system clock (not the hardware clock).
date - Print or set the system date and time
Usage : date [options ...] [+format_str]
|
|
--help |
Print a usage message to STDOUT, then exit |
-d | --date datestr |
Display date as specified by datestr |
-s | --set datestr |
Set system clock according to data from datestr |
-u | --universal |
Print or set time and date using UTC |
--version |
Display rpm utility version information and exit |
format_str |
Specify the format for displaying the date |
Setting the system clock is a superuser-only task, and the datestr format shown below must be followed. Note that the last three fields (CC, YY, and ss) are optional and may be omitted.
MMDDhhmmCCYYss
==--==--==--==
 | | | | | | \-- Second (optional)
 | | | | | \---- Last two digits of year (optional)
 | | | | \------ First two digits of year (optional)
 | | | \-------- Minute
 | | \---------- Hour
 | \------------ Day
 \-------------- Month
The format options for the format_str are:
%% A literal '%' character
%n Newline
%t Horizontal Tab
%r Time, 12 hour: hh:mm:ss [AP]M
%T Time, 24 hour: hh:mm:ss
%c Locale's date & time, for example: Thu Jun 01 12:02:45 PDT 2000
%H hour: 00 .. 23
%I hour: 01 .. 12
%k hour: 0 .. 23
%l hour: 1 .. 12
%M minute: 00 .. 59
%p AM or PM for locale
%s Seconds since beginning of epoch (1970).
%S Seconds: 00 .. 60
%X Locale time representation: %H:%M:%S
%Z Timezone
%s Seconds since beginning of epoch (1970).
%a Abbreviated local weekday name: Sun .. Sat
%A Full weekday name: Sunday .. Saturday (variable length)
%b Abbreviated month name: Jan .. Dec
%B Full month name: January .. December
%d Day of month: 01 .. 31
%j Day of year: 001 .. 366
%m Month number: 01 .. 12
%U Week number of year: 00 .. 53 (Sunday first day of week)
%w Day of week number: 0 .. 6 (Sunday first day of week)
%Y Full year: 1979 ...
%y Last two digits of year: 79 ...
%c Locale's date and time, for example: Thu Jun 01 12:02:45 PDT 2000
Examples:
Usually, date is invoked without options which displays the current date and time in default format, as shown in the first example. The second example uses a format string to define the output. The leading plus is required for the format string.
[bilbrey@bobo bilbrey] date
Tue Jun  6 21:32:21 PDT 2000

[bilbrey@bobo bilbrey] date "+%H:%M%t%B %d, %Y"
21:33   June 06, 2000
Specifying part of a date results in the output as shown below. Since no time was specified, the only new thing we learn here is that Kwanzaa 2000 began on a Tuesday.
[bilbrey@bobo bilbrey] date -d 26-Dec
Tue Dec 26 00:00:00 PST 2000
Only the superuser is allowed to set the date and time. The information can be specified in the rigid format shown in the first example below, or in a "longhand" style using the -s option, as the second command demonstrates. The current year is always assumed, and seconds are set to zero unless specified.
[root@bobo bilbrey] date 06062145
Tue Jun  6 21:45:00 PDT 2000

[root@bobo bilbrey] date -s "June 06
Tue Jun  6 21:47:00 PDT 2000
tzselect enables the root user to set the local time zone by choosing from lists of ever smaller geographic regions, until a unique timezone area is selected. There are many distinct timezone files, mostly related to the rules for handling daylight savings time. For instance, we were surprised to learn from this program that there are (currently) seven distinct "Eastern" time zones in the United States, varying by state and sometimes by county. Tricky stuff made easy by this simple program. The end of a run from tzselect looks like this:
 * * *
The following information has been given:

     United States
     Pacific Time

Therefore TZ='America/Los_Angeles' will be used.
Local time is now:      Wed Jun  7 20:40:40 PDT 2000.
Universal time is now:  Thu Jun  8 03:40:40 UTC 2000.
Is the above information OK?
1) Yes
2) No
1
America/Los_Angeles
The output string can be concatenated with the zoneinfo path to yield /usr/share/zoneinfo/America/Los_Angeles. This is the file that /etc/localtime links to on Brian's system. If your timezone information appears to be confused ("messed up," according to some technical documentation we found online at http://www.linuxdoc.org/), running tzselect to determine the correct zoneinfo file is a good move.
hwclock is used to read from and write to the hardware clock. On some distributions (though not OpenLinux), this utility is also accessible through the symlink'd clock. Confusingly, even though the manpage is accessed by typing man hwclock, the page header reads CLOCK(8). Go figure. However, the manual page contains a good supplementary discussion of time and Linux; read it.
clock - Query and set the hardware clock (Real Time Clock, or RTC; the system clock)
Usage : hwclock [options ...]
|
|
--show |
Read RTC, display to STDOUT |
--set --date datestr |
Set RTC to specified date |
--hctosys |
Set system clock from RTC |
--systohc |
|
|
Set RTC from system clock |
--version |
Print version information to STDOUT |
--utc | --localtime |
Tells kernel whether RTC is keeping UTC or local time |
--test |
Do everything except actually modify the time on anything. Commonly used with debug to see what's going on |
--debug |
Display lots of data about hwclock activities |
In the following example, the superuser sets the RTC from the system clock. There is no output accompanying success.
[root@bobo bilbrey] hwclock --systohc
Most system clocks keep reasonably good time, if you squint a bit and don't look for too long. The aptly named adjtimex program allows the root user to directly manipulate the raw kernel variables that control the system clock. Reading through the manual page is quite instructive. Here's adjtimex in action:
[root@bobo bilbrey] adjtimex --print
         mode: 0
       offset: 0
    frequency: 0
     maxerror: 252795
     esterror: 82229
       status: 1
time_constant: 2
    precision: 1
    tolerance: 33554432
         tick: 10000
     raw time:  960433475s 164736us = 960433475.164736
Running adjtimex with the --print option lists all of the kernel's time variables, most of which are used actively by the kernel (though the maxerror and exterror as well as raw time are informational only). These are fully documented in the manual page.
adjtimex should be used in systems that aren't always left on, or have intermittent network connectivity. With careful tracking of time and drift rate, also known as slew, you might find, for example, that the system clock is 17.28 seconds slow each day. This is an extraordinarily handy number. Note that the tick number is 10000. This is the count of microseconds per tick. Changing that number by 1 either way results in a daily adjustment of approximately 8.64 seconds. To correct for a clock that is slow by 17.28 seconds per day, add the following line to the end of the /etc/rc.d/rc.local file:
adjtimex --tick 10002
This will apply the correction at each system boot.
NTP is the acronym for Network Time Protocol. Its purpose is to keep your system in sync with an external time reference, and optionally to provide synchronization for other machines on a local or wide-area network.
For a marvelous discussion of networked timekeeping, go to the best site first: Time Sync at http://www.eecis.udel.edu/~ntp/. If you want to provide time synchronization services for a private subnet, then read everything on the Time Sync site to learn all the bits we're going to leave off here. Right now, we'll cover configuring and running the network time server for a single workstation.
/etc/ntp.conf is the file that guides the operation of the xntpd daemon. The following listing includes the commented modifications we used in one OpenLinux installation:
01 # $Id: i386.linux,v 1.1 1997/11/06 22:40:51 duwe Exp $
02 # time servers reachable via network (sym-name or IP-Address)
03 # DO READ notes.html IN THE DOC DIRECTORY BEFORE CONFIGURING ANY !!!
04 # -- AT LEAST THE SECTION "Configuring Your Subnet" .
05 server ntp1.mainecoon.com    # local Stratum 2 server added by bilbrey
06 server clock.tricity.wsu.edu # local Stratum 2 server added by bilbrey
07 server ntp3.cs.wisc.edu      # local Stratum 2 server added by bilbrey
08
09 driftfile	/var/state/ntp.drift
10 keys		/etc/ntp.keys
11 #trustedkey 1
12
13 # WARNING: statistics may fill up your disk !
14 # (use scripts/support/* for cleanup)
15 #statsdir	/var/NTP/
16 #filegen	peerstats	file peerstats		type day	enable
17 #filegen	loopstats	file loopstats		type day	enable
18 #statistics peerstats loopstats
19
20 # sync to local (own) clock if everything else fails
21 server 127.127.1.0
22 fudge 127.127.1.0 stratum 7
23
24 #
25 # reference clocks -- see refclock.html for supported types & options
26 # and don't forget to create symlink(s) /dev/refclock-X -> /dev/cuaXX
27 #
28
29 #server 127.127.10.1 prefer		# austron 2201A gps receiver
30
31 #server 127.127.8.0 mode 5		# DCF receiver "TimeBrick" / Conrad
32 #fudge 127.127.8.0 flag1 1  flag2 1
33
34 #server 127.127.4.1			# Spectracom 8170 WWVB
35 #fudge 127.127.4.1 time1 0.0035 flag4 1
36
37 #
38 # Broadcasting / Multicasting -- Client / Server
39 #
40
41 broadcastclient yes
42 #broadcast 194.231.72.63 key 1
43
44 # multicastclient
45 # broadcast 224.0.1.1 key 1 ttl 3
46
47 # ... and many more advanced config options in xntpd.html ...
48
With the exception of lines 5, 6, and 7, which specify the timeservers that this system uses for synchronization, this is a stock configuration file. Multiple servers are specified, so that the NTP daemon can, in the words of the documentation, "...determine insanity on the part of any one server." Take note of the last line: the actual system location and name for this file is /usr/doc/xntp-4.0.97/html/ntpd.htm in our installation. We are not using the other features of this service.
One bit of information from the Time Sync site bears repeating. There are multiple tiers, or strata, of time servers. Stratum 1 public servers are reserved for use by servers that provide time for 100 or more other systems. Stratum 2 servers are for all other uses and are listed at http://www.eecis.udel.edu/~mills/ntp/clock2.htm. Time servers for your system should be chosen primarily for geographic location - a close server requires fewer network hops, thus a lower network load. To get the most accurate results, pay attention (using traceroute) to the number of hops - the lowest network hop count will generally yield less variability in the resulting time setting.
xntpd is the name of the NTP time daemon as installed by OpenLinux 2.4, although the system documentation refers to ntpd. We can't explain the disparity. xntpd is a system service, and should be started at boot. It can be incorporated into the startup scripts (which permits specifying for specific runlevels - probably a good thing, since you can't run networked time in runlevel 2, with no network, for example), or in rc.local.
Like the configuration file, there are no manual pages for the executables that are part of the NTP package. The Time Sync site and system HTML files are very complete, though not quite as easy to get at from the command line.
System administration is a BIG topic (as evidenced by the number of published tomes devoted to this one aspect of Linux) and an important part of keeping a Linux installation running optimally. It is also a controversial topic - every administrator has his or her own favorite tricks and methods, which often means a different path to reach the same destination. Welcome to the beauty of Linux: Flexibility in approach and style.
This chapter covered the following topics:
fsck (File System ChecK), tune2fs (for adjusting filesystem parameters), dumpe2fs, and debugfs for extreme problem recovery.shutdown command (or the GUI shutdown processes offered by KDE) should always be followed.vipw and vigr, respectively. These invoke the vim editor while locking the file so that other changes cannot be effected, corrupting the data.useradd and userdel can be used to handle normal addition and removal of user accounts from a Linux system. In addition, we went through the procedure for manually removing a user from the system, addressing all of the data and configuration considerations, some of which are overlooked by the userdel utility.ps, pstree, and fuser commands, among others.renice utility (for the former) and the kill or killall programs (for the latter).tar, cpio, dump, and restore are all tools that can be used for this purpose.tar makes another appearance in this chapter along with the rpm package manager when we discuss adding (and removing) software from an OpenLinux system.date command is the primary information and system clock setting tool. hwclock is used to work with the CMOS (or RTC) clock. tzselect is a utility which helps in selecting which time zone file is used by the system. xntpd (on OpenLinux).Go to the Table Of Contents