
Email Tom
Tom's Website


Email Brian
Brian's Website
|
Email Tom Tom's Website |
|
Email Brian Brian's Website |
Did you read the Preface? Thanks!
KDE is an X Window display manager, and a window manager/GUI environment. This distinction is important, since many people making the transition from a Microsoft product to Linux might see these two functions as identical.
The first function that KDE performs is that of display management. There are currently three major display managers for X Window systems: the original xdm, upon which many older window managers operate; gdm, the Gnome Display Manager (not available with stock OpenLinux); and kdm, the KDE Display Manager. The running display manager is set in the configuration file /etc/rc.d/rc.gui, by default kdm on current OpenLinux distributions. In each case, the duties are primarily the same. The display manager provides a login and password prompt (in the form of a dialog box, often with additional features), authenticates users, and starts the ensuing "session," which is an instance of a window manager (the second function) such as KDE. Figure 8-1 shows the features of Caldera's version of the kdm login screen.
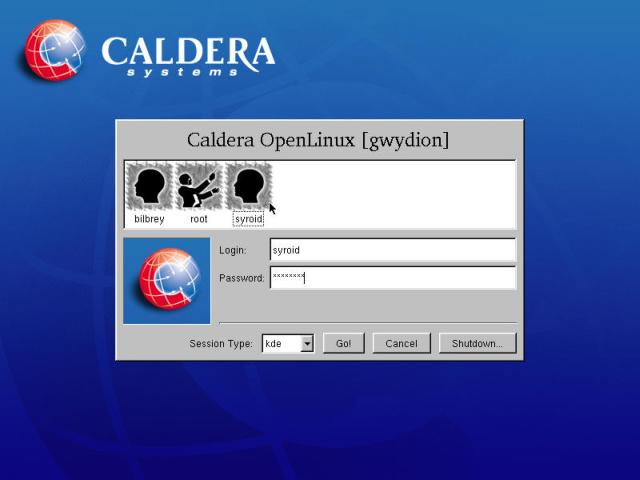
Figure 8-1
The kdm login screen for OpenLinux eDesktop, with a user selected and password entered.
The title of the dialog box includes the Caldera OpenLinux trademark, in addition to the name of the machine in square brackets. This is useful since many Linux boxes are run remotely, or via a KVM switch - knowing which machine you're logging into makes it a lot easier to get the password right.
kdm presents the user with a list of available accounts. When a graphic is selected, the associated user name is automatically entered in the Login field and the cursor moved to the Password field. As shown in the illustration, asterisks hide the password during entry.
Across the bottom of the login dialog box are various functions that may be selected. The least familiar is first on the left, Session Type. There are two session types available on a basic OpenLinux installation: KDE and failsafe. The default session is KDE. Additional sessions (window managers) may be added to an OpenLinux system; consult Chapter 13 for more details. Failsafe is a very simple fall-back session which opens a single, unadorned terminal window without any of KDE's bells and whistles. It is typically used to log into and repair a damaged KDE configuration.
Hint
Let's make a terrible assumption now. You've damaged your KDE configuration beyond the point of easy repair or taken a wrong turn with your desktop layout and don't know how to get back to where you started. While the following is a bit drastic, we've used it on more than one occasion. Log in using failsafe, chosen from the Session type: drop-down list. Then, at the command prompt, typemv .kde kde_old ; mv .kderc kderc.old, which moves all of your KDE configuration under the local .kde directory, as well as shifting your .kderc file. Log out (by typing exit in the terminal window), and log back in, choosing KDE this time. This installs a completely fresh set of defaults from the system KDE files. Then you can manually retrieve any important settings from the newly created *.old file and directory before deleting those.
The remaining option buttons are relatively straightforward. Go! is the default action of the dialog box, equivalent to pressing Enter. Provided a valid user account and associated password are in the appropriate fields, the selected session is started. If the account name or password are incorrect, the text fields blank and turn gray momentarily, the message "Login Failed!" is displayed in the lower left corner of the dialog box, then both fields are cleared for another attempt.
Cancel clears all the text fields. Shutdown opens a sub-dialog box with four options: Shutdown (halt and power down), Shutdown and restart (reboot), Restart X server, and Console mode. Select one of the four, then press OK; choosing Cancel from this subdialog returns you to the main login dialog box.
The last two shutdown options deserve more explanation. Unlike the MS Windows environment, the X Window server is not integral to the operating system and can be restarted with reasonable impunity. Any running processes that are children of a login session are terminated when the X Server is restarted, but fundamental services including networking, routing, and system daemons are unaffected. There are two reasons for restarting X windows. On occasion, the X server becomes unstable, sometimes due to a misbehaving application. The second reason for restarting X is to make use of a revised configuration (found in /etc/XF86Config). The fourth subdialog option, Console mode, exits the X Window environment altogether. The X server is shut down and a text-mode console is presented to the user with a new (text-based) login prompt.
When a user logs into KDE for the first time, two windows automatically open. The first is an instance of KFM (the KDE File Manager), which opens in the user's home directory. The second is the KDE Setup Wizard, shown above the KFM in Figure 8-2.
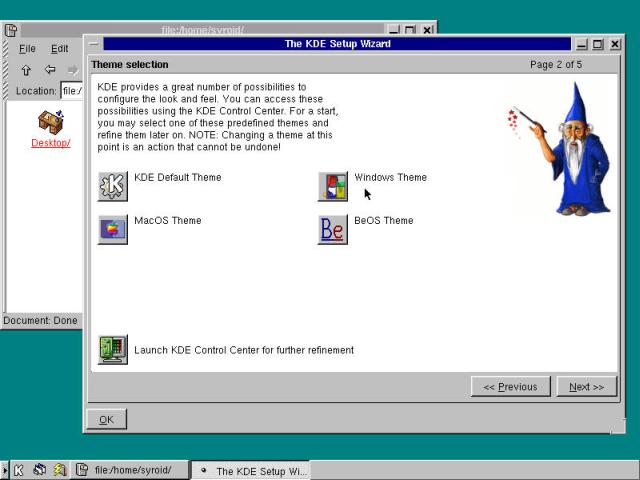
Figure 8-2
The KDE Setup Wizard in a KDE desktop, using the "Windows" theme.
We first introduced you to the OpenLinux version of the KDE Setup Wizard near the end of Chapter 3. Briefly, the wizard enables each user to quickly customize their desktop from a limited selection set, choosing desktop theme, system resource (floppy, CD-ROM and printer) icons, as well as workspace links to various online sites for KDE and Caldera. On the second screen, pictured in Figure 8-2, you can see the initial results of selecting the Windows Theme from page 2 of the Setup Wizard. There's a familiar green color to the desktop, and the standard menu and task bars from KDE are combined into a single low-profile bar at the bottom of the screen.
To reiterate our stance on this "feature," we advise using almost any other theme (besides the Windows Theme) for the OpenLinux desktop. While many of the functions in the Microsoft environment are replicated in one way or another on KDE and Linux, the implementations are not the same. We see the Windows Theme as setting an incorrect expectation for other parts of the system to look and operate in a manner consistent with Microsoft products, causing confusion and frustration for the new Linux user.
Altogether, we're going to spend Chapters 8 through 10 highlighting the details of the KDE environment. But right now, let's introduce you to KDE with all the depth of a seasoned Hollywood journalist - that's right, surface features only. Figure 8-3 shows a nearly-default starting KDE configuration. We've made changes to the background and text color, as well as toyed with the fonts a bit, in order to produce something recognizable when viewed as a printed screen shot.
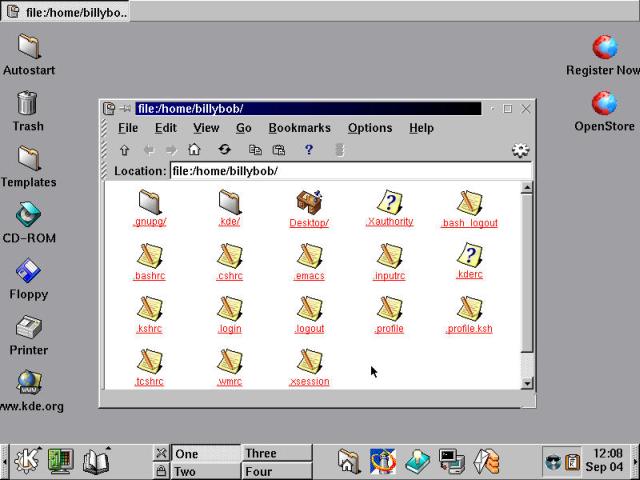
Figure 8-3
A basic KDE desktop, with all the default features present.
There are three main areas in the default KDE environment. The bar across the top of the screen is a taskbar. This contains a selectable button for every running GUI window. In the current case, there is only the KFM (KDE File Manager) task running, and the window is open. When a running task is minimized, selecting it on the taskbar returns the window to the position and state it was previously in. The main desktop area contains active windows and icons. The icons may be program links, links to system resources, or links to folders.
Hint
Alternatively, the third (middle) button, or right-left chord on the mouse brings up a context list of active tasks. These can be selected from with exactly the same effect as choosing a running process from the taskbar. For this reason, we configure systems without the taskbar, as shown later in this chapter, to reclaim a little more screen desktop real estate.
The bar running across the bottom of the desktop is called the Panel (aka kpanel). The panel has some stock contents as well as several program execution icons. The right and left side areas, textured with an arrow pointing outside the workspace, allow the KPanel to be retracted or hidden in the direction indicated by the arrow. This hide action is animated by default. The other features of the default KPanel are listed below, as they appear from right to left in a stock installation of eDesktop.
With that review of the contents of a KDE desktop over, now it's time to delve a little deeper into the highly configurable KDE environment.
The KDE desktop is a marvelously mutable space. Every visible feature, and many invisible behaviors, are easily configurable from a suite of utilities that are available from the KDE Control Center. In this section, we'll walk you through several of the major configuration possibilities. We won't touch on all of them, and there will be many more in the newest version of KDE, due out sometime in the Fall of 2000.
New
As final edits on this book progress, KDE 2.0 has been released. See http://www.kde.org for all the details. Additionally, we've added a section on KDE 2.0 Final in Chapter 21.
Newest
At this writing (April, 2001), the stable KDE version stands at 2.1.1. There are many new features and upgraded versions of just about everything we cover in this chapter. All of the material we cover stands up as a good intro to nearly every feature of the newest KDE, although there are differences in a few of the details.
As a demonstration of how the KDE can be configured, we're going to walk you through the process of getting a default KDE setup modified for the screenshots used in this book. There are constraints on the publishing process that place restrictions on type, style, and the resolution best suited for production of a book. Now you'll know how we got there.
We start off in Figure 8-4 with a default KDE background and theme. The front window is the KPanel Configuration dialog box. This utility is opened by right-clicking on a blank area of the KPanel (the icon bar running across the bottom of your computer screen), and selecting Configure. The other context menu option is Restart, used to fully enable all changes made during configuration.
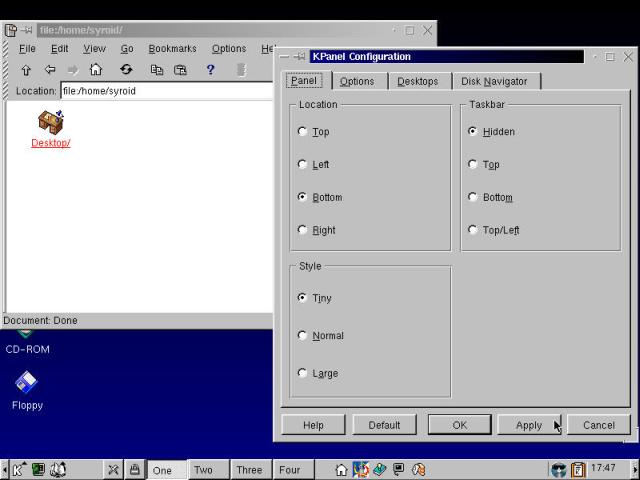
Figure 8-4
Default KDE Theme desktop, KPanel Configuration dialog box shown, with changes applied.
One of the major constraints of printed screenshots is the necessity of having recognizable features showing on an illustration just over four and one half inches (approximately 12 centimeters) wide. Clearly, a 1600x1200 desktop is not going to have very many useful images at this print scale. Our working resolution is 800x600, and in order to make best use of this space, we want to get as much area on the desktop as we can.
In order to accomplish this, we start on the Panel tab of the KPanel Configuration dialog box, leaving the location set to Bottom, the style (of the Panel) set to Tiny, and the taskbar hidden. This gains us 64 pixels of vertical space to play with, important in a small-screen environment (this is also handy with laptops). Then we close the dialog box with the OK button.
Our next step is to setup some desktop colors, fonts, and sizes that render well into the printed environment. Right-click in the empty area of the desktop and select Display Properties from the context menu. The Display settings dialog box is shown in Figure 8-5.
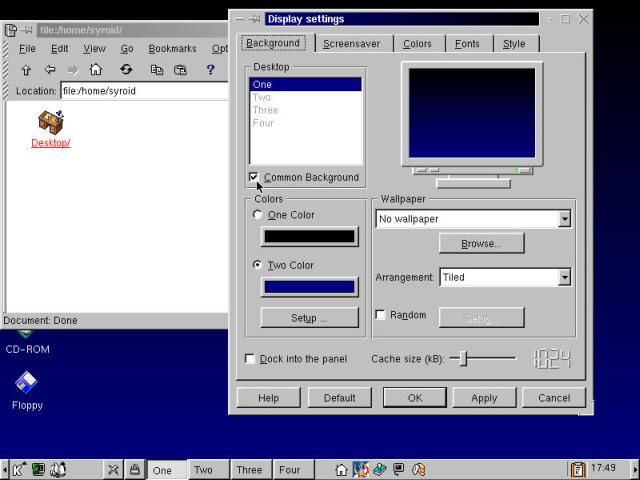
Figure 8-5
The Display settings dialog box, open on the KDE desktop.
The Display settings dialog box is unusually familiar looking. With a few exceptions, a moderately experienced user has very little difficulty learning how to configure the KDE desktop.
On the first tab of the dialog box, Background, a pair of distinctive features stands out. First, each named (numbered) desktop may be set to have a different background, if desired. In Figure 8-5, the Common Background box is just being checked. Consistency in a user interface is important for documentation purposes. In actual usage, we often configure each desktop to look slightly different, to provide additional visual cues for our working environment.
In Figure 8-6, we show setting the desktop background to be a single color, with the Select Color sub-dialog box open.
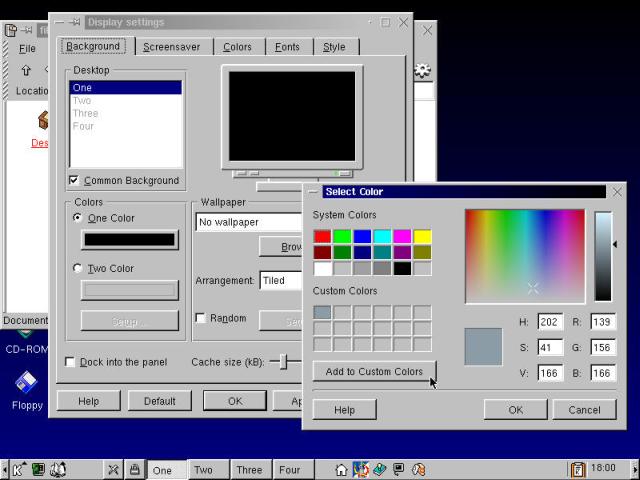
Figure 806
The Select Color dialog box, in the process of setting the Desktop Background color.
A drawback of the Select Color dialog box is that the HSV and RGB boxes are informational only. You can't specify a number directly in this version of the utility (you can in the next release of KDE, however). Instead, the color must be chosen using a combination of the color picker (the smeared rainbow window) and the hue intensity slider bar, on the right side.
Hidden Feature
These dialog boxes, like most every Linux configuration tool, are simply wrappers for text configuration files. In the case of the desktop color configuration, the appropriate files are ~/.kde/share/config/desktop0rc (...1rc, ...2rc and so on; ~/ indicates the user's home directory). In this file, the colors can be set specifically, although they must be converted to hexadecimal first. Thus the background color shown in Figure 8-6, with an RGB triplet of 139 / 156 / 166 is set in the desktop0rc file as Color1=#8b9ca6 (8b Base 16 equals 139 Base 10).
Additional features of the Background configuration include choosing and configuring desktop wallpaper, either from a stock set of photographic images, tileable images, or from images you've collected or generated yourself. Alternatively, you can setup the wallpaper to be randomly selected from a chosen directory, and to change at intervals that are defined in the Setup sub-dialog box. The "Dock into the panel" checkbox sets an icon in the area next to the KNote clipboard for easy access. The cache size is a user setting for how much memory to devote to the display background images.
Hint
On machines with small amounts of RAM (32MB or less), set a small cache size and don't use wallpaper. In this way, static RAM used by the KDE environment can be held to a minimum, leaving more room for user applications.
Skipping over the Screensaver setup (we'll leave that in your capable hands), we jump straight into the Colors configuration tab shown in Figure 8-7.
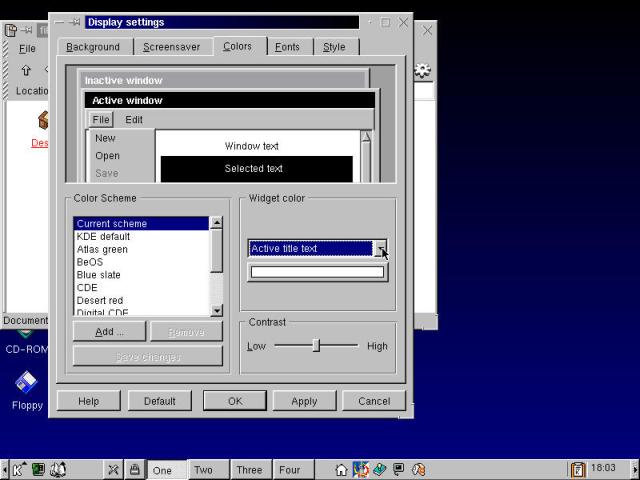
Figure 8-7
The Colors configuration tab on the Display settings dialog box.
The Colors tab allows you to set specific colors for a variety of application windows. The actual features list includes: Inactive title bar, Inactive title text, Inactive title blend, Active title bar, Active title text, Active title blend, Background (of the window border and menu area), Text, Select background, Select text, Window background, and Window text. The Contrast slider sets the visual depth of the window beveling feature.
All of these options may be specified by selecting one of the default color schemes from the list to the left of the box. Alternatively, you can set up all the colors to your preference (as we did for this work), and save the configuration by selecting the Add... button and providing a name. The saved configuration then appears at the bottom of the list of color schemes.
The fonts that are used by application windows in the title bar and menus may also be configured from the Fonts tab on the Display settings dialog box. This is depicted in Figure 8-8.
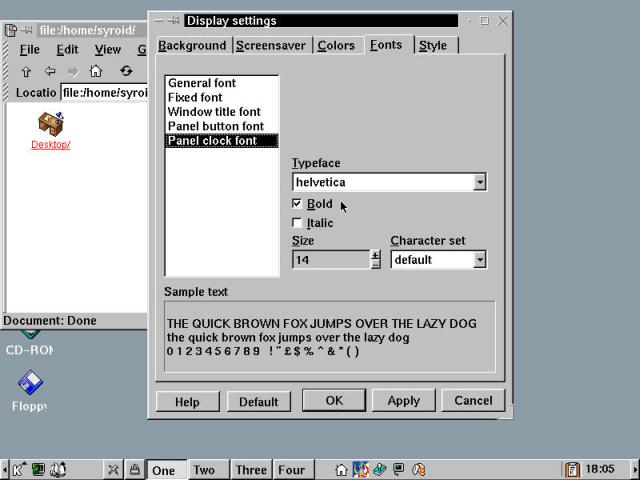
Figure 8-8
The Fonts tab screen from the Display settings dialog box.
There aren't many choices when it comes to system fonts. For each text application (General, Fixed, and so on), the typeface and font size can be chosen, as well as bold and italic (if available for the typeface). Additionally, a character set may be selected which will allow some fonts to display in the typefaces native to many different countries. Additional character sets can be installed from the Binaries and Installation CD-ROM.
Note
In the transition from Figure 8-7 to Figure 8-8, many of the options being discussed were applied. In the Display settings dialog box, selecting the Apply button enacts all of the changes made on any of the five tabbed dialog boxes. Font changes may not display properly until KDE is restarted.
The final area of display configuration is referred to as Style. This is a small collection of options that didn't quite fit in any of the other categories, and so drop into a miscellaneous category. The Style tab screen is shown in Figure 8-9.
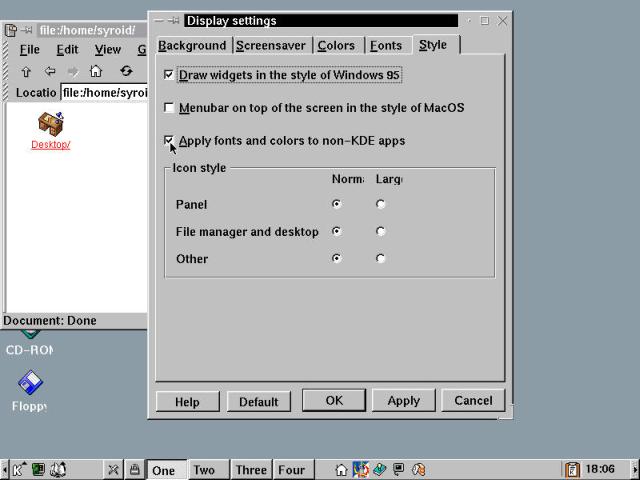
Figure 8-9
The Style tab screen from the Display settings dialog box.
Under the category of Style, as defined by the Display settings dialog box, we begin with widgets. Widgets are small drawn objects, like radio buttons and checkboxes. These may be displayed as shown in our screenshots, or in a different KDE-defined style. In this case, we defer to ease of use and select the Windows 95 style of widget for our purposes.
The next option puts a modified menu bar at the top of the screen, very similar to the Mac OS environment. The third checkbox offers the ability to apply the choices made to applications not specifically written to KDE standards. This is a good box to check, although there are programs that do not pay the slightest attention to this option.
Lastly, the various system icons can have their sizes adjusted. We have found that unless we're working in 1600x1200 resolution screens, the Normal size is just fine. Large helps to make icons distinctive at high resolutions.
KDE has a variety of features which at first appear very familiar to people who are used to the Microsoft way. This includes right-click context menus like the one shown in Figure 8-10. Aside from the familiar New, Open, Copy, and Properties selections on the context menu, there are Move to Trash and Delete choices. There is an important distinction between the latter two.
Warning
Deleting a file by saving it in a special location (like a "trashcan") is NOT a built-in part of the Linux operating system. Files deleted using the rm command in a terminal window are gone. Move to Trash is a feature of the KDE environment. Take advantage of the feature and the trash can, but do not forget that this particular beauty is only skin deep.
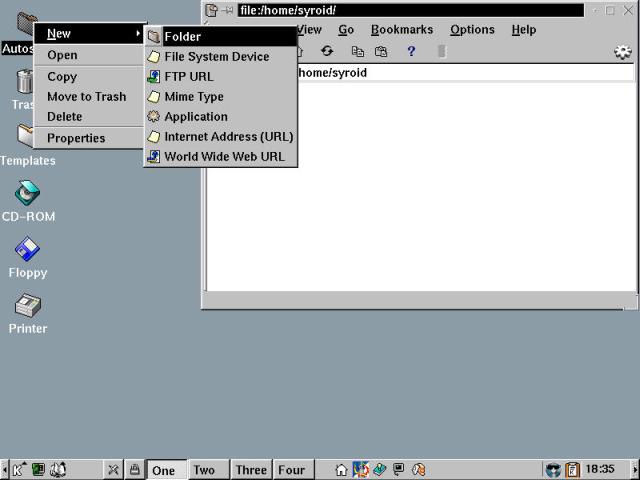
Figure 8-10
Right-click context menu on the KDE Desktop.
Move to Trash puts a file or other object in a special directory hung off the ~/Desktop directory. It is visible as a trash can icon on the KDE Desktop. Choosing Delete does just that. We've heard whispers that recovering a deleted file from a Linux system is sometimes possible, but usually unlikely. Keep good backups if you care about your data.
There are a variety of objects that can be created via the New selection from the Desktop and Item context menus. These include folders, device links, and several different types of URL, application, and mime type links. Folders and URLs are fairly standard. An application link on the desktop (or in most folders) simply starts that application. Mime links, in combination with application links, allow you to set application preferences for different types of files. Part of the relationship between applications and mime types is shown in Figure 8-11.
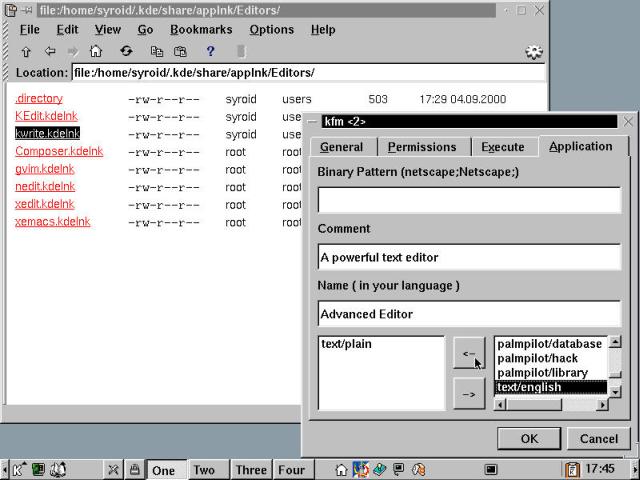
Figure 8-11
Setting up a mime type affiliation for an application in KDE.
To register an application to work with a specific defined mime type in KFM, select Edit --> Applications from the pull-down menus. The applications directory represents the structure of the KDE menu system. Locate the specific application file among the directories, and select Properties from the right-click context menu for the program link. Select the Application tab. Then using the two windows at the bottom of the dialog box, choose the appropriate mime type from the list on the right, and move it to the left window.
In Figure 8-11, the application KWrite is currently registered to handle files of type text/plain. In the screenshot, we're adding text/English to the list of registered types. As a result, when files of type text/plain or text/English are right-clicked in the KDE File Manager, the KWrite application appears in the context menu as a selectable option for opening the chosen file.
An additional feature of the KDE Desktop environment is tooltips. One of these perennial favorites makes an appearance in Figure 8-12. The tooltip text is defined in the Comment field of a link's Application tab, found on the Properties dialog box.
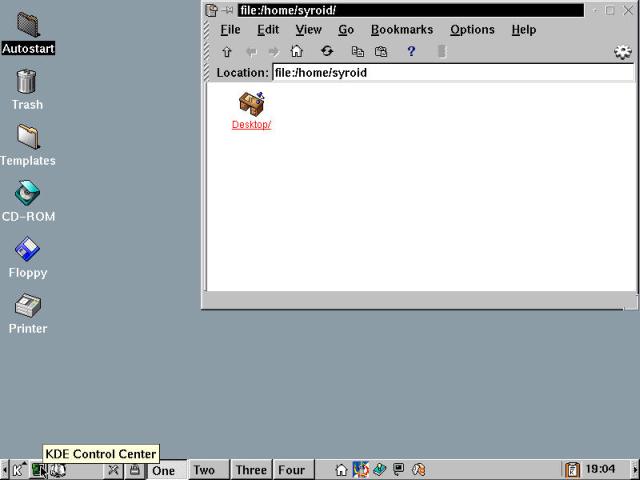
Figure 8-12
KDE Tooltips display when the cursor hovers over icons.
In each screen within the KDE Control Center (the actual program is called kcontrol), there are a minimum of three, and usually five, buttons that are at the bottom of each screen. The Help button displays a separate KDE Help Browser window with content targeted at the context of the tasks on the current screen or tab view. As changes are made, they are written to the configuration files in the .kde tree in the user's home directory. By choosing the Default button, any original configurations from the main KDE directory on your system are written into the fields you're currently working with. This bears saying another way: Default does not change the defaults for everything that KDE Control Center oversees, just the contents of the current screen. Alternatively, if there are no system-wide defaults, then choosing Default has no effect. The OK button applies any current changes and closes the current configuration view.
The first optional button is Apply, which commits the changes made to the current view (or screen) to disk, and often restarts the parts of KDE necessary to register the changes. In a multi-tabbed view such as Panel configuration, Apply or OK both effect changes made to all the tabs screens in the current view. Cancel closes the current window, rejecting any current changes. Apply and Cancel are not present in informational views where there are no possible changes to reject or commit. An alternative to cancellation is selecting a new configuration item from the tree to the left. That closes the current window, canceling any changes, and opens a view of the new configuration module.
There are few options in the pull-down menus in the KDE Control Center. The file menu contains a single selection, Exit. The Options menu also has but a single entry: Swallow modules. This is a rather obtuse phrase for users not well steeped in the lore of User Interface Design. A module that is swallowed is displayed in a pane of the current running application. A module that is not swallowed is displayed in a separate window. The default is to have Swallow Modules checked, and we leave it that way rather than defeat the purpose of having a control center! The Help menu contains a link to a short help file, and two About references for kcontrol and KDE. These are useful for garnering version information about the program, as well as contact and resource information for KDE.
You can see all of the top-level configuration power of the Control Center in the tree structured diagram, visible to the left in Figure 8-13 (and several of the ensuing figures, as well). In this illustration, we're accessing the Panel (KPanel) configuration, which we first encountered in Figure 8-4, only this time showing the Options tab screen. There are many items that can be configured here. On this screen, tooltips can be disabled, or the tip display speed adjusted. Other settings include Auto Hiding the Panel and Taskbar, enabling Auto Hide animation, and a variety of grab bag settings from menu organizational selections to KPanel clock options.
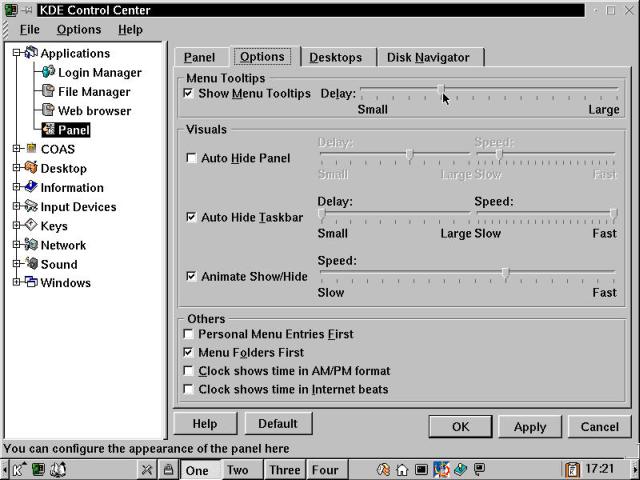
Figure 8-13
KDE Control Center dialog box, with the KPanel configuration pane visible at the Options tab.
Note
You might find yourself puzzling over the meaning behind the "Clock shows time in Internet beats" checkbox on the KPanel Options tab. A brief search indicates that Internet beats is a mode of timekeeping based upon a pace of 1000 state changes per day. That is, there are 1000 Internet beats in a standard day, with no time zones, no daylight savings time, nothing to support their use by humans at all. Internet beats were inflicted on the world by the makers of Swatch, which explains why the @000, or start-of-day beat, is coordinated with midnight, Central European Wintertime (BMT).
There are two other tab screens for KPanel. Desktops allow you to specify the number, names, and physical on-panel representation of virtual desktops. The Disk Navigator tab brings forward a number of K-Menu and Terminal application defaults.
Of the other programs shown under Applications, Login Manager is a root user-only program that we'll discuss in Chapter 13 (this also applies to the entire COAS sub-tree). File Manager and Web browser are two different aspects of KFM, and we'll take a look at those offerings in Chapter 10.
The Desktop sub-tree allows you to configure all of the items we discussed previously, from background color to fonts and much more. Figure 8-14 shows the Desktop tree opened, with the Borders configuration view active.
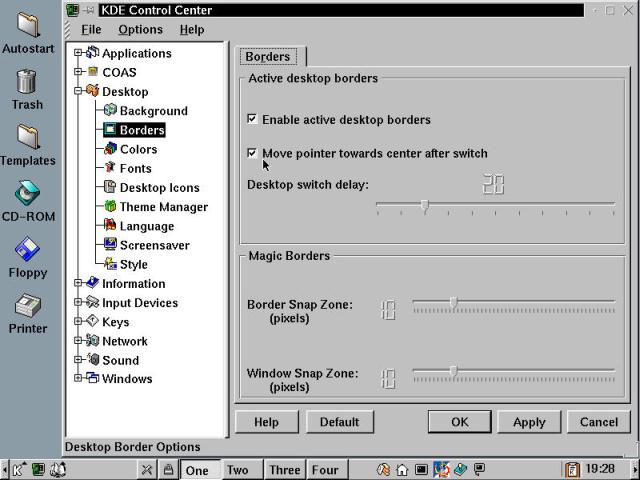
Figure 8-14
KDE Control Center in the Desktop sub-tree, with the Borders pane active.
Active desktop borders are a neat, if sometimes unnerving feature of many window environments under Linux and X, KDE included. As previously noted, there are four virtual desktops configured by default. In virtual orientation, One is in the upper left corner of a two-by-two grid of desktops, above Two, to the left of Three, and kitty-corner to desktop Four. (Bear in mind that these desktop names are variable, not permanent - you can name your desktops, from the Desktops tab of KPanel configuration.) However, all of these desktops wrap.
When the desktop borders option is set to Active, moving the cursor by itself or dragging a window to a desktop edge and continuing the motion, initiates a desktop switch. The Desktop switch delay allows you to set the "resistance" to this motion. The units shown are in tenths of a second, so a setting of 20 is a two-second delay. When getting acclimated to Active desktop borders, we appreciated the ability to have the pointer center on the screen in the direction of motion. This prevents rapid flipping back and forth between desktops, especially when the switch delay is set to a very low value (try this at home, to see what we mean).
Magic borders are also sometimes referred to as magnetism. The goal here is to park a window in the corner or on the side of the desktop. As the edge of the window approaches within the screen Border Snap Zone setting, it snaps across the intervening distance, settling neatly in place. The Window Snap Zone value provides the same functionality between application windows. Choosing large values for the snap zones is contra-indicated, as you will start snapping to anything at all the moment you start to move a window. Experimentation helps to determine the correct values for your comfort level.
The other Desktop sub-tree options we've mostly covered previously, in their stand-alone format. The Desktop Icons view allows icon grid spacing and foreground text color to be set, as well as the option of making hidden files visible on the desktop. We'll return to the Theme Manager at the end of this chapter, the frosting on the cake, so to speak. The Language pane allows you to select the primary, plus first and second alternate languages for displaying dialog boxes and messages, if available. If no translations are available, the fallback default is usually set to English.
Now let's have a look at the Information sub-tree, shown open in Figure 8-15. Memory is the view we selected to demonstrate the features of this group of system data utilities from the KDE Control Center. Notice that the Apply and Cancel buttons are missing from this context, as appropriate.
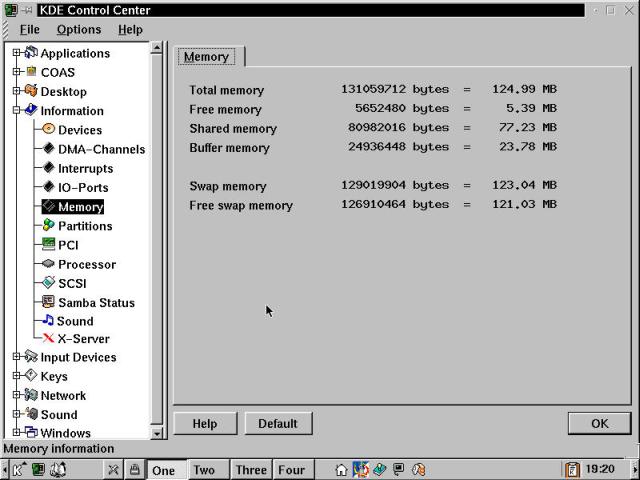
Figure 8-15
The Memory information view from the KDE Control Center.
Memory is unique among the informational views, in that its output is dynamic - as applications come and go and system tasks run or sleep, the current values of Free, Shared and Buffer memory, as well as Free swap memory fluctuate. These changing values are reflected in real time (well, snapshots of the values at some sub-one second frequency, anyway).
The other choices, from Devices and DMA-Channels through Sound and X-Server, allow you to determine the state and setup of much of your OpenLinux system. This is a powerful tool. For instance, you can check with the Sound view to determine if the sound.o driver module was loaded correctly and configured properly for your hardware setup. Interrupts is a useful place to view which resources are being used by which bits of system hardware. Back in Chapter 7, we discussed the /proc filesystem, noting that /proc is a window onto many parameters of the running Linux kernel. The Information views make available a small sub-set of that data available, as well as that of two key system daemons: Samba and X-Server.
In the next section of the KDE Control Center, some of the interactions between input devices and the desktop environment can be configured. Figure 8-16 shows the Mouse view.
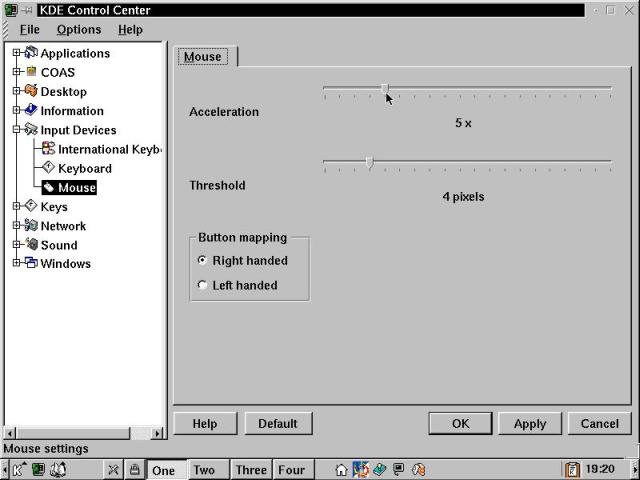
Figure 8-16
Configuring mouse behavior in the KDE Control Center.
Two of the standard mouse features are present: Acceleration and Threshold. In addition, the mouse can be easily switched from right- to left-handed orientation. Missing from this screen (and actually nowhere to be found in this version of KDE) is the ability to configure double-click behavior. Different individuals have wildly varying comfort levels when it comes to how fast a double click should be. This is a known shortcoming in the KDE 1.2 release, and is on the wish list for KDE 2.0 (Note: it has indeed been addressed in KDE 2, pre-release 4).
The other two Input Device views are International Keyboard and Keyboard. The former allows for configuration and hot-key switching of Language keymaps (a keymap is a correlation between the keyboard and a character set). We did not experiment at all with this feature, but glancing through the help files provides all the necessary information if you have a need to work in a multi-lingual environment. The Keyboard view is a simple one, setting key repeat (but no repeat rate setting) and audible key clicks via the system speaker (a "feature" we're glad to be able to turn all the way down!).
Figure 8-17 shows the Global Keys view. Global keys takes a bit of study, and is worth the effort of reconfiguring to your tastes if you are going to spend a lot of time working in KDE (as opposed to just dabbling in the environment).
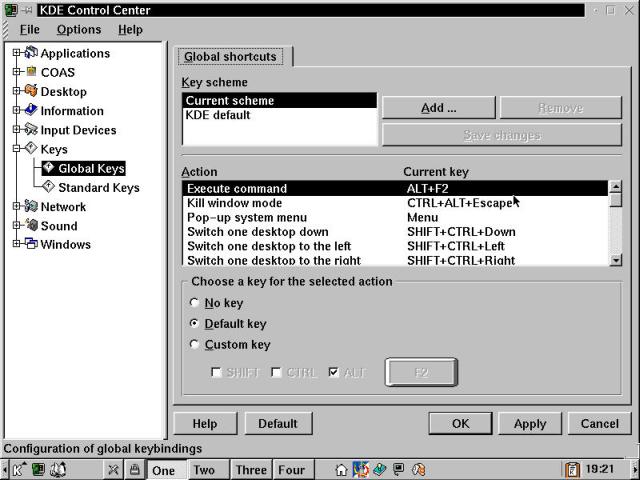
Figure 8-17
The Global shortcuts (Global Keys) view in the KDE Control Center.
Global shortcuts are focused on the working KDE desktop environment, rather than any specific application, although many keys are defined to work on or with application windows. As shown in Figure 8-17, Global shortcuts are keyboard combinations for performing common actions in place of mouse activity. For people that write or code for a living, setting up shortcuts that keep the hands on the keyboard can be a real time saver and productivity booster.
Warning
When opening the Global Keys view (or switching between Key schemes), a dialog box entitled "Global key conflict" may appear. This is most often referring to the Alt-F2 combination being pre-set, and is a result of KDE reading the Alt-F2 from the "Choose a key for the action" section at the bottom of the window. Press OK and continue. This error dialog box should only be cause for concern after you have made changes.
Random experimentation in this feature worked for us and may for you as well. However, we strongly recommend a careful reading of the Help page prior to making major modifications to the Global keyboard shortcuts.
The Standard Keys configuration view is just that, a way to define the keys to take care of standard actions: Cut (Ctrl + X), Paste (Ctrl + V), Copy (Ctrl + C), and Help (F1). These are recognized in any application that is KDE-aware (and there are a lot of these, as we shall see in the coming chapters).
The Network tree is oddly named, since there is very little here that relates to what one would generally regard as network options. The settings found here are not for system-to-system networking (Ethernet) or configuring dialup communications (PPP).
The first view is for configuring ISDN line networking. We understand that the KDE ISDN connectivity client is very useful and capable. Neither author has ISDN connectivity, nor experience with that, so we'll pass over this feature, commending you to the available Help and the resources online. It is likely that ISDN is a technology whose time has come and gone due to the onslaught of DSL and cable modems, at least in the US. We understand that ISDN is considerably more pervasive in Europe and other parts of the world.
Hint
There is a resource for Linux usage of ISDN connectivity found at http://www.muc.de/~hm/linux/linux-isdn.html. Among other useful links on that site is a reference for the "isdn4linux" mailing list, including subscription instructions. While we cannot vouch for the information at that site, we haven't found anyone complaining about it, either. Hopefully that provides you more guidance than we've been able to.
The second (and final) item under the Network tree is the setup for the ktalkd daemon. Unix and other networked computers typically ship with a software program called talk. Talk, in a client and server configuration, allows users on different machines to "converse" using text windows in the style of an instant messaging service, only without a central server. Each machine can run its own talk daemon (server), and has its own instance of the talk client.
ktalkd is an enhanced talk daemon, which provides the added capabilities of session forwarding as well as a talk answering machine. This is one of those features that we're not sure how many people will actually use, but it sure is cool. In order to work with it, you have to have a least two machines accessible to each other on a network and both systems must be running ktalkd. There is extensive help available to configure this special daemon. We strongly advise against running ktalkd on a machine directly connected to the Internet. Any unnecessary service running on a 'Net-connected box is a potential vulnerablity.
Configuring sound via the Control Center is a two-step process: setting up the system speaker (Bell), and choosing optional sounds for a variety of KDE window and desktop actions. The configuration views are very clear and easy to use, so in the interests of space, we'll leave this section for you to explore on your own.
This is the most significant portion of the KDE environment configuration. We'll spend a considerable amount of time explaining your choices and options here. This is due to the fact that many of the subtle differences between KDE environment behavior and that of other window environments are set in this area. A bit of study on this topic will help you understand why KDE acts as it does, whether or not you change any of the parameters.
In the upper portion of the Advanced view of Windows configuration, shown in Figure 8-18, there are three checkboxes. The first option enables (by default) the Ctrl + Tab keyboard shortcut to switch between active desktops. The Alt + Tab box, if unchecked, allows consecutive selection of all open windows, on all the desktops successively. The drop-down list to the right defaults to KDE mode, where separate Alt + Tab selections swap between the two most recent windows. Holding down Alt and repeatedly pressing Tab walks you through the active windows, one after the other. The alternate mode is called Classic CDE (Common Desktop Environment, a legacy Sun Microsystems windowing system) in the documentation. In CDE mode, Alt + Tab always walks through successive windows, omitting the back and forth nature that many users are used to from the MS Windows milieu.
Figure 8-17
Advanced Windows configuration via the KDE Control Center.
The lower section of Advanced Windows - Filters - is a very useful feature. In a manner similar to setting rules for parsing e-mail, you can choose a by-program (Classes) or by-title configuration for the windows that are opened. So if you want windows opened by Netscape to have no decorations (the little icons at the top of each window, frames, or anything besides the application itself), then first choose "have no decorations" from the "Windows will" drop-down list. Of course, this is a dicey operation, since there is no frame to grab in order to move or resize the application window. The "have tiny decorations" is a better choice if your aim is to reduce screen clutter. Tiny decorations mean that the opened window has a minimal frame only. No title bar or action icons. Edges exist that can be right-clicked to get a standard window context menu (containing: Maximize, Iconify, Move, Resize, Sticky, To Desktop, and Close).
Hidden Feature
What is this "sticky" thing, anyway? It takes a little digging. We didn't find this referenced on the OpenLinux documentation. However, at the KDE site, in the User Manual (at http://www.sg.kde.org/documentation/en/quickstart.html) we find that sticky is a property used to make a window visible in all views - that is, the same window becomes usable on all desktops simultaneously. This is a useful feature if you have a small applet that you always want available at the corner of the screen, no matter which desktop you're working on. Windows can be made sticky dynamically by using the push-pin icon located on the window's title bar.
The other options available from "Windows will" are: "never gain focus," "start as sticky", and "be excluded from session management". The major reason for putting a specific application or window in the filter list is that sometimes applications do not work well within the KDE environment, to one degree or another. The first four options disable select parts of the KDE interface, the last removes the window from KDE oversight altogether. It is your responsibility to figure out which windows are causing problems - we aren't able to sit at your shoulder and help with that one. The good news is that we haven't run across any problem application windows, ourselves.
Hint
If a window has no decoration, it can be moved pressing the Alt key and clicking and dragging it with the left mouse button.
Figure 8-19 illustrates the next part of Windows configuration. A fairly simple screen, Buttons allows you to set up the presence and location of the five types of window title bar icons, Minimize, Maximize, Sticky, Close, and Menu. While the appearance of these features may change when themes are applied (as you'll see in the section "Variations on a Theme"), their function remains the same and locations are still configured from this Control Center view.
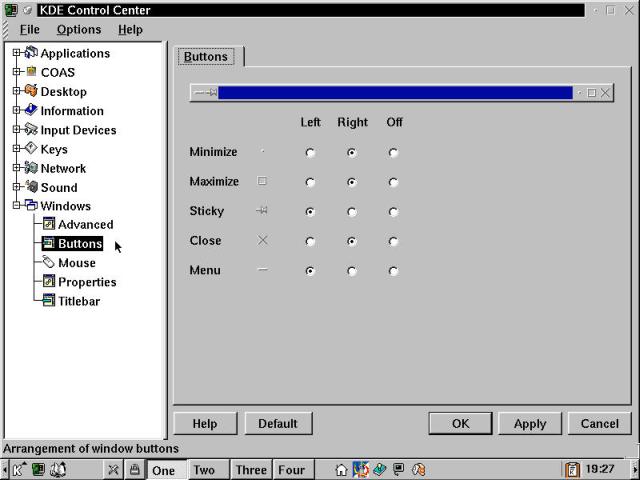
Figure 8-19
Configuring window title bar buttons from the KDE Control Center.
The next configuration view is Mouse. As opposed to the settings available in the Input Devices/Mouse view, here is where the interactions between mouse and KDE-managed window objects are configured. This view is shown in Figure 8-20. Following that, Table 8-1 contains the terms and definitions we'll need to talk about this topic coherently.
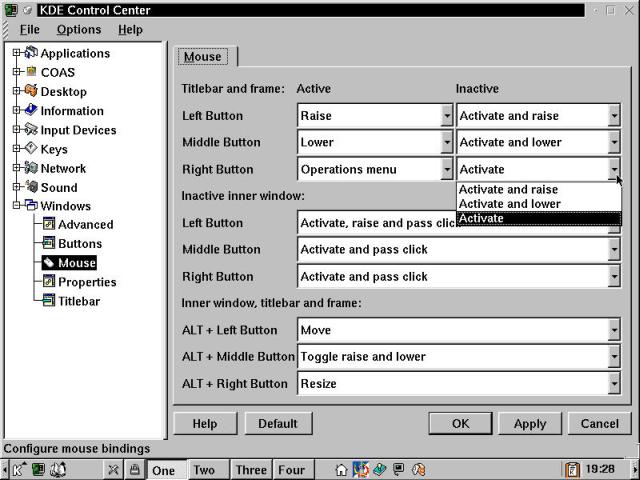
Figure 8-20
More Window/Mouse interactions configured in the KDE Control Center.
Table 8-1
KDE Terms for Mouse Behavior
| Term | Definition |
| Activate | The active window is the one that is the current recipient of input from the user (primarily keyboard). Also known from other window manager environments as Focus. The active window does not have to be the window in the front "layer." |
| Raise | Bring selected window to the front (or top). |
| Lower | Put selected window to the back (or bottom) of all currently open windows. |
| Pass Click | Pass the mouse action to the application running in the specified window. |
There are three distinct areas of configuration for Mouse action in relation to the KDE window manager. The first is shown in the upper third of the Mouse view in Figure 8-20, called "Titlebar and frame." This is further sub-divided into choices based on the window's initial state: Active or Inactive. Examining the default behavior shown in the illustration, it is fairly clear that clicking on the frame or titlebar of any window raises that window, making it the active object if it wasn't previously. Then using the middle button (or simultaneously right- and left-clicking, called a chord) lowers the chosen window, again activating it in the process.
Why would you want to activate a lowered window? There are a few reasons, mostly having to do with needing to see the output in all of one window, while still working in another. Additionally, we've used this feature for some of the screenshots in this book and on our Web sites. For the most part, we use the system such that active window and the front window are one and the same. Any other mode can be a bit confusing.
The right button brings up the Operations menu for windows, as shown in Figure 8-21. As a short aside, the operations menu duplicates functions that are available from the titlebar icons, or by using edge features for resizing and moving the window. There's one unique function, however - the "To desktop" option. This allows you to open a window, then send it to another desktop. This can also be accomplished by making a window sticky, then going to another desktop and making the window un-sticky, but the Operations menu makes that three-step process seem like an eternity.

Figure 8-21
Right click in the titlebar or frame to use the window Operations menu.
The middle section of the Window/Mouse view (seen in Figure 8-20) sets the click action when selecting inside an inactive window. The default choices all are set to pass the click through to the underlying application. In some cases, this may cause a problem. For instance, a left mouse click follows links in a browser, by design. So the browser window is activated, and the link is followed. Most of the time, this is unintended behavior. These options can be set to Activate, or Activate and raise, without passing through the click.
The final section of the Window/Mouse view controls the operation of the mouse in conjunction with the Alt key. These are set by default to run most of the options from the Operations menu, with the additional possibility of "nothing," meaning that no action is taken.
Figure 8-22 shows the Properties (aka Options) view for KDE windows. The first group configures four features related to moving and resizing windows. The first checkbox, "Vertical maximization only by default", is a useful option to enable. Most of the time, a window is already wide enough to show contents. If what you really want out of the maximize action is longer viewable pages, then this option is perfect. Display content in moving windows is enabled by default. We generally shut this option off. When moving a window, we don't care about the content, we're simply moving a box. With this setting unchecked, a wire-frame box is displayed and moved. Much faster, smoother motion, too. The same is true for the third checkbox, "Display content in resizing windows". This really bogs down all but the fastest processors; we notice a performance hit even on a PIII-600 [which seemed like a fast processor when we started writing this book <g> bpb 04/2001]. For most purposes, we suggest disabling these last two options, as well as setting the "Resize animation" slider to "None." These features add no benefit to our computing experience; your tastes might differ, however.
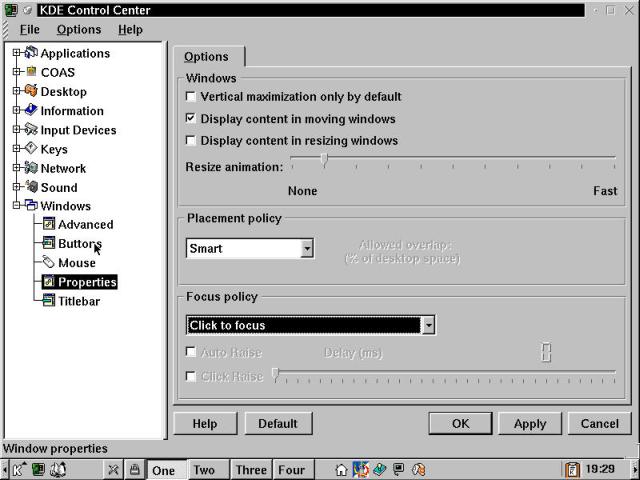
Figure 8-22
The Window Properties (Options) view from the KDE Control Center.
Placement policy, the second section, is concerned with where new windows are placed in the current desktop, in relation to already open windows. Table 8-2 contains a listing of the choices available.
Table 8-2
Window Placement Policies in KDE
| Policy Name | Description |
| Smart | The default (and recommended) selection, Smart uses an automatic placement scheme to minimize window overlap. |
| Cascade | The Cascade option opens windows that are displayed in a semi-cascaded manner. This mode doesn't have much effect on an already cluttered desktop. |
| Interactive | When this option is chosen, the grayed-out "Allowed overlap:" option activates, and a text field appears allowing a percentage number to be entered. Then, windows are opened automatically in "Smart" mode if the overlap number isn't exceeded; otherwise manual placement is invoked. |
| Random | As it sounds, Random puts windows just about anywhere (on the current desktop). |
| Manual | Manual displays a wire-frame box depicting the pending window. The box follows the mouse cursor, and a left click places the window. |
The last section of the Options view is Focus policy. This element overlaps and conflicts with the settings from the Windows/Mouse view, discussed previously. Press the Help button and read about these features if you want to play with Focus policy directly. We recommend leaving it set to "Click to focus", especially if you're just making the transition from another OS. Nothing is guaranteed to annoy a user faster than a mouse that doesn't behave as expected (except perhaps continuous blue screen features...).
Titlebar configuration is the last of the Windows configuration views, as illustrated in Figure 8-23. Title alignment places the text string in the titlebar. In Appearance, the blend colors, set in the Desktop/Colors view, can be set to blend horizontally (by default) or vertically. There's the Plain option, which uses just the first color, not the title blend color. Another option allows you to set a Pixmap (image) to use as a tiled background for the titlebar. These can be set separately for Active and Inactive windows. The checkbox at the bottom of the Appearance section enables shaded frames. This gives the active window a bit of extra visual distinction, with light up and left, dark down and right for that beveled 3-D look.
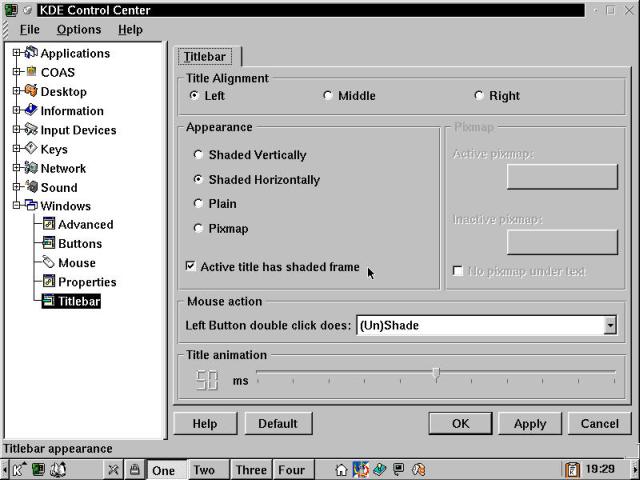
Figure 8-23
Window titlebar configuration with the KDE Control Center.
Mouse action is yet another click behavior entry, seemingly out of its rightful place in one of the other mouse configuration views. Since it is here, the possibilities are (Un)Maximize, (Un)Shade, Iconify, (Un)Sticky, and Close. The (Un)xxxx options are toggles. (Un)Shade, the default choice, "rolls up" the window into the titlebar. This can be quite useful for organizing a crowded desktop with multiple applications open.
Title animation slides the text in the titlebar left and right when that text is too long to display in the titlebar, allowing the whole title to be read. The slider sets a number which is related to the speed of the animation. Setting the slider all the way left, to zero, disables this feature.
Themes are cool. Really, there's no other word for them. They are a combination of artwork and configuration designed to give a specific look and feel to the KDE desktop. Point your browser to http://kde.themes.org. At this writing, there are 233 distinct themes available for KDE. These are primarily contributed by end users, many of them extraordinarily talented people.
Generally, themes don't add much to the central purpose of running Linux - they are eye candy, and on slower, older machines with small amounts of RAM, we can't recommend them. However, some themes are just plain gorgeous to look at. Possibly useless to work in (since the levels of contrast between the text and the windows are so low as to make reading a real chore), but definitely pretty. We can't show you most of these here (in print, anyway), because they'd show up as black and grey blurs.
After browsing through the themes site for a while, you can point the KDE File Manager to ftp://ftp.themes.org/pub/themes/kde/, as shown in Figure 8-24. Using one of our favorite features in the KDE environment, drag and drop the theme files you want from the themes.org FTP site.
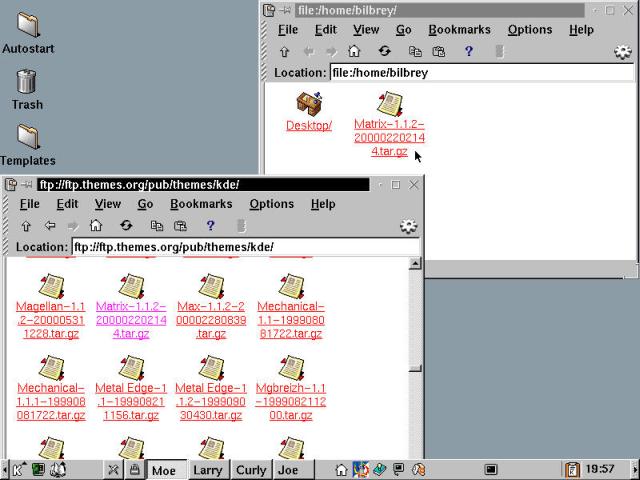
Figure 8-24
Using two KFM windows to get files from the themes.org FTP site.
As you can see from Figure 8-24, there are a lot of themes. Some of them are named after hit movies, and try to convey the theme artist's impression of the film. Needless to say, the science fiction genre is very popular for this sort of thing. However, we had to pick and choose from the few themes that are likely to show up well in gray scale, for the purposes of this book.
In Figure 8-25, we've returned to the KDE control center, selecting the Theme Manager view from the Desktop configuration area. Once the view is open, choose the "Add..." button on the Installer tab. This opens the Add Theme dialog box, where the downloaded themes are selected. Note that the themes do not need to be decompressed or unarchived (which would use the gzip and tar utilities respectively); they can be read and configured by the theme manager in their compressed state. This is a nice touch.
Warning
One problem we encountered in our explorations of the Theme Manager is that the Add Theme process doesn't work if there are spaces in the filename of the downloaded theme. In order to work around this problem, select the file in KFM, right-click to the context menu, open the Properties dialog for the file, and revise the filename to remove any spaces. Then return to the Add Theme step and continue.
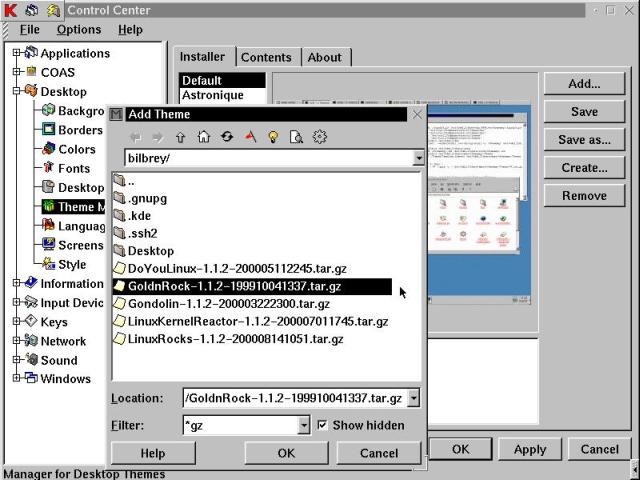
Figure 8-25
Adding a theme in the KDE Control Center, using the Theme Manager.
Once the theme is added, it may be selected and applied. There are several other buttons that offer control over themes. Save submits all the current KDE settings to the active theme (one that has been applied) and saves it under that theme name. Save as allows you to export a theme. Create takes all the current KDE settings and makes a new theme entry. Remove takes themes and removes them from your local themes directory. Global themes, which reside in the system KDE directory, not a user's directory, cannot be removed; the Remove button is grayed-out (action not available) when a global theme is chosen.
Hint
Before applying a new theme, the KDE Help for the Theme Manager advises that you create a new local theme called Default, which overrides the global theme of the same name. In this way, you can always roll back your changes to the current settings.
Figure 8-26 shows the results of applying a theme to the KDE desktop. For this example, we chose Gold 'n Rock. Colors, Wallpapers and Window borders are all changed with this theme. These are listed as "available" on the Contents tab view of the Theme Manager. Other possible changes that can be included with themes include Panel, Sounds, Icons, Window Titlebar, Window Gimmick, Window Button Layout, File Manager, and Konsole.
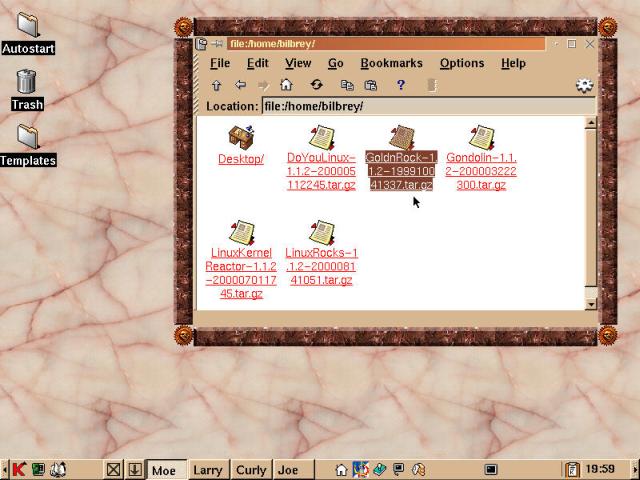
Figure 8-26
The Gold 'n Rock theme, applied to the KDE desktop.
On the Contents tab view specific elements of a theme can be disabled before the theme is applied. The About tab view from the Theme Manager gives information about the selected theme as well as KDE Theme Manager program information.
KDE is the default (and only) Window Manager packaged with OpenLinux. KDE is a capable and complete desktop environment with a wide variety of configurable features. We discussed some of the main elements of the desktop and all of the look and feel configuration options. This chapter covered the following points:
Go to the Table Of Contents