
Email Brian
Brian's Website


Email Tom
Tom's Website
|
Email Brian Brian's Website |
|
Email Tom Tom's Website |
Did you read the Preface? Thanks!
Installation is done. The machine is secure. You made all the right choices and Linux has been doing everything you set it up to achieve. But now you've changed your mind about your goals. In this chapter, we look at modifying the purpose or feature set of a system, preview the administrative tools available to assist with the change-over, and walk you through the steps of acquiring, validating, installing, and removing software packages.
We begin by examining some common configuration alterations, what they affect, and how to achieve them. These transitions frequently involve adding or deleting server functionality. As always, we'll work at providing guidance on the security implications of the activities at hand, as adding (and sometime removing) software places your system in a potential state of vulnerability.
There are a variety of package groupings (types and versions of software that work together) that make sense for a given set of tasks. Certainly a machine that is destined to be a mail server, sitting behind the corporate firewall, has no need for a GUI environment, office software, or games, although an application server might have all of those loaded. On the other hand, a computer configured for use in an end-user role should not have multiple server functions enabled, as they might interfere with existing network operations and usage.
The following are the default configurations first outlined in Chapter 2: Minimum, Recommended, All Packages, Business Workstation, Development Workstation, Home Computer, and Custom.
Information
A complete listing of all software packages installed with each of Caldera's setup options is detailed in Appendix A.
Minimum and Custom are both specialty installation sets, offered by OpenLinux primarily as handy starting points for the IT professional. The other five configurations are rather broadly defined, with lots of overlap between the selections; none of them, at first glance, appear to lend themselves directly to server configuration. The truth of the matter is that most of these installation packages already include most of what any server needs to get to work. About all that's lacking is the correct values in the appropriate configuration files, and to start the program's service (these subjects are addressed in Part VI, Chapters 24 through 29).
Appendix A is a useful tool for determining whether a particular piece of software is loaded for any of the given package groups. However, when it comes time to add software or functionality that might be missing, then you have to find what isn't there, and that's a little trickier. One way to achieve this is by using the diff command to highlight the disparity between package groups. Start by inserting the Binaries and Installation CD-ROM, then from a terminal or console window execute the following commands:
[brian@gryphon bilbrey]$ mount /mnt/cdrom

[brian@gryphon bilbrey]$ cd /mnt/cdrom/col/data

[brian@gryphon cdrom]$ ls
cd1            it                       pkgs-02development.generic  pt
de             meta.db                  pkgs-03home.generic         sizes
es             pkgfiles.gz              pkgs-minimum.generic        us
fr             pkglist.gz               pkgs-standard.generic       use-force
framework.cgz  pkgs-01business.generic  pkgs.db

[brian@gryphon data]$ diff pkgs-03home.generic pkgs-02development.generic | less
3a4
> ImageMagick-devel
14a16
> XFree86-Xvfb
17a20,22
> XFree86-devel
> XFree86-devel-prof
> XFree86-devel-static
19d23
< XFree86-fonts-100dpi
26a31
> XFree86-server-devel
33a39
> Xaw3d-devel
34a41
> Xbae-devel
37d43
< aktion
38a45,46
> apache
> apache-devel
40a49,50
> autoconf
> automake
44a55
> bin86
45a57,58
> binutils-pilot
> bison

 * * *
The first command mounts (makes available for reading) the disk in the CD-ROM drive. Next we "cd" to the CD-ROM directory containing the package listing files. Typing ls prints on the screen a listing of the directory contents, to make it a little easier to type the correct file names in the following line. The key to this exercise is contained in the command diff pkgs-03home.generic pkgs-02development.generic | less This "analyzes" the differences between the two files supplied, with the output piped through less pager utility (displaying one screen page of outputat a time). In this example, diff generates over 300 lines of output describing the differences between the Home Computer and Development Workstation package selections. The Greater Than (>) symbol indicates files required to make the first file like the second, and the Less Than symbol (<) is used to indicate packages in the first file that are not present in the second.
So, to convert from a Home Computer installation to a Development Workstation, just add all the packages prefaced with a ">," and remove all the packages with leading with "<." In this case, we can see that we need to add (among many packages) the autoconf, automake, and bin86 utilities. The lines preceding these three packages pertain to development packages for image manipulation and the X Window environment, possibly not necessary in your circumstances. Which tools are needed and how to install them are topics addressed below, under the section titled "Adding and Removing Software."
Interestingly, the Business Workstation selection set includes none of the packages required to compile software. One presumes this is to prevent the "casual" business desktop user from the sorts of unrecoverable things that sysadmins hate so very much.
When designing a system to fulfill one role well, we recommend building the software up from scratch. This means starting with a minimum installation and adding the required functionality and nothing else, at least the first time.
Hint
Why only the first time? If you've done it once, then you can use the package lists generated by typing rpm -qa to create a disk for use in a custom selection set installation. This feature is handy in setting up a farm of Web servers, or a bunch (a technical term meaning lots) of limited functionality machines for a specific role or department. Alternatively, type /bin/mklizard -floppy with a DOS-formatted disk in the floppy drive. This is documented at file://home/httpd/html/openlinux_help/lui/Lizard-HOWTO.html (access with a browser).
Even so, there are packages installed on the minimum system that may be unneeded. For example, looking through the listing in Appendix B (or the file listing on the Binaries and Installation CD under /mnt/cdrom/col/data/pkgs-minimum.generic), we find the following services included:
Communicator - The Netscape browser, mail client, and so on
XFree86 - The X Window System implementation
KDE - The KDE GUI desktop environment
In most true server configurations a graphical environment is not necessary, so KDE, Netscape, and X are just taking up space that can be dedicated to other uses. The flip side of this coin is that at least X is required to run the COAS GUI configuration tools, and to run the Webmin utility locally Netscape (or some other graphical browser) is handy. For command line or remote configuration, none of these packages are needed.
Our basic premise for configuring a server box is to pare down the available functionality to only what's required by the specific application or applications it will support. For example, a dedicated Web server should not include the XFree86 server software, as it creates vulnerabilities in an exposed (network access-wise) machine. There are maintenance benefits to a reduced feature box as well. Services that are not present on a system do not need to be monitored for security flaws and updates, greatly reducing administration costs.
For corporate use, Linux boxes are often configured with just the functionality necessary for the end user to accomplish certain tasks, without the distraction of additional packages such as games, image manipulation programs, and network maintenance and probing tools. Again, building the required functionality up from a minimum installation is a good starting point. Look to the upcoming section "Adding and Removing Software" for guidance on completing these tasks.
If you have a general purpose system running OpenLinux, but find it lacks functionality in some aspects, add the packages required. Keep security in mind for machines that connect to the Internet either directly or via a dialup connection. Many of the packages that can be added to a Linux system integrate some form of network communications or connectivity in the normal course of events. See Chapter 21 for advice on continuing security in the process of adding or upgrading software. That said, there needs to be additional software put on the system first, in order to configure it. That's the next topic on the agenda.
There comes a time in each system's life when it's time for a face lift, a makeover, or maybe just a new wardrobe. Installing new software packages adds required features or extra functionality. However installing new software - safely and correctly - can be an involved process. We'll start by discussing each of the major way stations, in order to point out forks in the path. Then we'll illuminate the path, and guide you around the pitfalls with two full examples: a network utility: Ethereal, and a user application, Joe. This section closes with a few pointers on removing software that is no longer necessary, or desired.
There are literally thousands of sources for Linux software. In addition, as a grassroots Internet-based phenomenon, there are typically a multitude of competing solutions available to scratch your itch. A fraction of these compete with the functionality provided in the 654 Open Source licensed packages provided with OpenLinux 2.4. How is anyone to choose what's best?
We usually follow a simple three-step process. First, is the program or feature we're looking for available on the OpenLinux CD? Often the answer is yes. The best advice we can offer is to start off with the offerings of your current distribution. These packages are built from sources to work with the rest of the software in the bundle, and (especially when loaded from the CD-ROM) the most secure version of software you can install.
If you can't find what you're looking for on the CD, the next step is to head over to the FTP archives for the distribution. For instance, at ftp://ftp.caldera.com/pub/contrib/RPMS/libc6/ there are an additional 504 software packages, including alternatives to KDE such as Gnome, additional window managers like Afterstep, Enlightenment, and Blackbox, and more. Publisher FTP archives are among the most secure, and few vendors are going to risk the wrath of the Linux community by putting up a Trojaned program (or if one does sneak through the cracks, leaving it there for long).
An alternative search tool for looking through the resources in steps one and two is the kpackage utility, detailed in Chapter 10. kpackage can be configured to search both local and online archives. It provides a GUI interface to the RPM package management utility. kpackage can be found from the KDE desktop by selecting K --> System --> kpackage. Another way to start kpackage is from the right-click context menu after selecting an RPM package in the KDE File Manager.
Still haven't found what you're looking for? Then for the next step, you'll want to visit the Linux software home on the Web: http://www.freshmeat.net. Freshmeat is the canonical source for the latest information and announcements about Linux software packages. There are a variety of links and an extraordinarily capable search tool to help locate even the most obscure programs. From the Freshmeat announcements, you can link back to the homepage and download locations for the package in question.
Chances are in one of the previous steps you've found the code you're looking for, either as a pre-compiled binary RPM package (like all of the packages in the RPMS directory on your CD-ROM), a source RPM package (locate the SRPMS directory in the Caldera FTP server), or a source gzipped tarball (the *NIX nickname for a compressed archive file). Whew, just a moment while we take a deep breath. OK, now we're ready to actually get the software.
There are two primary formats used to package downloadable software for Caldera. The first is RPM, which is covered in Chapter 19. Briefly, RPM packages offer the advantage of installations that are logged in a set of databases (see the contents of /var/lib/rpm/), making dependencies with other software easy to determine, as well as facilitating upgrades and removal. The second major format uses archive files. These archives have either a .tar, .tar.gz, or .tgz file extension: the latter two indicate that the archive has been compressed.
There's a fast and easy route to finding and installing the software that you want, provided it's in RPM format, and on a safe, trusted source. The latter restriction boils down, in our case, to the CD-ROM or the Caldera FTP site as discussed previously. In case you didn't know, the KDE File Manager (kfm) is also a capable Web and FTP browser. Figure 6-1 shows kfm in action, at the Caldera FTP site, with an RPM selected and ready for download.
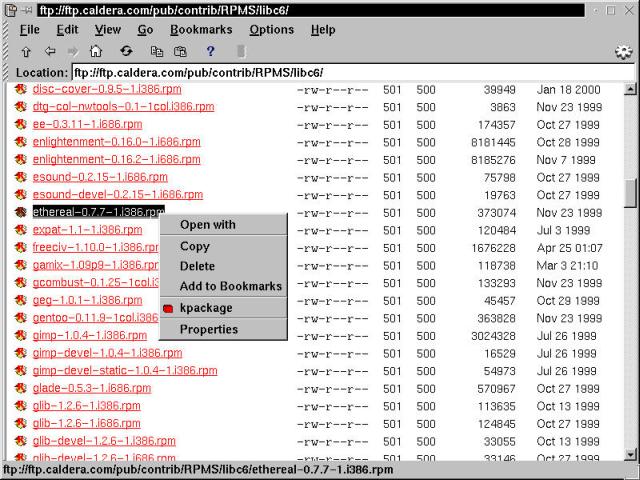
Figure 6-1
Using the KDE File Manager to acquire additional software from the Caldera FTP site.
In this mini-example, we're downloading the network traffic analyzer, Ethereal. Select the package name or icon, then right-click to bring up a context menu. Choose kpackage from the menu. If you're not running as root, then a brief dialog box pops up, requesting the root password before starting the program. When kpackage opens, it automatically downloads (via FTP) the selected package. This may take a while depending on package size. When the download completes, the description and install dialog box is displayed (see Figure 6-2).
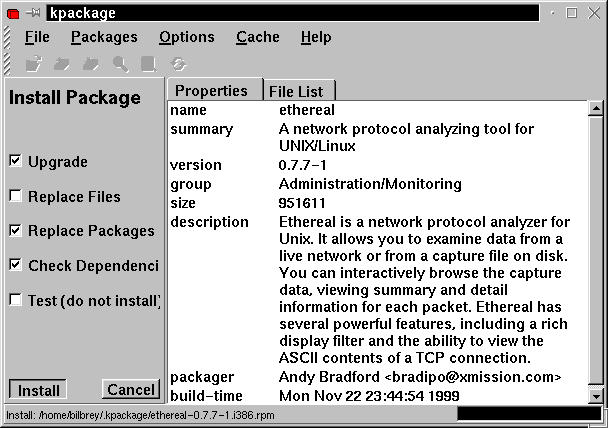
Figure 6-2
The kpackage RPM utility running, ready to install the Ethereal network analyzer.
Because we are confident of the package's provenance (as it came from the Caldera site), we accept the default options and click Install.
Hint
When using kpackage to install an RPM, it's important to leave the Check Dependencies box checked, as this informs you of any related packages that need to be installed for proper program operation. As an additional safety check, you can run with the Test box checked first, to ensure that everything works properly.
Once the install is complete, kpackage drops into what is referred to as Management Mode (discussed in Chapter 10). At this point we can exit from kpackage and give Ethereal a trial spin.
Figure 6-3 illustrates part of the TCP interplay between Grinch, a machine on the orbdesigns.com network, and MTA5, which is a mail server. We had to be careful to select the window of data shown because this conversation takes place in clear text, and is not encrypted. Passwords and plaintext messages fly about on the wires with devil-may-care abandon.
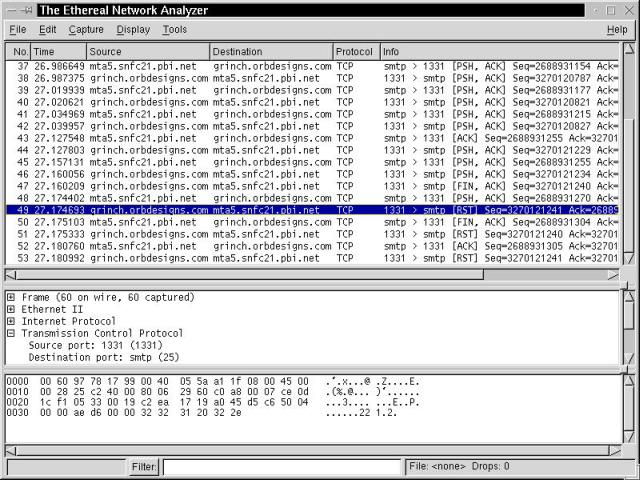
Figure 6-3
An Ethereal network capture of a conversation between Grinch and a mail server.
In Chapter 15, we detail the process of downloading and installing a text editor (called Joe) from the command line. The next section approaches the same process from a slightly different angle - this time around we'll use KDE's graphical utilities to acquire and decompress the archive. First, as with the RPM retrieve previously, use the KDE File Manager to navigate to the desired file for downloading (see Figure 6-4).
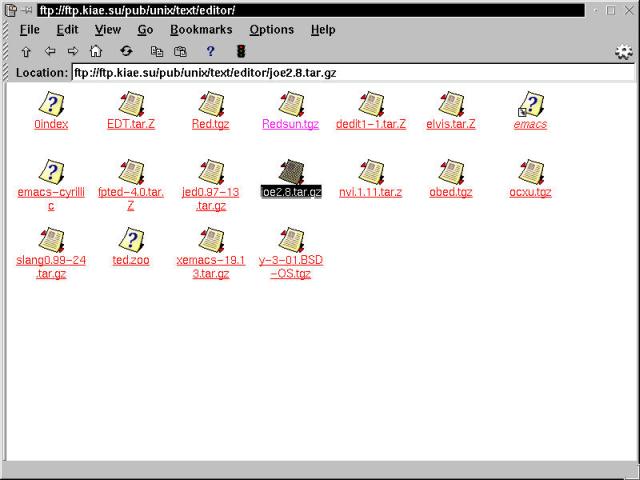
Figure 6-4
Getting the Joe tarball from an FTP site using the KDE File Manager.
With the desired file located, open a second instance of KFM, and drag the joe2.8.tar.gz file, dropping it in your home directory. Once there, use the context menu to open the file using the Archiver utility, and extract the contents as depicted in Figure 6-5.
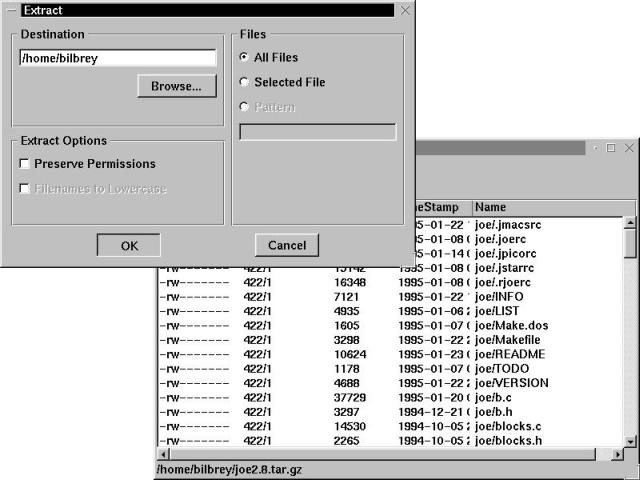 Using the Archiver utility to extract the contents of joe2.8.tar.gz
Figure 6-5
Once the archive is extracted, it's time to drop into the command line, which is just as well, since the Joe editor is a terminal mode text editor similar to the WordStar editor of days gone by. With a terminal window open, follow the sequence in the following listing to compile and test Joe (the vertical ellipsis indicates numerous lines of nearly identical content).
[syroid@gryphon syroid]$ cd joe

[syroid@gryphon joe]$ make
cc conf.c -o conf
./conf /usr/local/lib 1
cc -O   -c -o b.o b.c
cc -O   -c -o blocks.o blocks.c

*** (content omitted) ***

cc -O   -c -o w.o w.c
cc -O   -c -o zstr.o zstr.c
rm -f jmacs jstar rjoe jpico
cc -O -o joe b.o blocks.o bw.o cmd.o hash.o help.o kbd.o macro.o main.o menu.o path.o poshist.o pw.o queue.o qw.o random.o rc.o regex.o scrn.o tab.o termcap.o tty.o tw.o ublock.o uedit.o uerror.o ufile.o uformat.o uisrch.o umath.o undo.o usearch.o ushell.o utag.o va.o vfile.o vs.o w.o zstr.o -lcurses
ln joe jmacs
ln joe jstar
ln joe rjoe
ln joe jpico

[syroid@gryphon joe]$ ./joe Makefile
Processing '.joerc'...done
The first command, cd joe, changes the current directory to be the one created when the joe2.8.tar.gz archive was extracted. The second line, make, uses the contents of a file named Makefile to correctly compile Joe. The last command, ./joe Makefile, starts the Joe editor, opening for editing the selfsame Makefile. This edit window is illustrated in Figure 6-6.
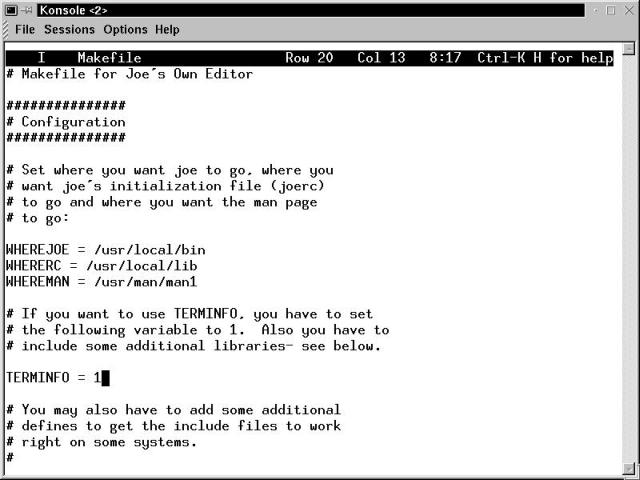
Figure 6-6
The Joe editor, with the Makefile file loaded, in a Konsole window
Note that this process was accomplished without becoming the root user. Of course, the editor is only useful in this form to the user syroid. In order to have Joe available system wide, it needs to be installed in the system bin directory. This has step has an associated risk attached to it, since the program must be installed by the root user, and many programs installed by root also inherit root privileges - privileges you do not want to give to the wrong executable. How safe is the code we get, load, and run? That's our next topic.
Ideally, you only want to use software checked and approved by the Linux vendors, either from the release CD-ROMs or from secure, trusted FTP sites. The truth of the matter is that everyone downloads bits of software from here and there, for fun or to evaluate a new product. Unfortunately, this is frequently how new e-mail viruses enter the environment. The good news is that unlike other environments, as a normal user, you have very few real permissions on your own system. Real power is granted only to the root user (or to a process running with root privileges). And so far, there are no currently known Linux viruses. [There are a few worms making the rounds of badly secured installations as of this formatting... bpb 04/2001]
Programs can run in a number of different modes: with the permissions of the user that executes the program (most common, and safest), with the permissions of the group ownership for the program (called SetGID, effects depend on the group in question), and with the permissions of the owner of the program file (called SetUID, usually root and most dangerous). These special execution modes are configured with the chmod command.
Hint
While a number of programs (like passwd and login) are required to run SetUID in order to work properly, in general SetUID programs are a major source of security holes. Typefind / -perm -4000 -printas root to generate a list of SetUID programs, and determine for yourself which must remain. A good, concise online reference is found at http://www.acm.uiuc.edu/workshops/security/setuid.html.
On the other hand, programs may not be what they purport to be, or they may simply be inadequate to the task of protecting themselves (and your system) in an open network environment. The only truly secure system is one that is turned off and locked in a guarded vault. It doesn't do you much good there, so our next topic of discussion is risk management, and methods to confirm you've received clean code.
As noted earlier in this chapter, we trust the CD-ROM published by Caldera. We also trust the FTP site Caldera runs. Software acquired from these sources is generally assumed harmless unless proven otherwise.
Note
Harmless is, of course, not exactly the correct choice of words. Programs can be configured to operate in a secure manner, accomplishing their tasks without exposing the system to undue vulnerabilities. On the other hand, a badly configured program or system might as well have a sign up on the Internet saying, "Come play in my sandbox!" And as the root user, we can easily mistype a common command (rm, for instance) and erase the contents of the hard drive.
It is generally a good idea to keep an eye on the security pages of a distribution (in the case of Caldera, http://www.calderasystems.com/support/security/). This carries good advice not only for knowing what vulnerabilities exist, but because most advisories are accompanied by pointers and verification methods for getting repaired packages. Figure 6-7 shows the Caldera Security Advisories page, current as of mid-August, 2000.
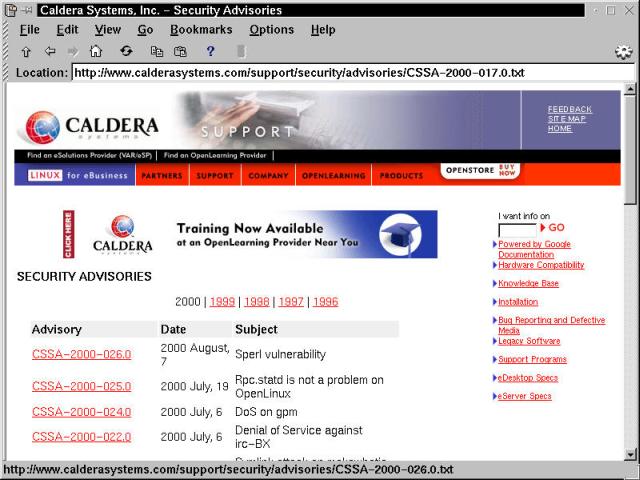
Figure 6-7
The Caldera Security Advisories Web page - visit it often!
Each Advisory link leads to a text file describing the problem, possible workarounds, fixes, revised packages, and more. Advisories are delivered as text files rather than Web pages, which make it possible to cryptographically sign the document. All of these features are shown in the following listing of a Netscape flaw, issued in June 2000.
-----BEGIN PGP SIGNED MESSAGE-----
Hash: SHA1

______________________________________________________________________________
		   Caldera Systems, Inc.  Security Advisory

Subject:		flaws in the SSL transaction handling of Netscape
Advisory number: 	CSSA-2000-017.0
Issue date: 		2000 June, 09
Cross reference:
______________________________________________________________________________

1. Problem Description

   There are some flaws in the SSL transaction handling of Netscape Version
   4.72 which could compromise encrypted SSL sessions.

   This update upgrades Netscape to version 4.73, which also fixes some
   annoying crashes during common usage.

   Upgrade to the new version is recommended.

2. Vulnerable Versions

   System                       Package
   -----------------------------------------------------------
   OpenLinux Desktop 2.3        not vulnerable

   OpenLinux eServer 2.3        not vulnerable
   and OpenLinux eBuilder

   OpenLinux eDesktop 2.4	previous to communicator-4.73-2


3. Solution

   Workaround:

   none

   The proper solution is to upgrade to the fixed packages.

4. OpenLinux Desktop 2.3

   not vulnerable

5. OpenLinux eServer 2.3 and OpenLinux eBuilder for ECential 3.0

   not vulnerable

6. OpenLinux eDesktop 2.4

   6.1 Location of Fixed Packages

       The upgrade packages can be found on Caldera's FTP site at:

       ftp://ftp.calderasystems.com/pub/updates/eDesktop/2.4/current/RPMS/

       The corresponding source code package can be found at:

       ftp://ftp.calderasystems.com/pub/updates/eDesktop/2.4/current/SRPMS

   6.2 Verification

       9ecb1ce4bc3725e83547508d668c96ce  RPMS/communicator-4.73-2.i386.rpm
       6693cb054149d0d59c3adea89913052b  SRPMS/communicator-4.73-2.src.rpm

   6.3 Installing Fixed Packages

       Upgrade the affected packages with the following commands:

          rpm -F communicator-4.73-2.i386.rpm

7. References

   This and other Caldera security resources are located at:

   http://www.calderasystems.com/support/security/index.html

8. Disclaimer

   Caldera Systems, Inc. is not responsible for the misuse of any of the
   information we provide on this website and/or through our security
   advisories. Our advisories are a service to our customers intended to
   promote secure installation and use of Caldera OpenLinux.

9. Acknowledgements

   Caldera Systems wishes to thank Netscape and SuSE for providing fixes
   for the encountered crashes and security problems.
______________________________________________________________________________
-----BEGIN PGP SIGNATURE-----
Version: GnuPG v1.0.1 (GNU/Linux)
Comment: For info see http://www.gnupg.org

iD8DBQE5QN3H18sy83A/qfwRAnKNAKCbmDwTAIDpb9aHiAcB5/q2Y62kwgCdFeDI
HPYcm2eBLiFmg907sCh0jeY=
=mzDh
-----END PGP SIGNATURE-----
The solution in this case is to head off to the Caldera FTP site and download the RPM. Once the RPM file is local, then run an MD5 hash on the file, as shown here:
[syroid@gryphon syroid]$ md5sum communicator-4.73-2.i386.rpm
9ecb1ce4bc3725e83547508d668c96ce  communicator-4.73-2.i386.rpm
md5sum is a utility for creating a unique binary signature of constant size for any type of file. Because the advisory has been signed (and can be checked -- see Chapter 19 for details on verifying PGP/GPG signed files), the matching MD5 hash number confirms that we've got the right file, free of any potential intruding influences. These extra steps that Caldera takes to ensure the safety and quality of their package updates are also the ones you should use (and demand) when acquiring software from an unknown source.
The last step in the verification chain is to check the signature on the text file. Before we can do this, however, we need the public key that is the mate to the private key Caldera signed the advisories with. Tricky bit here, as Caldera doesn't go out of the way to actually advertise the location, which is ftp://ftp.calderasystems.com/pub/pgp-keys/. Once the keys are downloaded and in your system, you can use PGP to verify the validity of the signature on the advisory.
Warning
Caldera changed their security signing key between March and May of 2000. The new public key was not published as of August 2000. If you are at all uncomfortable with not being able to fully verify the advisory and the associated MD5 hash sums, write to Caldera and ask for a copy of their current security public key directly, as we did.Maybe you'll have better luck than we did - they did not answer that particular query. With just a bit of diligence, we were able to root out the answer for you... If you have installed gpg, then type
gpg --keyserver wwwkeys.pgp.net --recv-keys 0x703FA9FC- this will add the public key from Caldera Security to your keyring, which will permit you to check the validity of their downloaded security bulletins.
Once we are assured that the file is what it should be, we can use RPM - either the command line version or the kpackage interface to RPM - to install the new version. While this procedure may seem like a lot of work to go through to get a package from a trusted source, the bottom line is that you should always try to get as much information as possible about the software you put on your system.
Hint
RPM also has a built-in signature checking facility. In the RPM manual pages, read the sections on "-checksig", "-verify", and "PGP SIGNATURES"
We went the extra nine yards in verifying the source and validity of the downloaded Netscape communicator file prior to installation. But then, we knew what we were getting. When you're not sure about the source of your software, then it's time to do a little more sleuthing. Some key questions (and their answers) are as follows:
If it isn't included with OpenLinux, is it safe to use? Yes, running software that is not included with OpenLinux is usually safe. However, it's always best to locate source code and compile your own copy, as it is then assured to work properly with the kernel and libraries that came with OpenLinux.
Warning
As our technical editor, Kurt Wall, so correctly points out, the above is true, unless the code is trojaned. You have to develop your own criteria for the acceptability of any given piece of code, source or binary. Unless you have the ability to audit source code for yourself, then you must decide whom to trust.
Is the software included with another distribution? If the answer to this is yes, then someone has taken the time to (at the least) do automated security audits and a verified source download is reasonably safe, since at least one Linux vendor saw fit to include it in their commercial distribution.
Has anyone complained about the software? Check this out by searching on the program name with using Google, Deja, or your favorite search engine. Read the applicable hits. Rave reviews and no complaints (except upgrade/feature requests) are generally a good sign; this means people have used the code and found few problems. However, keep in mind that a return of no information (a false positive) might only indicate that very few people have used the program.
Does the program's author or maintainer have a PGP key available from a public keyserver? If so, and he signs the packages, he is likely to be extra careful with the code since reputation management is critical in the Open Source arena.
If you still aren't sure that the code is clean or safe, then you have four options:
Removing unused software packages is always a good idea. Keeping up with security updates and version upgrades for a piece of software you never use is an excellent waste of time and energy. Again, keep in mind - especially when it comes to production boxes - leaner is meaner, and leaner means there's fewer things to go wrong.
Taking RPM-packaged software off your OpenLinux system is easy. Log in as root and use the kpackage program to select and remove individual packages or whole trees, as shown in Figure 6-8.

Figure 6-8
Using kpackage to remove RPM-packaged software.
We chose to do a test uninstall of the package kdebase for this example. As you can see from the kpackage uninstall dialog box in the upper right of Figure 6-8, we checked the Test (do not uninstall) box, and then clicked Uninstall to generate the error message shown. There are other packages (many more than kquery, which is just the first dependency error) that are dependent on kdebase for correct operation. When uninstalling using kpackage or RPM, it is a good idea to make sure that what is being removed doesn't break anything. For instance, we were successful in removing the entire ISDN functionality tree from Gryphon without difficulty. But we ran a test to ensure that there were no other packages we are using that depend on functionality provided by the ISDN package.
Doing a test uninstall from the command line is just as easy:
[syroid@gryphon syroid]$ su
Password: root_password_here

[root@gryphon syroid]# rpm --test -e kdebase
error: removing these packages would break dependencies:
        kdebase is needed by kquery-0.9-2
After logging in as root, rpm uses the --test option in conjunction with the -e (for erase, remove) on kdebase, returning us the same information that we found with the graphical tool.
# Makefile for Joe's Own Editor

   * * *

WHEREJOE = /usr/local/bin
WHERERC = /usr/local/lib
WHEREMAN = /usr/man/man1

   * * *

# Install procedure

install: joe termidx
   strip joe
   strip termidx

   if [ ! -d $(WHEREJOE) ]; then mkdir $(WHEREJOE); chmod a+rx $(WHEREJOE); fi
   rm -f $(WHEREJOE)/joe $(WHEREJOE)/jmacs $(WHEREJOE)/jstar $(WHEREJOE)/jpico $(WHEREJOE)/rjoe $(WHEREJOE)/termidx
   mv joe $(WHEREJOE)
   ln $(WHEREJOE)/joe $(WHEREJOE)/jmacs
   ln $(WHEREJOE)/joe $(WHEREJOE)/jstar
   ln $(WHEREJOE)/joe $(WHEREJOE)/rjoe
   ln $(WHEREJOE)/joe $(WHEREJOE)/jpico
   mv termidx $(WHEREJOE)
   if [ ! -d $(WHERERC) ]; then mkdir $(WHERERC); chmod a+rx $(WHERERC); fi
   rm -f $(WHERERC)/joerc $(WHERERC)/jmacsrc $(WHERERC)/jstarrc $(WHERERC)/jpicorc $(WHERERC)/rjoerc $(WHEREMAN)/joe.1
   cp joerc $(WHERERC)
   cp jmacsrc $(WHERERC)
   cp jstarrc $(WHERERC)
   cp rjoerc $(WHERERC)
   cp jpicorc $(WHERERC)
   cp joe.1 $(WHEREMAN)
   chmod a+x $(WHEREJOE)/joe
   chmod a+x $(WHEREJOE)/jmacs
   chmod a+x $(WHEREJOE)/jstar
   chmod a+x $(WHEREJOE)/rjoe
   chmod a+x $(WHEREJOE)/jpico
   chmod a+r $(WHERERC)/joerc
   chmod a+r $(WHERERC)/jmacsrc
   chmod a+r $(WHERERC)/jstarrc
   chmod a+r $(WHERERC)/rjoerc
   chmod a+r $(WHERERC)/jpicorc
   chmod a+r $(WHEREMAN)/joe.1
   chmod a+x $(WHEREJOE)/termidx
   rm -f $(WHERERC)/termcap
   cp termcap $(WHERERC)/termcap
   chmod a+r $(WHERERC)/termcap
   rm -f $(WHERERC)/terminfo
   cp terminfo $(WHERERC)/terminfo
   chmod a+r $(WHERERC)/terminfo

   * * *
In the first section of the Makefile, the destination directories for the various files are set up. Then we happily skip right over all the bits that tell the computer how to compile Joe from source code into a running program.
We pick up the file again at the "Install procedure". The highlighted lines are the actual commands that move files around upon the issuance of the make install command, and deciphering these is the key to figuring out what to remove. Instead of doing all the work manually, we'll use the Makefile as a basis to build an un-installation routine, shown in the following script:
#!/bin/bash
#
# deljoe, an un-installation script for joe,
# adapted by Bilbrey from the joe Makefile
# 8/21/2000
#
# locations of installation
export WHEREJOE=/usr/local/bin
export WHERERC=/usr/local/lib
export WHEREMAN=/usr/man/man1


# Un-install procedure
rm $WHEREJOE/joe
rm $WHEREJOE/jmacs
rm $WHEREJOE/jstar
rm $WHEREJOE/rjoe
rm $WHEREJOE/jpico
rm $WHEREJOE/termidx
rm $WHERERC/joerc
rm $WHERERC/jmacsrc
rm $WHERERC/jstarrc
rm $WHERERC/rjoerc
rm $WHERERC/jpicorc
rm $WHEREMAN/joe.1
rm $WHERERC/termcap
rm $WHERERC/terminfo
To create the script, first copy the Makefile by typing cp Makefile deljoe. Make the new file executable by typing chmod +x deljoe. Then edit deljoe to look like the prior listing. Observe that there are a couple of key differences: the locations are now exports, and the variable references are no longer enclosed in parentheses. These changes are a result of writing the script to run in a bash environment. Once the completed script is saved to disk, it can be executed by the root user by typing ./deljoe. Then delete the Joe source directory and the system is clear of the application. This solution can be generalized to just about any piece of source-installed code.
Warning
Using this method, it is possible to cause unintended problems with your software installation. For example, suppose another program had previously created the file /usr/local/lib/termcap when it was installed. Then the Joe installation overwrites that file with it's own version, probably compatible enough to work properly. Hmmm. Maybe that's OK. But when you run the above uninstall script, it'll delete the file. While that's OK for Joe (since Joe's been deleted), it won't be there when the prior program comes looking, either. Your only recourse at that point is usually to reinstall the recalcitrant program.
Once you've added software functionality, there are three primary methods of configuration on an OpenLinux system: Manual, Caldera Open Administration System (COAS), and Webmin. In our opinion, one of the leading features of the various Unix variants is that editable ASCII files control all program configurations. These are easy to work with in console mode using simple text editors. The GUI tools are fundamentally just pretty front-ends to these very same text files, and have strongly overlapping feature sets.
The command-line driven, console-based environment is the original and premier configuration tool for Linux, especially for Linux servers. Many servers are run headless, which means that they don't have a keyboard, mouse, or monitor connected. These systems are administered remotely over a network, and usually do not have any graphical configuration tools even loaded on them. Command line administration is covered extensively in Chapter 19, as well as in the OpenLinux documentation resources found under the directory /usr/doc/.
We introduced you to the Caldera Open Administration System (COAS) back in Chapter 3, in the context of switching off network services. COAS is a capable suite of modular configuration tools that took its first bow in the middle of 1998. COAS (pronounced as though saying coast, only without the 't') is covered extensively in Chapter 13, along with the new kid on the block, Webmin.
Webmin was an independent contender in the GUI configuration tool arena until purchased by Caldera. Like COAS, Webmin is an umbrella utility for a variety of modular tools. It would appear that Webmin is the wave of the future in graphical system administration and configuration.
Info
In a late breaking development, Caldera has introduced yet another administration and configuration tool, network-based, called Cosmos, since branded as Volution. Appearing too late for inclusion in this book, you should look for details on this product at the Caldera Website.
Any of these methods, properly used, are competent tools for getting the job done. In our eyes, one of the major drawbacks of GUI administration is that it hides a bit too much of the underlying system from the user. We would love to see the option to press a button on the interface to see the actual configuration file, with the proposed changes highlighted on screen, both to ensure correctness and to aid us in understanding more of the underlying functionality of the services we've set up.
It is possible to easily change the configuration of an OpenLinux system from one type of installation or purpose to another. This is accomplished by determining the current packages that are installed on the system, and then locating and installing the software necessary to accomplish the new goals. Older or unused software is best uninstalled, so that it doesn't have to be maintained or monitored for security flaws. This chapter covered the following points:
Go to the Table Of Contents